About This Chunky Ninja Turtle Amigurumi Pattern
Perfect for 90s kids or any little hero in training, these squishy turtles make wonderful gifts that look professional but are surprisingly simple to assemble.
Ideal for those with basic crocheting experience, featuring slightly more advanced stitches and techniques to expand your skills.
Fits nicely into a free afternoon — 2 to 5 hours of focused, enjoyable crocheting.
Playful characters full of personality, designed to spark imagination and become cherished playtime favorites.
Perfect for 90s kids or any little hero in training, these squishy turtles make wonderful gifts that look professional but are surprisingly simple to assemble.
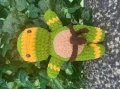
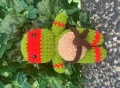
I honestly can't get over how satisfying it is to see their little personalities emerge once you add the mask and eyes! It's a really fun way to practice joining legs and working with textured yarn without it feeling like a chore.
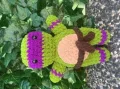
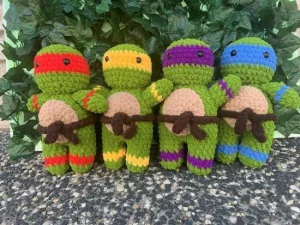
I've always had a soft spot for the Ninja Turtles. There's something so nostalgic about those four colors, and seeing them all lined up on my craft desk after a long weekend of stitching just makes my heart happy. When I first sat down to write this pattern, I wanted to make sure they were as chunky and squishable as possible, which is why I went with the blanket chenille yarn. It’s so forgiving and hides almost any tiny mistake!
One of my favorite parts of this project is how customizable it is. While I’ve included the steps for the classic four, you could totally go rogue and make a whole army of turtles in every color of the rainbow. I found that using a slightly larger hook (the 7mm) really helps the yarn glide, but if you're a tight crocheter, don't be afraid to go up half a size. The most important thing is making sure your stitches are tight enough that the stuffing doesn't peek through those little green bellies. I hope you enjoy every stitch of these guys—they really are a joy to bring to life!
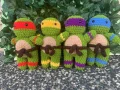
Bring some turtle power to your crochet hook with these adorable, squishy ninjas! They are the perfect size for hugging and look fantastic as a full set of four. You'll love how quickly they work up using chunky blanket yarn, making them a great project for a cozy afternoon spent crafting your favorite heroes.
Start this section using your Forest Green yarn.
6 sc in mc (6)
inc x6 (12)
1 sc, inc x6 (18)
2 sc, inc x6 (24)
3 sc, inc x6 (30)
cc to mask color, sc around (30)
sc around (30)
sc around (30)
sc around (30)
sc around (30)
sc around (30)
Insert safety eyes between Round 7 & 8, leaving a 5-stitch gap between them.
cc back to Green, 3 sc, dec x6 (24)
sc around (24)
Begin stuffing the head firmly as you continue.
2 sc, dec x6 (18)
1 sc, dec x6 (12)
Fasten off and use your needle to weave through the flo to close the gap.
Start with Forest Green yarn.
6 sc in mc (6)
1 sc, inc x6 (9)
sc around (9)
cc to mask color, sc around (9)
sc around (9)
sc around (9)
sc around (9)
Add a small amount of stuffing to the arm. You have two finishing options.
Fold the top opening flat and work 4 sc through both layers to close. This makes the arms sit flatter.
Do not sc the top closed. Leave it open if you want the arms to protrude more from the body. Fasten off with a long tail for sewing.
Use Forest Green yarn.
6 sc in mc (6)
inc x6 (12)
sc around (12)
cc to mask color, sc around (12)
sc around (12)
cc back to Green, sc around (12)
sc around (12)
Finish the first leg and fasten off. For the second leg, do not cut the yarn. ch 2 and join to any stitch on the first leg to begin the body.
sc 12 around the first leg, 2 sc along the ch, 12 sc around the second leg, and 2 sc along the other side of the ch (28)
6 sc, inc x3, 6 sc (30)
Stitch count at end of Round 8 appears inconsistent in the source — ensure you have 30 stitches total before continuing.
sc around for 7 identical rounds (30)
Stuff the body very firmly.
3 sc, dec x6 (24)
sc around (24)
2 sc, dec x6 (18)
sc around (18)
1 sc, dec x6 (12)
slst and leave a long tail for sewing. Do not close the hole.
Use Chocolate Brown yarn.
8 sc in mc (8)
inc x8 (16)
1 sc, inc x8 (24)
3 sc, inc x8 (30)
sc around (30)
sc around (30)
flo hdc around (30)
slst and leave a long tail. Roll the hdc row upward to create the shell's rim.
Use Beige yarn.
6 sc in mc (6)
inc x6 (12)
1 sc, inc x6 (18)
2 sc, inc x6 (24)
sc around (24)
slst and leave a long tail for sewing.
Using Brown yarn, ch 46
Turn and sc into the 2nd ch from the hook, then sc in every ch across. Fasten off.
I hope you have as much fun making these little guys as I did! There's something so rewarding about finishing a whole set of four. They look amazing lined up on a shelf or given away as a special handmade gift. Don't forget to play around with the mask colors to create your favorite character! Whether you're a Leo fan or more of a Mikey person, these plushies are bound to be a hit. Happy hooking, and I can't wait to see your finished ninja crew ready for action! 🧶✨🐢
Absolutely! Just keep in mind that your turtle will be much smaller, so you'll need to use a smaller hook (like a 3.5mm or 4mm) and smaller safety eyes to match the scale.
Instead of sewing the arm closed at the top (Option 1), leave the opening round (Option 2) and sew the entire circle to the body for a more 3D look.
A 6.5mm or 8mm hook will also work with blanket yarn, but your stitch tension will change, making the final toy slightly smaller or larger than the original.
Yes, lightly stuffing the shell before you finish sewing it to the back gives it that nice domed shape rather than letting it lie flat against the body.
