About This Chubby Yellow Chick Amigurumi Pattern
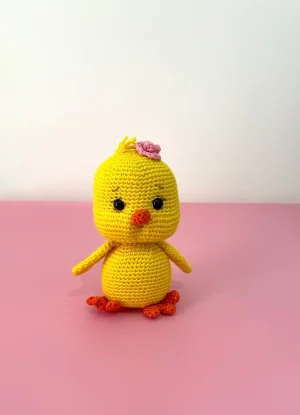
A wonderful addition to your spring decor or a precious nursery gift, this adorable chick is designed to bring smiles and warmth to whoever holds it.
Ideal for those with basic crocheting experience, featuring slightly more advanced stitches and techniques to expand your skills.
Fits nicely into a free afternoon — 2 to 5 hours of focused, enjoyable crocheting.
An adorable friend to cherish, handcrafted with love to bring comfort and joy for years to come.
A wonderful addition to your spring decor or a precious nursery gift, this adorable chick is designed to bring smiles and warmth to whoever holds it.
I absolutely adore how the seamless body construction makes this such a satisfying, low-sew project. Getting the cheeks to puff out using simple increases is pure magic, and rolling up that tiny rose for the head always makes me smile!
Every time spring rolls around, I find myself reaching for my brightest yellow yarn. There is just something so incredibly therapeutic about crocheting little farm animals, and this chubby chick has quickly become one of my absolute favorites to make. When I first designed this pattern, I wanted to create a toy that felt substantial in your hands but didn't require hours of tedious sewing. That is why the seamless head-and-body construction is such a game-changer!
If you want to add a unique twist, try playing around with different flower colors on the head—a soft lavender or a sunny peach looks absolutely darling. You can also brush a tiny bit of pink cosmetic blush onto the cheeks right below the safety eyes to give your chick an extra-shy, sweet look. I love putting these little guys in decorative nests on my mantelpiece, but they also make the ultimate surprise inside Easter baskets. I can't wait to see how yours turns out!
Bring a splash of sunshine into your crafting space with this incredibly sweet little chick! You'll love watching this plump feathered friend come to life stitch by stitch. It's the perfect cozy project to work on while relaxing with a warm cup of tea, and the finished toy makes a heartwarming gift for anyone who needs a little cheer.
Start with a mr and work 6 sc into it. (6)
Work an inc in every st around. (12)
Repeat [1 sc, 1 inc] 6 times. (18)
Repeat [2 sc, 1 inc] 6 times. (24)
Repeat [3 sc, 1 inc] 6 times. (30)
Repeat [4 sc, 1 inc] 6 times. (36)
Repeat [5 sc, 1 inc] 6 times. (42)
Repeat [6 sc, 1 inc] 6 times. (48)
Repeat [7 sc, 1 inc] 6 times. (54)
Work 1 sc in each st around for these 10 rounds. (54)
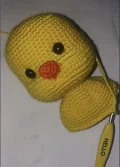
Insert the 10mm safety eyes between Round 17 and Round 18, leaving a distance of 8 st between them.
Work 18 sc, then work 18 inc, and finish with 18 sc. (72)
Work 1 sc in each st around for these 6 rounds. (72)
Work 18 sc, then work 18 dec, and finish with 18 sc. (54)
Repeat [7 sc, 1 dec] 6 times. (48)
Repeat [6 sc, 1 dec] 6 times. (42)
Repeat [5 sc, 1 dec] 6 times. (36)
Repeat [4 sc, 1 dec] 6 times. (30)
Begin stuffing the head firmly. Ensure you keep adding stuffing as you continue to work.
Repeat [3 sc, 1 dec] 6 times. (24)
Repeat [2 sc, 1 dec] 6 times. (18)
Work 1 sc in each st around for these 2 rounds. (18)
Note: The original pattern misnumbered the following rounds by repeating Round 35. We have corrected the sequence below to ensure your stitch counts remain accurate.
Repeat [2 sc, 1 inc] 6 times. (24)
Repeat [3 sc, 1 inc] 6 times. (30)
Repeat [4 sc, 1 inc] 6 times. (36)
Repeat [5 sc, 1 inc] 6 times. (42)
Repeat [6 sc, 1 inc] 6 times. (48)
Work 1 sc in each st around for these 12 rounds. (48)
Repeat [6 sc, 1 dec] 6 times. (42)
Repeat [5 sc, 1 dec] 6 times. (36)
Repeat [4 sc, 1 dec] 6 times. (30)
Repeat [3 sc, 1 dec] 6 times. (24)
Fill the body firmly with stuffing, making sure the neck area is solid so the head does not wobble.
Repeat [2 sc, 1 dec] 6 times. (18)
Repeat [1 sc, 1 dec] 6 times. (12)
Work 6 dec, FO, and weave in your yarn end neatly. (6)
Using orange yarn, make a mr and work 6 sc into it. (6)
Work 1 sc in each st around. (6)
Repeat [2 sc, 1 inc] 2 times. (8)
Work 1 sc in each st around for these 2 rounds. (8)
FO and leave a long yarn tail for sewing the beak to the face.
Using yellow yarn, make a mr and work 6 sc into it. (6)
Repeat [2 sc, 1 inc] 2 times. (8)
Work 1 sc in each st around. (8)
Repeat [3 sc, 1 inc] 2 times. (10)
Work 1 sc in each st around. (10)
Repeat [4 sc, 1 inc] 2 times. (12)
Repeat [5 sc, 1 inc] 2 times. (14)
Repeat [6 sc, 1 inc] 2 times. (16)
Repeat [7 sc, 1 inc] 2 times. (18)
Repeat [8 sc, 1 inc] 2 times. (20)
Work 1 sc in each st around for these 3 rounds. (20)
Repeat [8 sc, 1 dec] 2 times. (18)
Repeat [7 sc, 1 dec] 2 times. (16)
Repeat [6 sc, 1 dec] 2 times. (14)
Flatten the wing and work 7 sc through both layers to close the opening. FO, leaving a long tail for sewing.
You will need to make 3 separate toe nails first for each foot, then join them together.
Using orange yarn, make a mr and work 6 sc into it. (6)
Work 1 sc in each st around for these 3 rounds. (6)
Fasten off the first two toe nails. Do not fasten off the third toe nail, as you will use it to join all three together.
Join the three toe nails together by working sc across all of them in a continuous circle. (18)
Work 1 sc in each st around for these 3 rounds. (18)
Flatten the foot and work 8 sc through both layers to close. FO, leaving a long tail for sewing.
Using pink or lilac yarn, ch 17 and turn. (17)
Repeat [ch 1, 1 sc in the next st, ch 1, 4 dc in the next st] 8 times across. FO, leaving a long tail.
Roll the finished strip tightly into a rose shape and secure the base with a few stitches using your tapestry needle.
Thank you so much for crafting this sweet little chick with me! I hope this project brought a little bit of sunshine and joy to your crochet hook. There is nothing quite like seeing those chubby cheeks and tiny orange feet come together. Don't forget to share your finished chick with our lovely community—I absolutely adore seeing your unique color choices and creative personal touches! Happy crafting, and may your days always be filled with cozy stitches and warm yarn! 🧶✨🐥
You can, but 10mm eyes are highly recommended to achieve that signature chubby, cute expression. If you use smaller eyes, they might get lost in the textured yellow stitches of the cheeks.
The trick is to stuff the bottom of the body very firmly and flatten it slightly with your palm before sewing on the feet. Positioning the feet flat against the bottom surface will create a sturdy tripod effect.
Absolutely! Using super bulky blanket yarn with an 8mm hook will turn this little chick into a giant, ultra-squishy plushie. Just remember you will need much larger safety eyes, around 20mm to 24mm.
When crocheting across the joins in Round 5, pull your working yarn extra tight on the transition stitches between the toes. If any tiny gaps remain, you can easily sew them closed using the starting yarn tails.
