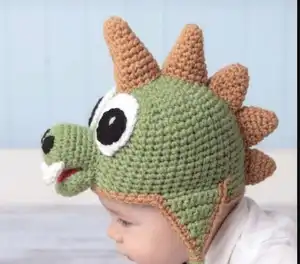
Get ready to crochet the most fun hat your little one will ever wear! This Crochet Hatimals Dinosaur Hat is a full single crochet beanie packed with personality — from the spiky scales running along the top to the goofy cartoon snout, tiny white teeth, and little black nostrils. You get to choose the eyes: go full cartoon with big white backs and black pupils, or mix it up with serious eyelids for extra drama. Every stitch is single crochet, so while it takes a bit of time, the result is a hat that's genuinely warm, wind-resistant, and absolutely adorable. Whether you're making it for a baby, toddler, or child, this pattern walks you through every piece — beanie base, earflaps, scales, snout, teeth, nostrils, eyes, and braided ties — so you can build your very own dino creature from scratch.
Progress Tracker
0% Complete
— Basic Beanie (All Sizes) :
Info :
Hat is made in continuous rounds. Do not join at the end of rounds. Use a stitch marker.
Rnd 1 :
With Main Color (Tea Leaf) and H hook, CH 2, 6 SC in 2nd CH from hook. (6 SC)
Rnd 2 :
2 SC in each SC around. (12 SC)
Rnd 3 :
*1 SC in next SC, 2 SC in next SC*, repeat from * to * around. (18 SC)
Rnd 4 :
*1 SC in each of the next 2 SC, 2 SC in next SC*, repeat from * to * around. (24 SC)
Rnd 5 :
*1 SC in each of the next 3 SC, 2 SC in next SC*, repeat from * to * around. (30 SC)
Rnd 6 :
*1 SC in each of the next 4 SC, 2 SC in next SC*, repeat from * to * around. (36 SC)
Rnd 7 :
*1 SC in each of the next 5 SC, 2 SC in next SC*, repeat from * to * around. (42 SC)
Rnd 8 :
*1 SC in each of the next 6 SC, 2 SC in next SC*, repeat from * to * around. (48 SC)
— Size 14"–16" (0–3 month) :
Rnd 9 :
1 SC in each SC around. (48 SC)
Info :
Repeat Rnd 9 until hat measures approximately 5" from top to bottom, SLST to join, fasten off.
Trim :
With Trim Color (Warm Brown), join with SC in back of hat, 1 SC in each SC around, SLST to join, fasten off. (48 SC)
— Size 16"–18" (3–6 month) :
Rnd 9 :
*1 SC in each of the next 7 SC, 2 SC in next SC*, repeat from * to * around. (54 SC)
Rnd 10 :
1 SC in each SC around. (54 SC)
Info :
Repeat Rnd 10 until hat measures approximately 6" from top to bottom, SLST to join, fasten off.
Trim :
With Trim Color (Warm Brown), join with SC in back of hat, 1 SC in each SC around, SLST to join, fasten off. (54 SC)
— Size 18"–20" (Toddler / Child) :
Rnd 9 :
*1 SC in each of the next 7 SC, 2 SC in next SC*, repeat from * to * around. (54 SC)
Rnd 10 :
*1 SC in each of the next 8 SC, 2 SC in next SC*, repeat from * to * around. (60 SC)
Rnd 11 :
1 SC in each SC around. (60 SC)
Info :
Repeat Rnd 11 until hat measures approximately 7" from top to bottom, SLST to join, fasten off.
Trim :
Join SC in back of hat with Trim Color, 1 SC in each SC around, SLST to join, fasten off. (60 SC)
— Size 20"–22" (Child / Pre-Teen / Adult) :
Rnd 9 :
*1 SC in each of the next 7 SC, 2 SC in next SC*, repeat from * to * around. (54 SC)
Rnd 10 :
*1 SC in each of the next 8 SC, 2 SC in next SC*, repeat from * to * around. (60 SC)
Rnd 11 :
*1 SC in each of the next 9 SC, 2 SC in next SC*, repeat from * to * around. (66 SC)
Rnd 12 :
1 SC in each SC around. (66 SC)
Info :
Repeat Rnd 12 until hat measures approximately 8" from top to bottom, SLST to join, fasten off.
Trim :
Join SC in back of hat with Trim Color, 1 SC in each SC around, SLST to join, fasten off. (66 SC)
— Size 22"–24" (Large Teen / Adult) :
Rnd 9 :
*1 SC in each of the next 7 SC, 2 SC in next SC*, repeat from * to * around. (54 SC)
Rnd 10 :
*1 SC in each of the next 8 SC, 2 SC in next SC*, repeat from * to * around. (60 SC)
Rnd 11 :
*1 SC in each of the next 9 SC, 2 SC in next SC*, repeat from * to * around. (66 SC)
Rnd 12 :
*1 SC in each of the next 10 SC, 2 SC in next SC*, repeat from * to * around. (72 SC)
Rnd 13 :
1 SC in each SC around. (72 SC)
Info :
Repeat Rnd 13 until hat measures approximately 9" from top to bottom, SLST to join, fasten off.
Trim :
Join SC in back of hat with Trim Color, 1 SC in each SC around, SLST to join, fasten off. (72 SC)
— Earflaps (Optional) :
Info :
Lay hat flat on hard surface with tie off in center back. Count 3 stitches in from left side and place a marker. Count 3 stitches in from right side and place a marker.
— Left Earflap :
Info :
With right side facing, opening at top, attach Main Color with a SC in the same SC the stitch marker is in.
Row 1 (14"–16") :
SC in next 7 SC, CH 1, turn. (8 SC)
Row 1 (16"–18") :
SC in next 7 SC, CH 1, turn. (8 SC)
Row 1 (18"–20") :
SC in next 9 SC, CH 1, turn. (10 SC)
Row 1 (20"–22") :
SC in next 11 SC, CH 1, turn. (12 SC)
Row 1 (22"–24") :
SC in next 11 SC, CH 1, turn. (12 SC)
Row 2 (all sizes) :
Skip first SC, SC in each SC across, CH 1, turn.
Info :
Repeat Row 2 until only 1 SC remains. Fasten off. Remove marker.
— Right Earflap :
Info :
With right side facing, opening at top, count to the right of the remaining stitch marker the number of stitches needed for desired size and attach yarn with a SC. The stitch marker space counts as the first stitch.
Row 1 (14"–16") :
SC in next 7 SC, CH 1, turn. (8 SC)
Row 1 (16"–18") :
SC in next 7 SC, CH 1, turn. (8 SC)
Row 1 (18"–20") :
SC in next 9 SC, CH 1, turn. (10 SC)
Row 1 (20"–22") :
SC in next 11 SC, CH 1, turn. (12 SC)
Row 1 (22"–24") :
SC in next 11 SC, CH 1, turn. (12 SC)
Row 2 (all sizes) :
Skip first SC, SC in each SC across, CH 1, turn.
Info :
Repeat Row 2 until only 1 SC remains. Fasten off. Remove marker.
— Earflap Trim :
Info :
Attach Trim Color to back of hat in same stitch where hat was fastened off. CH 1, SC in each stitch and row end around the hat. Do 3 SC in the tip of each earflap. SLST to join, fasten off.
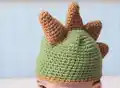
— Large Scale (make 1) :
Info :
With Trim Color (Warm Brown) and H hook.
Rnd 1 :
CH 2, 4 SC in 2nd CH from hook. Use stitch marker as needed. (4 SC)
Rnd 2 :
2 SC in each SC around. (8 SC)
Rnd 3–4 :
SC in each SC around. (8 SC)
Rnd 5 :
*2 SC in next SC, SC in next SC*, repeat from * to * around. (12 SC)
Rnd 6–7 :
SC in each SC around. (12 SC)
Rnd 8 :
*2 SC in next SC, SC in next 2 SC*, repeat from * to * around. (16 SC)
Rnd 9–11 :
SC in each SC around. (16 SC)
Rnd 12 :
SC in each SC around, SLST in next SC, fasten off leaving an 8" tail for sewing. (16 SC)
— Medium Scale (make 1 or more) :
Info :
With Trim Color (Warm Brown) and H hook.
Rnd 1 :
CH 2, 4 SC in 2nd CH from hook. Use stitch marker as needed. (4 SC)
Rnd 2 :
2 SC in each SC around. (8 SC)
Rnd 3–4 :
SC in each SC around. (8 SC)
Rnd 5 :
*2 SC in next SC, SC in next SC*, repeat from * to * around. (12 SC)
Rnd 6–7 :
SC in each SC around. (12 SC)
Rnd 8 :
*2 SC in next SC, SC in next 2 SC*, repeat from * to * around. (16 SC)
Rnd 9 :
SC in each SC around, SLST in next SC, fasten off leaving an 8" tail for sewing. (16 SC)
— Small Scales (make 2 or more) :
Info :
With Trim Color (Warm Brown) and H hook.
Rnd 1 :
CH 2, 4 SC in 2nd CH from hook. Use stitch marker as needed. (4 SC)
Rnd 2 :
2 SC in each SC around. (8 SC)
Rnd 3 :
SC in each SC around. (8 SC)
Rnd 4 :
*2 SC in next SC, SC in next SC*, repeat from * to * around. (12 SC)
Rnd 5 :
SC in each SC around. (12 SC)
Rnd 6 :
*2 SC in next SC, SC in next 2 SC*, repeat from * to * around. (16 SC)
Rnd 7 :
SC in each SC around, SLST in next SC, fasten off leaving an 8" tail for sewing. (16 SC)
— Teeth (make 2 or more) :
Info :
With White and F hook.
Rnd 1 :
CH 2, 3 SC in 2nd CH from hook. Do not join. (3 SC)
Rnd 2 :
2 SC in first SC, 1 SC in next 2 SC. (4 SC)
Rnd 3 :
1 SC in each SC around, SLST to join, fasten off leaving a small tail to sew. (4 SC)
— Nostrils (make 2) :
Info :
With Black and F hook.
Rnd 1 :
CH 2, 3 SC in 2nd CH from hook, SLST to join, fasten off leaving a small tail to sew with.
— Snout :
Info :
With Main Color (Tea Leaf) and H hook.
Rnd 1 :
CH 2, 6 SC in 2nd CH from hook. Do not join. (6 SC)
Rnd 2 :
2 SC in each SC around. (12 SC)
Rnd 3 :
*1 SC in next SC, 2 SC in next SC*, repeat from * to * around. (18 SC)
Rnd 4–8 :
SC in each SC around. (18 SC)
Rnd 9 :
SC in each SC around, SLST to join, fasten off leaving a tail to sew with. (18 SC)
— Cartoon Eyes — Backs (make 2) :
Info :
With White and H hook. If eyes come out too big, drop down to a smaller hook.
Rnd 1 :
CH 5, 1 SC in 2nd CH from hook, 1 SC in next 2 CH, 3 SC in last CH, working on opposite side of CH, 1 SC in next 2 CH, 2 SC in last CH. Do not join. Use stitch marker if needed. (10 SC)
Rnd 2 :
2 SC in next SC, SC in next 2 SC, 2 SC in next 3 SC, 1 SC in next 2 SC, 2 SC in next 2 SC. (16 SC)
Rnd 3 :
1 SC in next SC, 2 SC in next SC, 1 SC in each of the next 2 SC, *1 SC in next SC, 2 SC in next SC*, repeat from * to * 2 more times, SC in next 2 SC, *1 SC in next SC, 2 SC in next SC*, repeat from * to * 1 more time, SLST to join, fasten off leaving a tail to sew with. (22 SC)
— Cartoon Eyes — Pupils (make 2) :
Info :
With Black and H hook.
Rnd 1 :
CH 2, 6 SC in 2nd CH from hook. Do not join. (6 SC)
Rnd 2 :
2 SC in each SC around, SLST to join, fasten off leaving a tail to sew with. (12 SC)
— Serious Eyes (make 2 — optional alternative) :
Info :
With Black and F hook.
Rnd 1 :
CH 2, 6 SC in 2nd CH from hook, SLST to join, fasten off. (6 SC)
Rnd 2 :
Attach Warm Brown (or eye color of choice) in any SC with a SC, SC again in same SC, 2 SC in each SC around, SLST to join, fasten off. (12 SC)
Rnd 3 :
Attach White in any SC with a SC, 2 SC in next SC, *SC in next SC, 2 SC in next SC*, repeat from * to * around. Do not join. (18 SC)
Rnd 4 :
SC in each SC around, SLST to join, fasten off leaving a long tail to sew with. (18 SC)
— Serious Eyelids (make 2 — optional) :
Info :
With Main Color (Tea Leaf) and H hook.
Rnd 1 :
CH 2, 6 SC in 2nd CH from hook. Do not join. (6 SC)
Rnd 2 :
2 SC in each SC around. (12 SC)
Rnd 3 :
*SC in next SC, 2 SC in next SC*, repeat from * to * 5 more times. (18 SC)
Rnd 4 :
*2 SC in next SC, SC in next SC, 2 SC in next SC, SC in next 6 SC*, repeat from * to * one time, SC in next 2 SC. (22 SC)
Row 1 :
Fold piece in half and working through both thicknesses SC in each SC across, fasten off leaving a tail to sew with. (11 SC)
— Cartoon Mouth :
Info :
With Main Color (Tea Leaf) and H hook.
Rnd 1 :
CH 2, 5 SC in 2nd CH from hook. Do not join. (5 SC)
Rnd 2 :
2 SC in each SC around. (10 SC)
Rnd 3 :
*1 SC in next SC, 2 SC in next SC*, repeat from * to * around. (15 SC)
Rnd 4–5 :
1 SC in each SC around. (15 SC)
Rnd 6 :
1 SC in each SC around, SLST to join, fasten off leaving a tail to sew with. (15 SC)
Info :
This will be sewn under the snout during assembly.
— Cartoon Tongue :
Info :
With Red and H hook.
Row 1 :
CH 2, 6 SC in 2nd CH from hook, CH 1, turn. (6 SC)
Row 2 :
*2 SC in first SC, 1 SC in next SC*, repeat from * to * across, fasten off leaving a tail to sew with. (9 SC)
Info :
This will be sewn to the top of the mouth during assembly.
— Ties :
Tri-color tassels :
Cut 6 x 36" strands of each of the 3 colors used (18 strands total). Separate into piles of 3 per color. Take 1 pile of each color, string through the bottom of one earflap ensuring both sides are even. Separate back into individual color groups and braid. Secure with a slip knot at the bottom and trim ends even. Repeat for the second earflap.
Striped tassels (alternative) :
Cut 8 x 36" strands of Main Color and 8 strands of Trim Color (16 strands total). Separate into piles of 4 per color. String 1 pile of each color through one earflap. Separate into 4-strand groups per color and work a 4-way braid alternating colors to create striping. Secure with a slip knot and trim even. Repeat for the second earflap.
This Crochet Hatimals Dinosaur Hat is one of those projects that truly has it all — a warm, practical single crochet beanie combined with the most expressive little dinosaur face you've ever put on a head. I love how every detail, from the layered scales marching along the top to the snout, teeth, and googly eyes, comes together to create something that makes everyone in the room smile. The pattern covers every head size from newborn to adult, so this is a gift that genuinely fits everyone on your list. 🦕 Grab your hooks and make something magical — happy crocheting! 🧶✨