๐Ÿงถ Beautiful โœจ Detailed ๐Ÿ’ Adorable

Tommy the T-Rex Amigurumi Pattern

Tommy the T-Rex Amigurumi Pattern
4.5โ˜… Rating
4-5 Hours Time Needed
1.1K Made This
โœ‚๏ธ

Intermediate Level

Ideal for those with basic knitting experience, featuring slightly more advanced stitches and techniques to expand your skills.

โฑ๏ธ

Weekend Treat

Takes 5-7 hours, making it an enjoyable project to finish over a couple of days.

๐Ÿฆ–

Whimsical Buddy

Playful characters full of personality, designed to spark imagination and become cherished playtime favorites.

About This Tommy the T-Rex Amigurumi Pattern

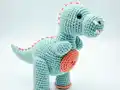
Tommy the T-Rex is a delightfully mischievous dinosaur pattern that combines fun techniques like bobble stitches for nostrils and embroidered details for stripes and teeth. The pattern uses a clever construction method where the legs are worked separately in orange and then joined to create the body, while the head features dimensional details that give Tommy his unique personality. With careful shaping throughout the body and tail, this pattern creates a well-proportioned dinosaur that can stand on his own two feet and is perfect for display or imaginative play.

Tommy the T-Rex Amigurumi Pattern crochet pattern - detailed view of completed project

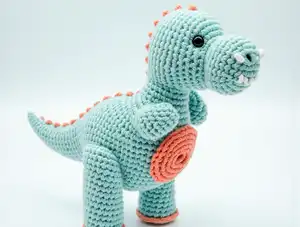
Standing at about 23cm tall, Tommy features a vibrant green body with contrasting orange accents on his legs, belly, and decorative stripes. The intermediate-level techniques include color changes, bobble stitches, and strategic shaping that creates a professional-looking finished piece with wonderful character.

Why You'll Love This Tommy the T-Rex Amigurumi Pattern

I absolutely adore this T-Rex pattern because it perfectly captures that sweet contradiction of trying to be fierce while being utterly adorable. The bobble stitch nostrils are such a clever detail that adds dimensional character to Tommy's face, and I love how the embroidered stripes give him that classic dinosaur look without complicated colorwork. Working up the tail with its gradual increases is so satisfying as you watch it grow from a tiny point to a substantial base. The way the legs are constructed separately and then joined to form the body is brilliant engineering that creates perfect proportions. I find the embroidery work for the teeth particularly rewarding because it's the moment Tommy's personality really shines through. Every time I make this pattern, I'm impressed by how well-balanced the finished dinosaur is, and how those little arms positioned just right add to his charm. This pattern has taught me so much about creating character through thoughtful construction and detail placement.

Tommy the T-Rex Amigurumi Pattern step 1 - construction progress Tommy the T-Rex Amigurumi Pattern step 2 - assembly progress Tommy the T-Rex Amigurumi Pattern step 3 - details and accessories Tommy the T-Rex Amigurumi Pattern step 4 - final assembly and finishing

Switch Things Up

I love experimenting with different color combinations to create unique Tommy personalities - try making him in classic dinosaur brown with cream accents, or go wild with bright purple and hot pink for a fantastical prehistoric creature. You could even use variegated yarn for the body to create a tie-dye dinosaur effect that's absolutely stunning.

For a more realistic approach, I sometimes use multiple shades of green by switching colors every few rounds on the body and head, creating beautiful depth and dimension that mimics real reptile skin. The tail looks particularly impressive when you alternate between dark and light greens.

If you want to add extra personality, consider embroidering scales along Tommy's back instead of simple stripes, or add small felt claws to his tiny arms and feet. I've also experimented with safety eyes in different colors - amber or red eyes give him a more fierce look, while blue or green eyes keep him sweet and friendly.

For special occasions, you can accessorize Tommy with a tiny bow tie, a birthday hat, or even a miniature scarf. I love making seasonal versions - a Tommy with a Santa hat for Christmas or with pastel colors and a flower crown for spring celebrations makes adorable themed gifts that recipients treasure forever.

Common Mistakes & How to Fix Them

โœ— Placing safety eyes too close together or too far apart, which completely changes Tommy's expression and makes him look cross-eyed or wall-eyed instead of cute and friendly โœ— Not stuffing the head firmly enough before closing, resulting in a saggy or misshapen head that doesn't hold the proper rounded T-Rex profile โœ— Forgetting to change to green yarn at round 5 of the legs before joining them, which ruins the orange feet effect and the color transition โœ— Missing the bobble stitches in round 8 of the head for the nostrils, losing important dimensional details that give Tommy his character and expression โœ— Incorrectly positioning the embroidered stripes so they don't align properly along the back, creating an uneven or sloppy appearance instead of neat dinosaur markings

Tommy the T-Rex Amigurumi Pattern

Bring this mischievous and adorable T-Rex to life with this charming amigurumi pattern that captures personality in every stitch. Tommy tries his best to be scary with his pointy white teeth, but his cuteness wins every time, making him the perfect companion for dinosaur lovers of all ages. Standing approximately 23cm tall, this intermediate pattern features detailed construction techniques including bobble stitches for texture, embroidered stripes, and carefully positioned safety eyes that bring Tommy's character to life. Create this lovable green and orange dinosaur with clear step-by-step instructions that guide you through each piece from his tiny arms to his impressive tail.

Intermediate 4-5 Hours

Materials Needed for Tommy the T-Rex Amigurumi Pattern

โ€” Main Fabric

  • 01
    8ply DK or Light Worsted weight yarn in GREEN color (50g minimum)
  • 02
    8ply DK or Light Worsted weight yarn in ORANGE color (25g)
  • 03
    4ply yarn or embroidery thread in WHITE color for teeth details
  • 04
    Paintbox Yarns Cotton DK in color 425 Pistachio Green recommended for green
  • 05
    Paintbox Yarns Cotton DK in color 409 Light Camel recommended for orange

โ€” Tools Required

  • 01
    Crochet hook 2.75mm (US size C-2)
  • 02
    Safety eyes 7.5mm plastic
  • 03
    Scissors
  • 04
    Tapestry needle
  • 05
    Polyester toy stuffing
  • 06
    Stitch marker (optional)

Progress Tracker

0% Complete

โ€” Arms :

Info :

GREEN, make 2

Round 1 :

6 sc in MR [6]

Round 2 :

(sc, inc) x 3 [9]

Round 3 :

(sc x 2, inc) x 3 [12]

Round 4-7 :

sc x 12 [12]

Info :

Stuff, sc across the top and fasten off. Leave a tail for sewing.

โ€” Head :

Info :

GREEN

Round 1 :

6 sc in MR [6]

Round 2 :

inc x 6 [12]

Round 3 :

(sc, inc) x 6 [18]

Round 4 :

(sc x 2, inc) x 6 [24]

Round 5 :

(sc x 3, inc) x 6 [30]

Round 6 :

(sc x 4, inc) x 6 [36]

Round 7 :

sc x 36 [36]

Round 8 :

sc x 14, dc bobble, sc x 6, dc bobble, sc x 14 [36]

Round 9-10 :

sc x 36 [36]

Round 11 :

(dec, sc x 4) x 6 [30]

Round 12-13 :

sc x 30 [30]

Round 14 :

(sc x 2, inc) x 10 [40]

Round 15 :

(sc x 3, inc) x 10 [50]

Round 16 :

(sc x 9, inc) x 5 [55]

Round 17-19 :

sc x 55 [55]

Info :

Place 7.5mm safety eyes between rounds 17-18, 25 stitches apart. Stuff head and continue stuffing until fastened off. To indent the eyes, using the one piece of green yarn sew a stitch under each safety eye, pull the yarn and tie together.

Round 20 :

(sc x 6, dec) x 6, sc x 7 [49]

Round 21 :

(sc x 5, dec) x 7 [42]

Round 22 :

(sc x 4, dec) x 7 [35]

Round 23 :

(sc x 3, dec) x 7 [28]

Round 24 :

sc x 28 [28]

Round 25 :

(sc x 2, dec) x 7 [21]

Round 26 :

sc x 21 [21]

Round 27 :

(sc x 3, dec) x 4, sc [17]

Round 28 :

sc x 2, (dec, sc) x 5 [12]

Round 29 :

dec x 6 [6]

Info :

Weave tail through stitches of final round and pull to close. Weave end.

โ€” Legs and Torso :

Info :

ORANGE, make 2

Round 1 :

5 sc in MR [5]

Round 2 :

inc x 5 [10]

Round 3 :

(sc, inc) x 5 [15]

Round 4 :

(sc x 2, inc) x 5 [20]

Info :

Change to GREEN yarn.

Round 5 :

in BLO: sc x 20 [20]

Round 6-12 :

sc x 20 [20]

Info :

Fasten off 1st leg ONLY, continue for 2nd leg.

Round 13 :

ch5, sc x 20 around 1st leg, sc in 5 ch, sc x 20 in 2nd leg [50]

Round 14 :

sc in 5 ch, sc x 45 [50]

Round 15-22 :

sc x 50 [50]

Info :

Stuff and continue stuffing as you go.

Round 23 :

(sc x 8, dec) x 5 [45]

Round 24-25 :

sc x 45 [45]

Round 26 :

(sc x 7, dec) x 5 [40]

Round 27-28 :

sc x 40 [40]

Round 29 :

(sc x 6, dec) x 5 [35]

Round 30-31 :

sc x 35 [35]

Round 32 :

(sc x 5, dec) x 5 [30]

Round 33-34 :

sc x 30 [30]

Round 35 :

(sc x 4, dec) x 5 [25]

Round 36 :

sc x 25 [25]

Round 37 :

(sc x 3, dec) x 5 [20]

Round 38 :

sc x 20 [20]

Info :

Weave tail through final round and pull to close. Leave a tail for sewing.

โ€” Tail :

Info :

GREEN

Round 1 :

4 sc in MR [4]

Round 2 :

sc x 4 [4]

Round 3 :

(sc, inc) x 2 [6]

Round 4 :

sc x 6 [6]

Round 5 :

(sc x 2, inc) x 2 [8]

Round 6 :

(sc x 3, inc) x 2 [10]

Round 7 :

sc x 10 [10]

Round 8 :

(sc x 4, inc) x 2 [12]

Round 9 :

(sc x 5, inc) x 2 [14]

Round 10 :

sc x 14 [14]

Round 11 :

(sc x 6, inc) x 2 [16]

Round 12 :

(sc x 7, inc) x 2 [18]

Round 13 :

(sc x 8, inc) x 2 [20]

Round 14 :

sc x 20 [20]

Round 15 :

(sc x 3, inc) x 5 [25]

Round 16 :

sc x 25 [25]

Round 17 :

(sc x 4, inc) x 5 [30]

Round 18 :

sc x 30 [30]

Info :

Fasten off and leave a tail for sewing.

โ€” Stomach :

Info :

ORANGE

Round 1 :

6 sc in MR [6]

Round 2 :

inc x 6 [12]

Round 3 :

(sc, inc) x 6 [18]

Round 4 :

(sc x 2, inc) x 6 [24]

Round 5 :

(sc x 3, inc) x 6 [30]

Info :

Fasten off and leave a tail for sewing.

Assembly Instructions

  • Sew the orange stomach piece to the front of the torso between rounds 21-30, ensuring it's centered and lies flat against the body.
  • Attach the arms to both sides of the torso between rounds 28-34, positioning them so they angle slightly forward for a natural T-Rex pose.
  • Sew the head securely to the top of the torso, going around twice with your needle to ensure it's firmly attached and can support the weight.
  • Attach the tail to the back of the torso between rounds 19-27, positioning it so it angles downward naturally for proper balance.
  • Using orange yarn, embroider horizontal stripes over every second round along the tail, continuing up the back of the torso and onto the back of the head.
  • Using white yarn or embroidery thread, carefully embroider pointy teeth on each side of the head over rounds 8-10 where the bobble nostrils are located.

Important Notes

  • ๐Ÿ’กUse a yarn with no stretch for best results - cotton or cotton blend yarns work perfectly for maintaining amigurumi shape
  • ๐Ÿ’กWhen changing colors between orange feet and green legs, pull through the new color on the last stitch of the round prior for a clean transition
  • ๐Ÿ’กThe hook size used for amigurumi should be smaller than typical crochet to keep stitches tight and prevent stuffing from showing through
  • ๐Ÿ’กPlace safety eyes between rounds 17-18 with exactly 25 stitches apart, and use the indenting technique described to give Tommy character
  • ๐Ÿ’กStuff the head and body firmly but not overly tight to maintain proper shape and allow the dinosaur to stand on its own
  • ๐Ÿ’กIf making this for young children, consider embroidering eyes instead of using plastic safety eyes for enhanced safety

Tommy the T-Rex was designed by Cara's Creations to capture the perfect balance between fierce and adorable in plush dinosaur form. This pattern teaches valuable intermediate techniques including bobble stitches for dimensional features, strategic color changes for visual interest, and embroidery work that adds professional polish to your finished piece. With his mischievous personality shining through those carefully placed eyes and toothy grin, Tommy makes an incredible gift for dinosaur enthusiasts or a treasured addition to any amigurumi collection. The finished 23cm dinosaur has wonderful presence and character that will bring smiles for years to come. Happy crocheting and enjoy bringing this charming T-Rex to life! ๐Ÿฆ–๐Ÿงถ

You ask,

we answer.

FAQs

What size will my finished Tommy the T-Rex be?

Using the recommended 2.75mm hook and 8ply/DK weight yarn, Tommy will stand approximately 23cm tall (about 9 inches). Using larger yarn and hooks will create a bigger dinosaur, while smaller materials will make a mini version.

What are dc bobbles and why are they important in this pattern?

DC bobbles are made by working 5 double crochets together in the same stitch to create a raised, textured bump. In this pattern, they're used in round 8 of the head to create Tommy's nostrils, adding important dimensional detail to his face.

Can I use safety eyes or should I embroider the eyes?

The pattern is designed for 7.5mm plastic safety eyes placed between rounds 17-18, but you can absolutely embroider the eyes instead, especially if making Tommy for young children. Just ensure whichever method you choose is secure with no loose parts.

How do I join the two legs to create the body?

You crochet both legs separately up to round 12, then fasten off the first leg only. For the second leg at round 13, you chain 5 and connect to the first leg, then work around both legs and the chain to join them into one continuous body piece.

What does 'in BLO' mean in round 5 of the legs?

BLO stands for 'back loops only' - instead of inserting your hook under both loops of the stitch, you only work through the back loop. This creates a visible line/ridge and helps with the color transition from orange feet to green legs.

How do I create the eye indentation mentioned in the pattern?

After placing the safety eyes, take a piece of green yarn and sew a stitch under each eye. Pull the yarn tight to create an indentation that makes the eyes appear more sunken and gives Tommy more character, then tie the yarn securely.

Do I need to embroider the stripes and teeth?

Yes, the embroidered details are what really bring Tommy's character to life. Use orange yarn to create horizontal stripes every second round on the tail, back, and head. Use white thread to embroider pointed teeth on rounds 8-10 for his signature toothy grin.

Can I sell Tommy dinosaurs I make from this pattern?

According to the pattern copyright, you can sell finished items made from this pattern. However, you cannot copy, sell, alter, or redistribute the pattern itself, and you must not use images from the pattern when selling your finished items.