🧢 Beautiful ✨ Detailed πŸ’ Adorable

Cheeky Flower Amigurumi Pattern

Cheeky Flower Amigurumi Pattern
4.1β˜… Rating
5-7 Hours Time Needed
2.1K Made This
βœ‚οΈ

Intermediate Level

Ideal for those with basic knitting experience, featuring slightly more advanced stitches and techniques to expand your skills.

⏱️

Weekend Treat

Takes 5-7 hours, making it an enjoyable project to finish over a couple of days.

🧸

Cute Companion

An adorable friend to cherish, handcrafted with love to bring comfort and joy for years to come.

About This Cheeky Flower Amigurumi Pattern

This Cheeky Flower pattern brings together multiple crochet techniques to create a charming character with real personality. The design features six pink petals attached to a cheerful head with embroidered facial features, green leaf arms, and a detailed flower pot base. Each component is worked separately and then assembled, allowing you to customize colors and create your own unique floweret friend that's sure to brighten any room.

Cheeky Flower Amigurumi Pattern crochet pattern - detailed view of completed project

The pattern includes detailed instructions for creating a removable collar accessory and uses dry pastel chalk for adding realistic blush to the cheeks. With its sturdy construction and reinforced base, this flower friend stands perfectly on display.

Why You'll Love This Cheeky Flower Amigurumi Pattern

I absolutely love this pattern because it combines creativity with technical skill in such a delightful way! The process of watching individual petals come together to form a complete flower character is incredibly satisfying. I enjoy how the pattern allows for color customization, especially with the different shades of pink and yellow that add depth and dimension. The personality really shines through with the safety eyes and embroidered features, making each finished piece unique. Plus, the removable collar is such a sweet touch that adds charm without being permanent. It's a project that challenges your skills while remaining enjoyable throughout every step of the creation process.

Cheeky Flower Amigurumi Pattern step 1 - construction progress Cheeky Flower Amigurumi Pattern step 2 - assembly progress Cheeky Flower Amigurumi Pattern step 3 - details and accessories Cheeky Flower Amigurumi Pattern step 4 - final assembly and finishing

Switch Things Up

I love experimenting with color combinations when making this adorable floweret! Instead of traditional pink petals, I've tried creating sunflower versions with bright yellow petals and a chocolate brown center, and they turn out absolutely stunning. For a more whimsical approach, you could make each petal a different pastel shade to create a rainbow flower effect that's perfect for nursery dΓ©cor.

The flower pot offers endless customization possibilities too. I've made versions with stripes by changing colors every few rounds, or added texture by working in the back loops only for certain sections to create ridged patterns. You could even embroider little designs or names onto the pot to personalize it as a special gift.

For seasonal variations, I love making autumn flowers with orange and burgundy petals, or spring versions with lavender and mint green combinations. The removable collar is another fun element to play with - try making multiple collars in different colors so you can change the look whenever you want. I've even added tiny crocheted flowers or bows to the collar for extra embellishment that makes each piece truly unique and special.

Common Mistakes & How to Fix Them

βœ— Forgetting to stuff the petals before folding them in half can result in flat, lifeless petals that don't have proper shape or dimension βœ— Attaching petals unevenly during Round 8 of the head can cause the flower to look lopsided or unbalanced when completed βœ— Not reinforcing the flower pot bottom with cardboard will make the piece unstable and unable to stand upright properly on display βœ— Skipping the posterior shaping on the body results in a less anatomically correct and less charming finished character overall βœ— Placing safety eyes too early before completing the head rounds makes it difficult to stuff properly and achieve good facial proportions

Cheeky Flower Amigurumi Pattern

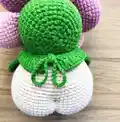
Create an adorable stuffed flower character with personality! This charming crochet pattern features a whimsical flower with pink petals, a cheerful yellow center, and sweet green leaves for arms. Standing at 18cm tall in a decorative pot, this delightful floweret comes complete with safety eyes, embroidered features, and a removable collar. Perfect for home dΓ©cor or as a thoughtful handmade gift that brings joy and smiles to any space.

Intermediate 5-7 Hours

Materials Needed for Cheeky Flower Amigurumi Pattern

β€” Main Fabric

  • 01
    Cotton blend yarn (330 m / 100 g) in pink - Alize Cotton Gold 518
  • 02
    Cotton blend yarn in pink - Alize Cotton Gold 98
  • 03
    Cotton blend yarn in green - Alize Cotton Gold 126
  • 04
    Cotton blend yarn in nude - Alize Cotton Gold 382 or 401
  • 05
    Cotton blend yarn in dark yellow - Yarn Art Jeans 35
  • 06
    Cotton blend yarn in yellow - Alize Cotton Gold 110
  • 07
    Cotton blend yarn in pastel yellow - Alize Cotton Gold 187
  • 08
    Cotton blend yarn in dark pink - Alize Cotton Gold 33

β€” Tools Required

  • 01
    Crochet hook 2 mm (US steel hook 4, UK 2Β½)
  • 02
    Polyester fiberfil for stuffing
  • 03
    Tapestry needle with large eye
  • 04
    Safety eyes, diameter 8 mm (0.32 in) - 2 pieces
  • 05
    Black thread or embroidery floss for embroidering mouth
  • 06
    Dry pastel chalk for toning
  • 07
    Soft cloth for applying pastel chalk
  • 08
    Tailor pins
  • 09
    Cardboard for reinforcing flower pot bottom
  • 10
    Stitch markers or contrasting yarn for marking rounds

Progress Tracker

0% Complete

β€” LEGS :

Info :

Stuff as you go. Worked in nude color. Make 2 pieces.

Round 1 :

6 sc into an AMR (6)

Round 2 :

6 inc (12)

Round 3 :

(1 sc, 1 inc) 6 times (18)

Round 4 :

(2 sc, 1 inc) 6 times (24)

Round 5 :

1 sc each in every stitch (24)

Round 6 :

5 sc, 7 dec, 5 sc (17)

Round 7 :

1 sc each in every stitch (17)

Info :

On first leg, break yarn and secure. On second leg, work 4 sc more to reach inside of leg. Do not break yarn.

β€” BODY :

Info :

Join legs together. Insert hook into inside stitch of first leg (4 sts from beginning towards right). Mark this spot as beginning of round. Stuff as you go.

Round 1 :

5 inc, 7 sc, 10 inc, 7 sc, 5 inc (54)

Round 2 :

1 sc each in every stitch (54)

Round 3 :

4 sc, 1 inc, (8 sc, 1 inc) 5 times, 4 sc (60)

Round 4 :

(9 sc, 1 inc) 6 times (66)

Round 5 :

5 sc, 1 inc, (10 sc, 1 inc) 5 times, 5 sc (72)

Info :

Thread nude yarn through remaining opening in crotch area, cinch from inside to close, and secure with knot.

Rounds 6-15 :

10 rounds total - 1 sc each in every stitch (72)

Round 16 :

24 sc, 12 dec, 24 sc (60)

Round 17 :

(8 sc, 1 dec) 6 times (54)

Round 18 :

1 sc each in every stitch (54)

Round 19 :

(7 sc, 1 dec) 6 times (48)

Round 20 :

1 sc each in every stitch (48)

Round 21 :

(6 sc, 1 dec) 6 times (42)

Round 22 :

1 sc each in every stitch (42)

Round 23 :

(5 sc, 1 dec) 6 times (36)

Round 24 :

1 sc each in every stitch (36)

Round 25 :

(4 sc, 1 dec) 6 times (30)

Info :

Break yarn leaving long end for seaming. Stuff piece with fiberfil.

Info :

Shape posterior by cinching: Attach nude yarn in back between legs, insert needle 12 rows up, pull yarn inside body and exit where you started. Pull with medium strength to create strand. Repeat two more times over first strand. Fasten and hide end inside.

β€” PETALS :

Info :

Make 6 petals. Worked in Pink (use two shades or same color).

Round 1 :

6 sc into an AMR (6)

Round 2 :

6 inc (12)

Round 3 :

(1 sc, 1 inc) 6 times (18)

Round 4 :

(2 sc, 1 inc) 6 times (24)

Round 5 :

(3 sc, 1 inc) 6 times (30)

Rounds 6-8 :

3 rounds total - 1 sc each in every stitch (30)

Round 9 :

(8 sc, 1 dec) 3 times (27)

Round 10 :

1 sc each in every stitch (27)

Round 11 :

(7 sc, 1 dec) 3 times (24)

Round 12 :

1 sc each in every stitch (24)

Round 13 :

(2 sc, 1 dec) 6 times (18)

Info :

Stuff piece with fiberfil to fill half of petal. Fold piece in half and crochet edges of both layers together with 8 sc. Break yarn and hide tail inside.

β€” HEAD :

Info :

Begin with dark yellow for center. Crochet chain of ch5 + ch1 for height adjustment.

Round 1 :

4 sc, 3 sc into last chain. Continue into unused loops on opposite side: 3 sc, 1 inc into first chain (12)

Round 2 :

1 inc, 3 sc, 3 inc, 3 sc, 2 inc (18)

Round 3 :

1 sc, 1 inc, 3 sc, (1 sc, 1 inc) 3 times, 3 sc, (1 sc, 1 inc) 2 times (24)

Round 4 :

2 sc, 1 inc, 3 sc, (2 sc, 1 inc) 3 times, 3 sc, (2 sc, 1 inc) 2 times (30)

Round 5 :

3 sc, 1 inc, 3 sc, (3 sc, 1 inc) 3 times, 3 sc, (3 sc, 1 inc) 2 times (36)

Round 6 :

4 sc, 1 inc, 3 sc, (4 sc, 1 inc) 3 times, 3 sc, (4 sc, 1 inc) 2 times (42)

Round 7 :

blo - 1 sc each in every stitch (42)

Round 8 - Joining Petals :

Insert hook through 2nd st of petal + blo of flower head center, work 1 sc. Work next 5 sc grasping sts of petal + blo of center. Insert hook through last st of petal + first st of next petal + blo of center, work 1 sc. Work next 6 sc grasping sts of petal + blo of center. Repeat around until all 6 petals are joined.

Info :

Change yarn to Green.

Round 9 :

In Green - (6 sc, 1 inc) 6 times (48)

Info :

Insert safety eyes and attach washers from inside. Embroider cheeks and mouth.

Info :

Attach light green yarn to first loop of Rnd 6. Ch3, sl-st into same st. Ch3, sl-st into next st. Work to end of round. Break yarn and secure.

Info :

Attach yellow yarn to first loop of Rnd 7. Ch4, sl-st into same st. Ch4, sl-st into next st. Work to end of round. Break yarn and secure.

Rounds 10-17 :

8 rounds total - 1 sc each into every st (48)

Round 18 :

3 sc, dec, (6 sc, 1 dec) 5 times, 3 sc (42)

Round 19 :

(5 sc, 1 dec) 6 times (36)

Round 20 :

2 sc, dec, (4 sc, 1 dec) 5 times, 2 sc (30)

Round 21 :

(3 sc, 1 dec) 6 times (24)

Info :

Stuff piece with fiberfil.

Round 22 :

1 sc, dec, (2 sc, 1 dec) 5 times, 1 sc (18)

Round 23 :

(1 sc, 1 dec) 6 times (12)

Round 24 :

6 dec

Info :

Add more stuffing. Cinch remaining opening closed and hide yarn tail.

β€” LEAF :

Info :

Make 2 pieces. Worked in Green.

Step 1 :

Crochet chain of ch11 + ch1 for height adjustment

Step 2 :

Work 11 sl-st along chain, ch1

Step 3 :

Without turning, work into unused loops on opposite side: 2 sc into same st, 1 hdc, 6 dc, 1 hdc, 2 sc, ch2

Step 4 :

Insert hook under loop (half stitch) of stitch under center braid, work: 2 sc, 1 hdc, 6 dc, 1 hdc, 2 sc into same st

Step 5 :

1 sl-st each into every st around

Info :

Break yarn leaving long end for seaming.

β€” COLLAR :

Info :

Worked in Green in back-and-forth rows with turning. Crochet chain of ch36 + ch1 for height adjustment.

Row 1 :

1 sc each in every stitch, ch3, turn work

Row 2 :

Alternate (dc, dc-inc) to end of round, then ch3, sl-st into same st

Info :

Without breaking yarn, ch30, work 36 sl-st along upper edge of collar, ch30, sl-st into last st. Break yarn and secure.

β€” FLOWER POT :

Info :

Worked in Pink. Crochet chain of ch5 + ch1 for height adjustment.

Round 1 :

4 sc, 3 sc into last chain. Continue into unused loops on opposite side: 3 sc, 1 inc into first chain (12)

Round 2 :

1 inc, 3 sc, 3 inc, 3 sc, 2 inc (18)

Round 3 :

1 sc, 1 inc, 3 sc, (1 sc, 1 inc) 3 times, 3 sc, (1 sc, 1 inc) 2 times (24)

Round 4 :

2 sc, 1 inc, 3 sc, (2 sc, 1 inc) 3 times, 3 sc, (2 sc, 1 inc) 2 times (30)

Round 5 :

3 sc, 1 inc, 3 sc, (3 sc, 1 inc) 3 times, 3 sc, (3 sc, 1 inc) 2 times (36)

Round 6 :

4 sc, 1 inc, 3 sc, (4 sc, 1 inc) 3 times, 3 sc, (4 sc, 1 inc) 2 times (42)

Round 7 :

5 sc, 1 inc, 3 sc, (5 sc, 1 inc) 3 times, 3 sc, (5 sc, 1 inc) 2 times (48)

Round 8 :

6 sc, 1 inc, 3 sc, (6 sc, 1 inc) 3 times, 3 sc, (6 sc, 1 inc) 2 times (54)

Round 9 :

7 sc, 1 inc, 3 sc, (7 sc, 1 inc) 3 times, 3 sc, (7 sc, 1 inc) 2 times (60)

Info :

Cut circle from cardboard to reinforce bottom.

Round 10 :

blo - 1 sc each in every stitch (60)

Round 11 :

1 sc each in every stitch (60)

Round 12 :

(19 sc, 1 inc) 3 times (63)

Round 13 :

1 sc each in every stitch (63)

Round 14 :

(20 sc, 1 inc) 3 times (66)

Round 15 :

1 sc each in every stitch (66)

Round 16 :

1 sl-st each into every stitch (66)

Info :

Continue in hdc.

Round 17 :

Insert hook under blo of Rnd 16 + under st of Rnd 15 (under braid) - (10 hdc, hdc-inc) 6 times (72)

Round 18 :

1 hdc each into every stitch (72)

Round 19 :

(11 hdc, hdc-inc) 6 times (78)

Rounds 20-22 :

3 rounds total - 1 hdc each into every stitch (78)

Round 23 :

blo - 1 hdc each into every stitch (78)

Round 24 :

1 hdc each into every stitch (78)

Info :

Break yarn and secure end.

Finishing Pot Brim :

Place pot with bottom away from you. Join new yarn to last front loop of Rnd 24. Ch4, work 1 tr each into every stitch around. Break yarn leaving long tail for seaming. Fold brim away from you and sew to unused loops 2 rnds below. Insert cardboard circle.

Assembly Instructions

  • Sew the completed head onto the body. Insert a double-pointed knitting needle through head and body to hold them together while sewing for easier attachment.
  • Pin the head in place using tailor pins before sewing to ensure proper positioning and alignment with the body.
  • Sew the leaves (arms) onto the sides of the body, positioning them 4 rounds below the neck seam where head meets body.
  • Place the removable collar around the neck area and tie it in the back with the chain ties for a decorative finishing touch.
  • Insert the cardboard circle into the bottom of the flower pot before final assembly to provide stable reinforcement.
  • Apply dry pastel chalk to the posterior cheeks for realistic blush by first applying chalk to soft cloth, then rubbing gently onto highest spots.
  • Ensure all yarn tails are securely fastened and hidden inside the pieces before final display to maintain a clean, professional appearance.

Important Notes

  • πŸ’‘Use stitch markers or contrasting yarn to mark the beginning of each round, especially when joining the petals to the head center
  • πŸ’‘Stuff all pieces firmly but not too tightly to maintain proper shape while allowing the flower character to have natural curves and dimension
  • πŸ’‘Work the back loop only (blo) stitches carefully in the head and pot sections as these create important structural definition and decorative texture
  • πŸ’‘When cinching the crotch area and posterior, pull the yarn with medium strength to create realistic shaping without distorting the overall body form
  • πŸ’‘Pin all components in place before sewing to ensure correct positioning and to visualize the final appearance before permanent attachment
  • πŸ’‘Apply pastel chalk blush only after completely finishing all crochet work and assembly to prevent smudging or transferring color during construction
  • πŸ’‘The pattern uses both US and UK crochet terminology - ensure you're following the correct abbreviations for your region to avoid confusion

This delightful Cheeky Flower pattern combines whimsy and charm to create a character that truly blooms with personality! The design features carefully crafted petals, a cheerful embroidered face, and adorable leaf arms that make this floweret an instant favorite. Standing proudly in its decorative pot with a removable collar accessory, this handmade creation brings joy and smiles wherever it's displayed. Perfect as a unique gift or charming home décor piece that celebrates the beauty of handmade artistry. 🌸 Happy crocheting! 🧢✨

You ask,

we answer.

FAQs

Can I use different yarn weights or hook sizes for this pattern?

While the pattern is designed for cotton blend yarn and a 2mm hook, you can experiment with different weights. However, this will change the finished size significantly. If you use thicker yarn and a larger hook, your flower will be bigger and may require larger safety eyes to maintain proper proportions. Always make a test swatch first.

Do I need to use three different shades of yellow for the center?

No, using three shades of yellow is optional and creates dimensional depth in the flower center. You can absolutely use just one or two shades of yellow if that's what you have available. The pattern will still look beautiful with simplified color choices.

How do I attach the petals evenly around the head?

Round 8 provides specific instructions for joining petals. The key is to work through both the petal stitches and the back loops of the head center simultaneously. Take your time with this round, and use pins to position petals evenly before crocheting them in place to ensure balanced spacing.

Is the collar removable or sewn on permanently?

The collar is designed to be removable, which is why it has chain ties that you simply tie in the back. This allows you to change the look of your flower or remove it for different styling options. You could also choose to sew it permanently if you prefer.

What can I use if I don't have dry pastel chalk for the cheeks?

If you don't have dry pastel chalk, you can use powdered blush makeup, pink eyeshadow, or even colored pencil applied very lightly. Another option is to simply skip the blushing step entirely, as the embroidered features alone give plenty of character to the face.

Can I make this pattern without the flower pot?

Yes! You can absolutely skip the flower pot section if you prefer. The flower character can stand on its own with the legs, or you could create a different base like a simple flat circle. The pot adds stability and display appeal but isn't essential to the character itself.