🧢 Beautiful ✨ Detailed πŸ’ Adorable

Buzz Lightyear Amigurumi Pattern

Buzz Lightyear Amigurumi Pattern
4.0β˜… Rating
6-8 Hours Time Needed
3.1K Made This
βœ‚οΈ

Intermediate Level

Ideal for those with basic knitting experience, featuring slightly more advanced stitches and techniques to expand your skills.

⏱️

Weekend Treat

Takes 5-7 hours, making it an enjoyable project to finish over a couple of days.

🧸

Cute Companion

An adorable friend to cherish, handcrafted with love to bring comfort and joy for years to come.

About This Buzz Lightyear Amigurumi Pattern

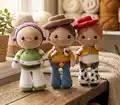
This Buzz Lightyear amigurumi pattern captures the essence of everyone's favorite space ranger from Toy Story. The pattern includes detailed instructions for creating Buzz's distinctive purple and white space suit, his rounded helmet detail, and charming facial features. Each component is carefully designed to bring out Buzz's heroic personality, from his sturdy body to his posable arms that are ready for intergalactic adventures.

Buzz Lightyear Amigurumi Pattern crochet pattern - detailed view of completed project

The pattern uses multiple yarn colors to recreate Buzz's iconic look, with color changes that add depth and authenticity. Safety eyes and embroidered details bring the character to life with personality and charm.

Why You'll Love This Buzz Lightyear Amigurumi Pattern

I absolutely love this Buzz Lightyear pattern because it brings back so many childhood memories of watching Toy Story! There's something incredibly satisfying about watching this beloved character come to life stitch by stitch. The pattern is well-structured with clear color changes that make the iconic space suit recognizable instantly. I find the combination of simple increases and decreases with strategic color placement creates a professional-looking result that's impressive yet achievable. The purple helmet detail adds that perfect finishing touch that makes Buzz instantly identifiable, and seeing those little safety eyes peek out brings such joy. Plus, it's the perfect size for gifting to Toy Story fans of all ages!

Buzz Lightyear Amigurumi Pattern step 1 - construction progress Buzz Lightyear Amigurumi Pattern step 2 - assembly progress Buzz Lightyear Amigurumi Pattern step 3 - details and accessories Buzz Lightyear Amigurumi Pattern step 4 - final assembly and finishing

Switch Things Up

I love experimenting with this Buzz Lightyear pattern to create unique variations! One of my favorite modifications is adjusting the size by using a larger hook and bulky yarn to create a jumbo version that makes an impressive statement piece. You could also try adding wire to the arms and legs to make them posable, allowing Buzz to strike different heroic poses on your shelf.

For a fun twist, consider embroidering additional details like the buttons on his chest or adding small fabric wings that attach to the back for an extra dimensional element. I've seen crafters use metallic thread for the emblem to give it that authentic space suit shimmer. You might also experiment with the helmet detail by adding a slight iridescent paint wash to mimic the glossy finish of Buzz's original design.

If you're making this for a young child, you could skip the safety eyes and embroider the eyes instead for a safer alternative. Some crafters also enjoy creating a whole Toy Story collection by pairing Buzz with other character patterns like Woody or Alien. The color-blocking technique used in this pattern works beautifully, so don't be afraid to get creative with your color choices while maintaining those signature purple and green tones!

Common Mistakes & How to Fix Them

βœ— Forgetting to stuff the head and body firmly enough before closing, which can result in a floppy finished product that loses its shape
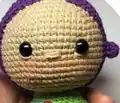
 βœ— Not placing safety eyes at the correct distance between rounds thirteen and fourteen, causing them to be too close or far apart
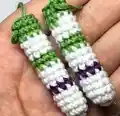
 βœ— Missing the back loops only instruction in row six of the body, which creates the important texture change for the suit design βœ— Skipping the color changes at specified rows, resulting in an incorrect pattern that doesn't match Buzz Lightyear's distinctive space ranger outfit βœ— Neglecting to leave long tails for sewing pieces together, making assembly difficult and creating weak attachment points that may come apart

Buzz Lightyear Amigurumi Pattern

Create your own space ranger with this charming Buzz Lightyear amigurumi pattern! This detailed guide walks you through crafting the beloved Toy Story character, complete with his iconic purple suit, white chest emblem, and signature features. Perfect for Toy Story fans and crochet enthusiasts alike, this pattern brings the hero who goes to infinity and beyond right into your hands. With step-by-step instructions for the head, body, limbs, and special details, you'll create a cuddly companion that captures Buzz's adventurous spirit.

Intermediate 6-8 Hours

Materials Needed for Buzz Lightyear Amigurumi Pattern

β€” Main Fabric

  • 01
    Alize Cotton Gold yarn in color 126 (main/skin color)
  • 02
    Alize Cotton Gold yarn in color 152 (white)
  • 03
    Alize Cotton Gold yarn in color 55 (green)
  • 04
    Drops Love You 7 yarn in color 10 (purple)
  • 05
    Drops Love You 7 yarn in color 04 (grey/additional color)
  • 06
    Fiber filling for stuffing

β€” Tools Required

  • 01
    Crochet hook size 2
  • 02
    Plastic safety eyes 7-8mm diameter
  • 03
    Tapestry needle for sewing
  • 04
    Scissors
  • 05
    Fiber filling
  • 06
    Embroidery thread in blue and red for emblem

Progress Tracker

0% Complete

β€” Head :

Round 1 :

6 sc in mr (6)

Round 2 :

6 inc (12)

Round 3 :

(1 sc, inc) x 6 (18)

Round 4 :

(2 sc, inc) x 6 (24)

Round 5 :

(3 sc, inc) x 6 (30)

Round 6 :

(4 sc, inc) x 6 (36)

Round 7 :

(5 sc, inc) x 6 (42)

Round 8 :

(6 sc, inc) x 6 (48)

Round 9 :

(7 sc, inc) x 6 (54)

Round 10-19 :

54 sc

Info :

Between the 15-16 rows insert safety eyes, 7-8 mm in diameter

Round 20 :

(7 sc, dec) x 6 (48)

Round 21 :

(6 sc, dec) x 6 (42)

Info :

Stuff

Round 22 :

(5 sc, dec) x 6 (36)

Round 23 :

(4 sc, dec) x 6 (30)

Round 24 :

(3 sc, dec) x 6 (24)

Round 25 :

(2 sc, dec) x 6 (18)

Round 26 :

(1 sc, dec) x 6 (12)

Info :

Stuff

Round 27 :

9 sc

β€” Detail for Head :

Info :

Start working with purple yarn color

Round 1 :

6 sc in mr (6)

Round 2 :

6 inc (12)

Round 3 :

(1 sc, inc) x 6 (18)

Round 4 :

(2 sc, inc) x 6 (24)

Round 5 :

(3 sc, inc) x 6 (30)

Round 6 :

(4 sc, inc) x 6 (36)

Round 7 :

(5 sc, inc) x 6 (42)

Round 8 :

(6 sc, inc) x 6 (48)

Round 9 :

(7 sc, inc) x 6 (54)

Round 10-16 :

54 sc

Round 17 :

(hdc, 2 dc, 2 inc (dc), 2 dc, hdc, 2 sc) x 2, 34 sc (58)

Round 18 :

(hdc, dc x 8, hdc, 2 sc) x 2, 34 sc (58)

Round 19 :

22 hdc, 36 sc (58)

Round 20 :

58 sc

Info :

Leave a long tail for sewing. Sew the detail on the head

β€” Ears :

Info :

Make 2 pieces. Start working with purple color

Round 1 :

6 sc in mr (6)

Info :

Leave a long tail for sewing

β€” Start Forming Head :

Step 1 :

Between the 16-17 rows sew on ears. Distance from ears to eyes 5-6 sc

Step 2 :

Embroider nose

Step 3 :

Embroider eyes: insert the white threaded needle on bottom of the eye and thread it to the bottom as shown in the picture. Bring the thread out near the second eye and repeat the same steps

Step 4 :

Toned cheeks: 3 sc, 2 sc, 2 sc

β€” Legs :

Info :

Make 2 pieces. Start working with green color

Round 1 :

6 sc in mr (6)

Round 2 :

6 inc (12)

Round 3 :

(1 sc, inc) x 6 (18)

Round 4 :

(2 sc, inc) x 6 (24)

Round 5 :

(3 sc, inc) x 6 (30)

Round 6 :

BLO 30 sc

Round 7 :

30 sc

Round 8 :

Change yarn color to the white color: 30 sc

Round 9 :

(8 sc, dec) x 3 (27)

Round 10-11 :

27 sc

Round 12 :

(7 sc, dec) x 3 (24)

Round 13 :

24 sc

Round 14 :

(6 sc, dec) x 3 (21)

Round 15-16 :

21 sc

Round 17 :

(5 sc, dec) x 3 (18)

Round 18 :

18 sc

Round 19 :

(4 sc, dec) x 3 (15)

Info :

Stuff. Crochet second leg the same way and continue crocheting the body. Do not cut off the thread on the second leg and continue crocheting the body. The gap between the legs should be 3 ch

β€” Body :

Round 1 :

15 sc on the leg, 3 sc on the chain, 15 sc on the leg, 3 sc on the chain (36)

Round 2 :

36 sc

Round 3 :

Change yarn color to the green color: 36 sc

Round 4 :

36 sc

Round 5 :

Change yarn color to the grey color: 36 sc

Round 6-7 :

36 sc

Round 8 :

Change yarn color to the white color: BLO (5 sc, inc) x 6 (42)

Round 9 :

(6 sc, inc) x 6 (48)

Round 10 :

(7 sc, inc) x 6 (54)

Round 11 :

Change yarn color to the green color: 54 sc

Round 12-13 :

54 sc

Round 14 :

(7 sc, dec) x 6 (48)

Round 15 :

(6 sc, dec) x 6 (42)

Round 16 :

(5 sc, dec) x 6 (36)

Round 17 :

(4 sc, dec) x 6 (30)

Info :

Stuff

Round 18 :

30 sc

Round 19 :

(3 sc, dec) x 6 (24)

Round 20-21 :

24 sc

Info :

Stuff. Leave a long tail for sewing. Sew the head to the body. Embroider emblem with blue and red thread

β€” Hands :

Info :

Start working with white color

Round 1 :

6 sc in mr (6)

Round 2 :

(1 sc, inc) x 3 (9)

Round 3-5 :

9 sc

Round 6 :

Change yarn color to the purple color: 9 sc

Round 7 :

Change yarn color to the white color: 9 sc

Round 8-9 :

9 sc

Round 10 :

Change yarn color to the green color: 9 sc

Round 11 :

9 sc

Round 12 :

Change yarn color to the white color: 9 sc

Round 13-14 :

9 sc

Round 15 :

Change yarn color to the green color: 9 sc

Round 16-17 :

9 sc

Info :

Stuff. Sew the hands to the body

Assembly Instructions

  • Sew the purple helmet detail piece onto the head, ensuring it sits properly and covers the top portion
  • Attach the small purple ears between rounds 16-17 of the head, maintaining a distance of 5-6 single crochets from the eyes
  • Insert safety eyes between rounds 15-16, making sure they are properly secured before stuffing the head completely
  • Embroider the nose and create the eye details using white thread as described in the forming head instructions
  • Sew the completed head to the body using the long tail left after finishing the body, ensuring proper alignment
  • Attach the hands to the sides of the body at an appropriate height for Buzz's posture
  • Embroider the chest emblem using blue and red thread on the white chest area of the body

Important Notes

  • πŸ’‘Pay close attention to color changes throughout the pattern as they create Buzz Lightyear's distinctive space suit design
  • πŸ’‘Use the back loops only technique in round 6 of the legs and round 8 of the body to create texture definition
  • πŸ’‘Stuff the head and body firmly to maintain the proper shape and structure of the character
  • πŸ’‘The purple helmet detail piece is crucial for the recognizable Buzz Lightyear look, so take time to sew it neatly
  • πŸ’‘Mark your rounds carefully when working with multiple color changes to avoid losing your place
  • πŸ’‘Leave long tails when finishing each piece to make assembly easier and more secure

This delightful Buzz Lightyear amigurumi pattern brings the legendary space ranger from Toy Story into your crafting world! With detailed instructions for every component and strategic color changes, you'll create a cuddly version of the hero who taught us that reaching for the stars is always worth it. The pattern combines beginner-friendly techniques with intermediate color work to achieve that iconic purple and green space suit. Perfect for gifting to Toy Story fans or adding to your own Disney collection! πŸš€ To infinity and beyond with your crochet hook! 🧢✨

You ask,

we answer.

FAQs

What size will the finished Buzz Lightyear amigurumi be?

Using the specified hook size 2 and recommended yarn, the finished amigurumi will be approximately 20-25 cm tall, making it a perfect cuddly size for display or play.

Can I use different yarn brands than those specified in the pattern?

Yes, you can substitute with any sport weight or DK weight yarn in similar colors. Just ensure your gauge matches by using the appropriate hook size to maintain the correct proportions.

How do I embroider the chest emblem mentioned in the pattern?

Use blue and red embroidery thread to create Buzz's distinctive star and circle emblem on the white chest area. You can sketch it lightly first or follow reference images from the movie for accuracy.

Is this pattern suitable for beginners?

This pattern is best suited for intermediate crocheters who are comfortable with basic stitches, color changes, and assembly. Beginners with some practice can definitely attempt it by taking their time with each section.

What can I do if I can't find the exact yarn colors specified?

Choose the closest alternatives in purple, white, green, and a skin tone color. The most important aspect is maintaining good contrast between the colors to achieve Buzz's recognizable appearance.