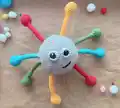
Create an interactive sensory toy that's perfect for little hands! This SpaceBall features eight colorful arms that pull safely in all directions, making it an engaging fidget toy for children. The pattern combines multiple colors in a spherical design with movable components that develop fine motor skills and tactile exploration. With its unique construction technique, you'll learn how to attach arms while crocheting the body, creating a toy that's both fun to make and delightful to play with.
Progress Tracker
0% Complete
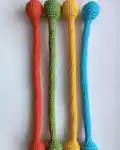
— Arms (make 4) :
Info :
Begin crocheting in any color you like. Make pieces in 4 different colors: red, green, yellow, and blue
Round 3 :
(1 SC, INC)*6 (18)
Round 4 :
(2 SC, INC)*6 (24)
Round 5-8 :
4 rnds straight: 24 SC
Round 9 :
(DEC, 2 SC)*6 (18)
Round 10 :
(DEC, 1 SC)*6 (12)
Round 11 :
(DEC, 2 SC)*3 (9)
Info :
Leave the pipe part of 9 SC hollow. Continue crocheting 60 rows
Round 12-71 :
60 rnds straight: 9 SC
Round 72 :
(INC, 2 SC)*3 (12)
Round 73 :
(1 SC, INC)*6 (18)
Round 74 :
(2 SC, INC)*6 (24)
Round 75-78 :
4 rnds straight: 24 SC
Round 79 :
(DEC, 2 SC)*6 (18)
Round 80 :
(DEC, 1 SC)*6 (12)
Round 81 :
DEC*6 fasten off
Info :
The first piece is ready. Make 3 more alike: yellow, blue and green
— Body :
Info :
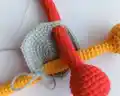
Begin crocheting with grey yarn. Be very attentive, as you are going to attach arms pieces as you crochet the body
Round 3 :
(1 SC, INC)*6 (18)
Round 4 :
(2 SC, INC)*6 (24)
Round 5 :
(3 SC, INC)*6 (30)
Round 6 :
(4 SC, INC)*6 (36)
Round 7 :
(5 SC, INC)*6 (42)
Info :
Take red and yellow arm pieces at this stage
Round 8 :
Chain 3, skip 3 SC, put the yellow arm and continue crocheting the round. 3 SC, INC, (6 SC, INC)*2, 3 CH, put the red arm, 3 SC, INC, (6 SC, INC)*2. The arms should be placed opposite each other symmetrically (48)
Round 9 :
(7 SC, INC)*6 (54) (work 1 SC into each CH)
Round 10 :
(8 SC, INC)*6 (60)
Round 11 :
(9 SC, INC)*6 (66)
Round 12 :
(10 SC, INC)*6 (72)
Round 13 :
(11 SC, INC)*6 (78)
Round 14 :
(12 SC, INC)*6 (84)
Round 15-18 :
4 rnds straight: 84 SC
Round 19 :
In this round you want to attach green and blue arms. 6 SC, 3 CH, skip 3 SC, put the green arm, 39 SC, 3 CH, skip 3 SC, blue arm, 33 SC
Round 20-24 :
5 rnds straight: 84 SC
Round 25 :
In this round place the remaining loose ends of blue and green arms. 3 SC, 3 CH, skip 3 SC, put the blue arm, 39 SC, 3 CH, skip 3 SC, green arm, 36 SC (84). Yellow and red pieces should go between the green and blue pieces inside the toy
Round 26-29 :
4 rnds straight: 84 SC
Info :
Further on work decreases
Round 30 :
(DEC, 12 SC)*6 (78)
Round 31 :
(DEC, 11 SC)*6 (72)
Round 32 :
(DEC, 10 SC)*6 (66)
Round 33 :
(DEC, 9 SC)*6 (60)
Round 34 :
(DEC, 8 SC)*6 (54)
Round 35 :
(DEC, 7 SC)*6 (48)
Round 36 :
In this round attach the loose ends of red and yellow arm pieces. DEC, 1 SC, 3 CH, skip 3 SC, put the red arm, 2 SC, DEC, (6 SC, DEC)*2, 1 SC, 3 CH, skip 3 SC, put the yellow arm, 2 SC, (DEC, 6 SC)*2 (42)
Round 37 :
(DEC, 5 SC)*6 (36). Work 1 SC into each CH
Round 38 :
(DEC, 4 SC)*6 (30)
Info :
Stuff tightly. Shape a nice sphere
Round 39 :
(DEC, 3 SC)*6 (24)
Round 40 :
(DEC, 2 SC)*6 (18)
Round 41 :
(DEC, 1 SC)*6 (12)
Round 42 :
DEC*6 fasten off
— Eyes (make 2) :
Info :
Begin crocheting in black yarn
Round 3 :
(1 SC, INC)*6 (18), SL ST, fasten off
Info :
Place the eyes between rounds 25 to 29, 4 SC apart. Secure them with white thread. Embroider 3 white stitches on top of the eyes and stitch semicircles at the bottom of each eye
Info :
Single crochet round the eyes. Insert your hook into the body and work 15 SC around the eyes. Do 2 rounds
— Embroidery :
Mouth :
Embroider a mouth in black under the left eye between rounds 30 and 32, make 2 stitches
Spots :
Embroider small spots over the top of the head above the right eye and over the back using red, yellow, green, and blue yarn with cross-stitch. Add these spots wherever you like to make the toy bright and attractive
— Finishing Details :
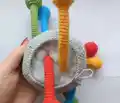
Info :
Test the arms and push the filler back in with a chopstick. Cut the excess stuffing with scissors if needed
Optional reinforcement :
For the best effect, single crochet round each opening where the arms come out (8 openings). Insert your hook into the corner of the hole on the body and work 3 SC, 2 SC to the corner, 3 SC, 2 SC - round 1 is done. Round 2 - 10 SC, SL ST
This innovative SpaceBall pattern transforms traditional amigurumi into an interactive sensory experience! The unique construction method of attaching movable arms while building the spherical body creates a fascinating engineering challenge for experienced crocheters. With its vibrant color combinations and playful embroidered face, this fidget toy becomes a beloved companion for children while showcasing your advanced crochet skills. The satisfaction of watching those colorful arms pull and move freely makes every careful stitch worthwhile. 🧶 Happy crocheting! 🎨✨