🧢 Beautiful ✨ Detailed πŸ’ Adorable

Bunny Lovey Crochet Amigurumi Pattern

Bunny Lovey Crochet Amigurumi Pattern
4.7β˜… Rating
8-10 Hours Time Needed
1.8K Made This
βœ‚οΈ

Intermediate Level

Ideal for those with basic knitting experience, featuring slightly more advanced stitches and techniques to expand your skills.

⏱️

All-Day Adventure

Requires 8-10 hours, ideal for a full day of immersive knitting.

🐰

Whimsical Buddy

Playful characters full of personality, designed to spark imagination and become cherished playtime favorites.

About This Bunny Lovey Crochet Amigurumi Pattern

This Bunny Lovey pattern brings together classic amigurumi techniques with adorable design elements. The bunny features a spherical head with long, floppy ears, four jointed limbs, and a fluffy tail, all dressed in a sweet teal blue outfit. Using spiral crochet technique and careful shaping, you'll create a three-dimensional friend with personality and charm. The pattern includes detailed embroidery instructions for the face, giving your bunny expressive eyes and a cute nose.

Bunny Lovey Crochet Amigurumi Pattern crochet pattern - detailed view of completed project

Working with two different hook sizes and combining gray and teal blue yarns, this pattern teaches you color transitions and garment construction. The body features trouser legs that join together, creating a unique clothing effect that makes this lovey extra special.

Why You'll Love This Bunny Lovey Crochet Amigurumi Pattern

I absolutely love this pattern because it combines so many satisfying techniques into one adorable project! The way the ears fold and attach creates such a realistic bunny shape, and I'm always amazed at how the embroidered face brings the whole piece to life. The teal outfit adds a pop of color that makes this bunny stand out from typical amigurumi. I find the spiral technique meditative, and watching each body part take shape is incredibly rewarding. The final assembly is like putting together a puzzle, and seeing all the pieces come together into this huggable companion never gets old!

Bunny Lovey Crochet Amigurumi Pattern step 1 - construction progress Bunny Lovey Crochet Amigurumi Pattern step 2 - assembly progress Bunny Lovey Crochet Amigurumi Pattern step 3 - details and accessories Bunny Lovey Crochet Amigurumi Pattern step 4 - final assembly and finishing

Switch Things Up

I love experimenting with color combinations for this bunny lovey! While the original uses gray and teal, I've made versions in soft pink with lavender, cream with sage green, and even a chocolate brown bunny with mustard yellow overalls. Each color combo gives the bunny a completely different personality.

Sometimes I add a little bow tie or hair accessory using leftover yarn scraps, which takes just a few extra minutes but adds so much charm. I've also tried using safety eyes instead of embroidered ones for a different look, though I personally prefer the softness of embroidered features for baby gifts.

For a special touch, I occasionally use variegated yarn for the clothing portion, which creates a beautiful color-changing effect throughout the body. You could also experiment with different textures - a fluffy boucle yarn for the tail makes it extra cuddly, or a sparkly yarn for the outfit creates a magical fairy-tale bunny.

If you want to make it more personal, consider adding initials or a small heart to the clothing using surface crochet or embroidery. I've even made holiday versions with red and green for Christmas, or pastel colors for Easter gifts!

Common Mistakes & How to Fix Them

βœ— Forgetting to stuff the head firmly enough before closing, resulting in a floppy or misshapen head that won't hold its round form properly βœ— Not counting stitches carefully during increase and decrease rounds, which throws off the entire pattern and creates uneven shaping throughout the piece βœ— Attaching the ears too far apart or too close together, making the bunny look unbalanced instead of having the proper facial proportions βœ— Using a hook that's too large, causing gaps between stitches where the stuffing shows through and ruins the finished appearance

Bunny Lovey Crochet Amigurumi Pattern

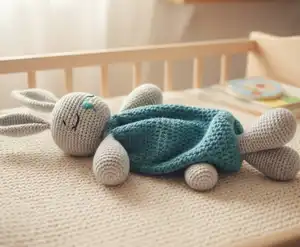
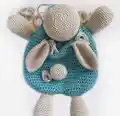
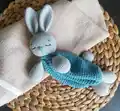
Create an adorable bunny lovey with this charming crochet pattern! This sweet companion features a cuddly gray bunny with endearing long ears, wearing a cute teal blue outfit. Perfect for gifting to little ones or keeping as a decorative treasure, this lovey combines soft textures with delightful details. The pattern guides you through creating the head, ears, limbs, tail, and body with clear row-by-row instructions. With embroidered facial features and careful assembly techniques, you'll craft a bunny friend that's sure to be cherished for years to come.

Intermediate 8-10 Hours

Materials Needed for Bunny Lovey Crochet Amigurumi Pattern

β€” Main Fabric

  • 01
    Gray yarn - Himalaya Deluxe BAMBOO color 124-19, 275 yards (250m) per 100g ball
  • 02
    Teal blue yarn - Himalaya Deluxe BAMBOO color 124-24, 275 yards (250m) per 100g ball
  • 03
    Black DMC embroidery floss color 310 for eyes
  • 04
    Teal blue DMC embroidery floss color 597 for nose and mouth

β€” Tools Required

  • 01
    Crochet hook 2.5mm (B)
  • 02
    Crochet hook 3.0mm
  • 03
    Stuffing material
  • 04
    Sewing needle
  • 05
    Embroidery needle
  • 06
    Sewing pins
  • 07
    Scissors
  • 08
    Wooden chopstick (for stuffing)

Progress Tracker

0% Complete

β€” Head :

Row 1 :

6 sc in Magic Ring (6)

Row 2 :

6 inc (12)

Row 3 :

(inc, 1 sc) rep 6 times around (18)

Row 4 :

(2 sc, inc) rep 6 times around (24)

Row 5 :

1 sc, (inc, 3 sc) rep 5 times around, inc, 2 sc (30)

Row 6 :

(4 sc, inc) rep 6 times around (36)

Row 7 :

2 sc, (inc, 5 sc) rep 5 times around, inc, 3 sc (42)

Row 8 :

(6 sc, inc) rep 6 times around (48)

Row 9 :

3 sc, (inc, 7 sc) rep 5 times around, inc, 4 sc (54)

Row 10 :

(8 sc, inc) rep 6 times around (60)

Rows 11-20 :

60 sc (10 rows should be without changes) (60)

Row 21 :

(8 sc, dec) rep 6 times around (54)

Row 22 :

3 sc, (dec, 7 sc) rep 5 times around, dec, 4 sc (48)

Row 23 :

(6 sc, dec) rep 6 times around (42)

Row 24 :

2 sc, (dec, 5 sc) rep 5 times around, dec, 3 sc (36)

Row 25 :

(4 sc, dec) rep 6 times around (30)

Row 26 :

1 sc, (dec, 3 sc) rep 5 times around, dec, 2 sc (24)

Info :

Stuff detail with stuffing material

Row 27 :

(2 sc, dec) rep 6 times around (18)

Row 28 :

(1 sc, dec) rep 6 times around (12)

Row 29 :

6 dec, sl st (6)

Info :

Add more filler using wooden chopstick, then tighten hole with needle through outer wall of each loop in row 29

β€” Ears (make 2) :

Row 1 :

6 sc in Magic Ring (6)

Row 2 :

6 inc (12)

Row 3 :

12 sc (12)

Row 4 :

(1 sc, inc) rep 6 times around (18)

Row 5 :

18 sc (18)

Row 6 :

(2 sc, inc) rep 6 times around (24)

Row 7 :

24 sc (24)

Row 8 :

(3 sc, inc) rep 6 times around (30)

Rows 9-18 :

30 sc (10 rows without changes) (30)

Row 19 :

(3 sc, dec) rep 6 times around (24)

Row 20 :

24 sc (24)

Row 21 :

(2 sc, dec) rep 6 times around (18)

Row 22 :

18 sc (18)

Row 23 :

(1 sc, dec) rep 6 times around (12)

Row 24 :

Fold ear and tie two sides together with 6 sc to close (6)

Info :

Fold again and attach two sides with three stitches using needle, fasten off leaving 7.9 inches (20 cm) yarn tail, do not stuff ears

β€” Forelegs (make 2) :

Row 1 :

6 sc in Magic Ring (6)

Row 2 :

6 inc (12)

Row 3 :

(1 sc, inc) rep 6 times around (18)

Row 4 :

(2 sc, inc) rep 6 times around (24)

Row 5 :

24 sc (24)

Row 6 :

(3 sc, inc) rep 6 times around (30)

Row 7 :

30 sc (30)

Row 8 :

(4 sc, inc) rep 6 times around (36)

Rows 9-10 :

36 sc (2 rows without changes) (36)

Row 11 :

(4 sc, dec) rep 6 times around (30)

Rows 12-14 :

30 sc (3 rows without changes) (30)

Row 15 :

(3 sc, dec) rep 6 times around (24)

Rows 16-18 :

24 sc (3 rows without changes) (24)

Row 19 :

(2 sc, dec) rep 6 times around (18)

Rows 20-22 :

18 sc (3 rows without changes) (18)

Info :

Fill with stuffing material, fasten off leaving 7.9 inches (20 cm) yarn tail, fold foreleg and attach sides with 9 stitches (9)

β€” Hind legs (make 2) :

Row 1 :

6 sc in Magic Ring (6)

Row 2 :

6 inc with sc (12)

Row 3 :

(1 sc, inc) rep 6 times around (18)

Row 4 :

(2 sc, inc) rep 6 times around (24)

Row 5 :

(3 sc, inc) rep 6 times around (30)

Row 6 :

30 sc (30)

Row 7 :

(4 sc, inc) rep 6 times around (36)

Rows 8-10 :

36 sc (3 rows without changes) (36)

Row 11 :

14 sc, dec, sc, dec, sc, dec, 14 sc (33)

Row 12 :

33 sc (33)

Row 13 :

12 sc, dec, sc, dec, sc, dec, 13 sc (30)

Row 14 :

30 sc (30)

Row 15 :

(3 sc, dec) rep 6 times around (24)

Rows 16-18 :

24 sc (3 rows without changes) (24)

Row 19 :

(2 sc, dec) rep 6 times around (18)

Rows 20-22 :

18 sc (3 rows without changes) (18)

Info :

Sl st, fasten off, cut yarn, fill detail with stuffing material

β€” Tail :

Row 1 :

6 sc in Magic Ring (6)

Row 2 :

6 inc (12)

Row 3 :

(1 sc, inc) rep 6 times around (18)

Row 4 :

(2 sc, inc) rep 6 times around (24)

Row 5 :

(3 sc, inc) rep 6 times around (30)

Rows 6-9 :

30 sc (4 rows without changes) (30)

Row 10 :

(3 sc, dec) rep 6 times around (24)

Info :

Fill detail with stuffing material

Row 11 :

(2 sc, dec) rep 6 times around (18)

Row 12 :

(1 sc, dec) rep 6 times around (12)

Row 13 :

6 dec, sl st (6)

Info :

Add more filler, fasten off leaving 7.9 inches (20 cm) yarn tail to attach to body later

β€” Body :

Trouser Leg 1 - Row 1 :

6 sc in Magic Ring, sl st (6)

Row 2 :

ch, 2 sc in same st (6 inc with sc), sl st (12)

Row 3 :

ch, (1 sc, inc) rep 6 times around, sl st (18)

Row 4 :

Take hind leg, attach to detail, join pieces together by crocheting (18)

Row 5 :

ch, 2 sc in same st (18 inc with sc), sl st (36)

Info :

Change hook to 3.0 mm

Rows 6-8 :

ch, 36 hdc, sl st (3 rows without changes) (36)

Info :

Fasten off and cut yarn

Trouser Leg 2 :

Repeat same steps for second pant leg but do not cut yarn

Info :

Connect both legs: make 2 stitches attaching 1st loop of row 7 of first leg to 18th loop of row 7 of second leg, and last loop of row 7 of first leg to 19th loop of row 7 of second leg

Row 8 :

ch, 17 hdc in second leg, hdc at connection point (18th loop), hdc at connection point of first leg (1st loop), 35 hdc along first leg to connection, hdc in connection of second leg, 17 hdc along second leg to end, sl st (72)

Rows 9-27 :

ch, 72 hdc, sl st (19 rows without changes) (72)

Row 28 :

ch, (6 hdc, dec) rep 9 times around, sl st (63)

Row 29 :

ch, 63 hdc, sl st (63)

Row 30 :

ch, (5 hdc, dec) rep 9 times around, sl st (54)

Row 31 :

ch, 54 hdc, sl st (54)

Row 32 :

ch, (4 hdc, dec) rep 9 times around, sl st (45)

Row 33 :

ch, 45 hdc, sl st (45)

Row 34 :

ch, (3 hdc, dec) rep 9 times around, sl st (36)

Row 35 :

ch, (2 hdc, dec) rep 9 times around, sl st (27)

Row 36 :

ch, (1 hdc, dec) rep 9 times around, sl st (18)

Row 37 :

ch, 9 dec hdc, sl st (9)

Info :

Fasten off leaving 7.9 inches (20 cm) yarn tail, tighten hole with needle

β€” Assembly :

Step 1 :

Attach head to body by joining third from end row of head (18 loops) to second last row of body (18 loops) with 18 double stitches

Step 2 :

Attach forelegs to body sides at distance of one row from head using 9 double stitches per leg

Step 3 :

Attach ears to fourth row of head with 9 sc distance between them across face, fasten off and hide yarn ends inside head

Step 4 - Face Details :

Using teal blue DMC floss, embroider triangle nose between rows 16-17 with 3 sc width and 2 rows height, pull needle down 2 rows to make mouth, fix yarn and cut hiding ends inside

Step 5 :

Using black DMC floss, embroider eyes on face

Assembly Instructions

  • Attach the head to the body by aligning the third row from the end of the head with the second last row of the body, both containing 18 loops, and join with 18 double stitches
  • Sew the forelegs to the sides of the body at a distance of one row down from where the head attaches, using 9 double stitches per leg
  • Position and attach the ears to the fourth row of the head, ensuring there is a 9 single crochet gap between them across the front of the face
  • Embroider the nose using teal blue DMC floss between rows 16 and 17, creating a triangle shape that is 3 single crochets wide and 2 rows tall
  • Create the mouth by pulling the needle down 2 rows from the bottom of the nose and making a small curved line
  • Embroider the eyes using black DMC floss, positioning them symmetrically on either side of the nose
  • Attach the tail to the back of the body using the reserved yarn tail and secure all loose ends by weaving them inside the pieces

Important Notes

  • πŸ’‘Use tight stitches throughout to prevent stuffing from showing through the fabric
  • πŸ’‘Select a hook size smaller than recommended on the yarn label to achieve proper tension and density
  • πŸ’‘Stuff the head and tail firmly but not too tightly to maintain proper shape
  • πŸ’‘Leave long yarn tails when finishing pieces that need to be attached later for easier assembly
  • πŸ’‘Do not stuff the ears as they should remain flat and floppy
  • πŸ’‘Use sewing pins to position all pieces before permanently attaching them to ensure proper placement
  • πŸ’‘Work in continuous spiral rounds without joining unless specifically instructed to use slip stitches

This adorable Bunny Lovey pattern combines traditional amigurumi techniques with charming clothing details to create a huggable companion full of personality! The sweet gray bunny dressed in teal blue attire features carefully crafted proportions, from the rounded head with floppy ears to the jointed limbs and fluffy tail. The pattern guides you through spiral crochet, color changes, and detailed embroidery work to bring this precious friend to life. Whether you're making it as a gift for a little one or adding to your own collection, this lovey will surely become a treasured keepsake. πŸ°πŸ’™ Happy crocheting! 🧢✨

You ask,

we answer.

FAQs

What yarn weight should I use for this bunny lovey pattern?

The pattern uses Himalaya Deluxe BAMBOO yarn which is a DK/light worsted weight yarn. You can substitute with any similar weight yarn, but make sure to adjust your hook size accordingly to achieve tight stitches that prevent stuffing from showing through.

Why do I need two different hook sizes for this pattern?

The 2.5mm hook is used for the bunny's body parts (head, ears, limbs, tail) to create tight, dense fabric, while the 3.0mm hook is used for the clothing portion of the body to create a slightly looser, more fabric-like texture that contrasts nicely with the bunny parts.

Should the ears be stuffed or left flat?

The ears should NOT be stuffed. They are meant to remain flat and floppy, which is achieved by folding them twice during assembly - first to close the opening with 6 single crochets, then again with three needle stitches to create the characteristic bunny ear shape.

How do I join the two trouser legs to form the body?

After completing both trouser legs separately through row 8, you'll use the yarn tail from the first leg to connect specific loops from both legs together. Then continue crocheting in the round, working across both legs to create the body opening of 72 stitches total.

What's the best way to embroider the facial features?

Use DMC embroidery floss and a sharp embroidery needle. The nose is embroidered between rows 16-17 as a triangle (3 sc wide, 2 rows tall) in teal blue, then extend down 2 rows for the mouth. The eyes are embroidered with black floss and positioned symmetrically on either side of the nose.

Can I make this bunny in different colors?

Absolutely! While the pattern uses gray and teal blue, you can substitute any color combination you prefer. Just make sure to maintain the same yarn weight and tension for consistent results throughout your project.