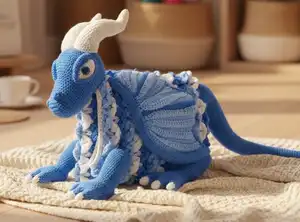
Transform your crochet skills into pure magic with this enchanting 3-in-1 Ice Dragon Baby Blanket pattern. This intermediate-level project combines functionality with whimsy, creating a cozy 95cm x 80cm blanket that folds into an adorable ice dragon companion. Featuring intricate lattice work with pointy leaves, dimensional dragon features including safety eyes, sculptured horns, and poseable wings, this pattern offers both a practical baby blanket and a decorative toy. Perfect for nursery decor or as a thoughtful handmade gift, this pattern includes detailed instructions for 22 separate components that come together to create a truly magical piece.
Progress Tracker
0% Complete
— The Head
Info:
Crochet in the round without turning or closing rounds using Turquoise and 4mm hook. Ch6 to start.
Round 1:
3sc in 2nd ch from hook, sc in next 3ch, 3sc in last ch, continue on other side of chain, sc in next 3ch (12)
Round 2:
inc in next 3sts, sc in next 3sts, inc in next 3sts, sc in next 3sts (18)
Round 3:
(sc, inc) x 3, sc in next 3sts, (inc, sc) x 3, sc in next 3sts (24)
Round 4:
(sc in next 2sts, inc) x 3, sc in next 3sts, (sc in next 2sts, inc) x 3, sc in next 3sts (30)
Round 5:
(sc in next 3sts, inc) x 3, sc in next 3sts, (sc in next 3sts, inc) x 3, sc in next 3sts (36)
Round 6:
sc in next 31sts, bo, sc in next 4sts (36)
Round 7:
sc in next 4sts, bo, sc in next 31sts (36)
Rounds 8-19:
sc in each stitch (36)
Round 20:
inc in next 5sts, sc in next 31sts (41)
Round 21:
(sc, inc) x 5, sc in next 31sts (46)
Round 22:
inc, sc in next 13sts, inc, sc in next 31sts (48)
Round 23:
sc in next 2sts, inc, sc in next 6sts, inc, sc in next 6sts, inc, sc in next 31sts (51)
Round 24:
(inc, sc in next 16sts) x 3 (54)
Round 25:
(inc, sc in next 17sts) x 3 (57)
Rounds 26-33:
sc in each stitch (57)
Round 34:
(dec, sc in next 17sts) x 3 (54)
Round 35:
(dec, sc in next 7sts) x 6 (48)
Round 36:
(dec, sc in next 6sts) x 6 (42)
Round 37:
(dec, sc in next 5sts) x 6 (36)
Round 38:
(dec, sc in next 4sts) x 6 (30)
Round 39:
(dec, sc in next 3sts) x 6 (24)
Round 40:
(dec, sc in next 2sts) x 6 (18)
Round 41:
(dec, sc in next st) x 6 (12)
Info:
Fasten off, close the hole and weave in ends
— The Lower Lids (Make 2)
Info:
Work in round without turning using Turquoise and 3.5mm hook
Round 1:
4sc into magic ring, pull tail to close (4)
Rounds 2-3:
sc in each stitch (4)
Round 4:
(inc, sc) x 2 (6)
Rounds 5-6:
sc in each stitch (6)
Round 7:
(inc, sc in next 2sts) x 2 (8)
Rounds 8-12:
sc in each stitch (8)
Round 13:
(dec, sc in next 2sts) x 2 (6)
Rounds 14-15:
sc in each stitch (6)
Info:
Fasten off, close hole, leave long tail. Do not stuff lids.
— The Upper Lids (Make 2)
Info:
Using Turquoise and 3.5mm hook
Row 1:
ch15, sc in 2nd ch from hook, sc in next 13ch (14)
Info:
Fasten off, leave long tail
— The Eye Whites (Make 2)
Info:
Using White and 3.5mm hook
Row 1:
ch2, 3sc in 2nd ch from hook, turn (3)
Row 2:
sc in each 3sts, turn (3)
Row 3:
inc, sc, inc, turn (5)
Row 4:
sc in each st, turn (5)
Row 5:
inc, sc in next 3sts, inc, turn (7)
Rows 6-8:
sc in each st, turn (7)
Row 9:
dec, sc in next 3sts, dec, turn (5)
Row 10:
sc in each st, turn (5)
Info:
Fasten off, leave long tail
— The Horns (Make 2)
Info:
Crochet in round without turning using White and 4mm hook, except for short rows
Round 1:
4sc into magic ring, pull tail to close (4)
Round 2:
(sc, inc) x 2 (6)
Round 3:
sc in each stitch (6)
Round 4:
(sc in next 2sts, inc) x 2 (8)
Round 5:
sc in each stitch (8)
Round 6:
(sc in next 3sts, inc) x 2 (10)
Rounds 7-8:
sc in each stitch (10)
Row 9 Short Row (RS):
sc in next 5sts, turn (5)
Row 10 Short Row (WS):
sc in next 5sts, turn (5)
Round 11:
sc in next 5sts of previous short row, sc in next 5sts of round 8 (10)
Round 12:
sc in each stitch (10)
Round 13:
(sc in next 4sts, inc) x 2 (12)
Round 14:
sc in each stitch (12)
Round 15:
(sc in next 5sts, inc) x 2 (14)
Round 16:
sc in each stitch (14)
Round 17:
(sc in next 6sts, inc) x 2 (16)
Round 18:
sc in each stitch (16)
Round 19:
sc in next 16sts, continue to sc in next 9sts to move starting point (16)
Info:
Mark last sc as end of round
Row 20 Short Row (RS):
sc in next 8sts, turn (8)
Row 21 Short Row (WS):
sc in next 8sts, turn (8)
Round 22:
sc in next 8sts of previous short row, sc in next 8sts of round 19 (16)
Round 23:
(sc in next 7sts, inc) x 2 (18)
Round 24:
sc in each stitch (18)
Row 25 Short Row (RS):
sc in next 9sts, turn (9)
Row 26 Short Row (WS):
sc in next 9sts, turn (9)
Round 27:
sc in next 9sts of previous short row, sc in next 9sts of round 24 (18)
Round 28:
(sc in next 8sts, inc) x 2 (20)
Row 29 Short Row (RS):
sc in next 10sts, turn (10)
Row 30 Short Row (WS):
sc in next 10sts, turn (10)
Round 31:
sc in next 10sts of previous short row, sc in next 10sts of round 28 (20)
Round 32:
(sc in next 9sts, inc) x 2 (22)
Round 33:
sc in each stitch (22)
Row 34 Short Row (RS):
sc in next 11sts, turn (11)
Row 35 Short Row (WS):
sc in next 11sts, turn (11)
Round 36:
sc in next 11sts of previous short row, sc in next 11sts of round 33 (22)
Round 37:
(sc in next 10sts, inc) x 2 (24)
Rounds 38-39:
sc in each stitch (24)
Info:
Fasten off leaving long tail. Stuff horn firmly.
— The Legs (Make 4)
Info:
Make 3 toes first using Turquoise, White and 3.5mm hook
The Toes - Round 1:
With White, 4sc into magic ring, pull tail to close (4)
Round 2:
inc, sc in next 3sts (5)
Round 3:
inc, sc in next 4sts (6)
Round 4:
inc, sc in next 5sts (7)
Info:
Change to Turquoise and cut white yarn
Round 5:
inc, sc in next 6sts (8)
Round 6:
(inc, sc in next 3sts) x 2 (10)
Round 7:
(inc, sc in next 4sts) x 2 (12)
Round 8:
(inc, sc in next 5sts) x 2 (14)
Info:
Make 3 toes total. Fasten off yarn on 2 toes, leave yarn attached on Toe 1
Joining The Toes - Round 9:
Pick up Toe 1 and Toe 2, sc in next 7sts of Toe 2, sc in next 14sts of Toe 3, sc in next 7sts of Toe 2, sc in next 14sts of Toe 1 (42)
Round 10:
(dec, sc in next 19sts) x 2 (40)
Round 11:
(dec, sc in next 18sts) x 2 (38)
Round 12:
(dec, sc in next 17sts) x 2 (36)
Round 13:
(dec, sc in next 16sts) x 2 (34)
Round 14:
sc in next 12sts, continue with short rows 14A-14E
Short Row 14A (RS):
sc in next 16sts, turn (16)
Short Row 14B (WS):
sc in next 16sts, turn (16)
Short Row 14C (RS):
sc in next 16sts, turn (16)
Short Row 14D (WS):
sc in next 16sts, turn (16)
Short Row 14E (RS):
sc in next 16sts (16)
Info:
Continue round 14: sc4tog along edge of short rows, sc in next 5sts (34)
Round 15:
sc in next 11sts, sc4tog in reverse, sc in next 22sts (34)
Round 16:
sc in each st (34)
Round 17:
sc in next 13sts, continue with short rows 17A-17E
Short Row 17A (RS):
sc in next 17sts, turn (17)
Short Row 17B (WS):
sc in next 17sts, turn (17)
Short Row 17C (RS):
sc in next 17sts, turn (17)
Short Row 17D (WS):
sc in next 17sts, turn (17)
Short Row 17E (RS):
sc in next 17sts (17)
Info:
Continue round 17: sc4tog along edge, sc in next 3sts (34)
Round 18:
sc in next 12sts, sc4tog, sc in next 21sts (34)
Round 19:
sc in next 13sts, (dec, sc in next 3sts) x 4, sc (30)
Round 20:
sc in each st (30)
Round 21:
(dec, sc in next 3sts) x 6 (24)
Round 22:
(inc, sc in next 11sts) x 2 (26)
Round 23:
(inc, sc in next 12sts) x 2 (28)
Round 24:
(inc, sc in next 13sts) x 2 (30)
Rounds 25-26:
sc in each st (30)
Round 27:
inc, sc in next 29sts (31)
Rounds 28-29:
sc in each st (31)
Round 30:
sc in next 15sts, inc, sc in next 15sts (32)
Rounds 31-32:
sc in each st (32)
Info:
Start filling leg, don't overstuff
Round 33:
inc, sc in next 31sts (33)
Rounds 34-35:
sc in each st (33)
Round 36:
sc in next 16sts, inc, sc in next 16sts (34)
Rounds 37-38:
sc in each st (34)
Round 39:
(dec, sc in next 15sts) x 2 (32)
Round 40:
(dec, sc in next 6sts) x 4 (28)
Round 41:
(dec, sc in next 5sts) x 4 (24)
Round 42:
(dec, sc in next 2sts) x 6 (18)
Round 43:
(dec, sc) x 6 (12)
Info:
Finish stuffing leg lightly and flatten slightly. Fasten off, leave long tail.
— The Tail
Info:
Work in round without turning using Turquoise and 3.5mm hook
Round 1:
4sc into magic ring, pull tail to close (4)
Round 2:
inc, sc in next 3sts (5)
Rounds 3-4:
sc in each stitch (5)
Round 5:
inc, sc in next 4sts (6)
Rounds 6-7:
sc in each stitch (6)
Round 8:
inc, sc in next 5sts (7)
Rounds 9-10:
sc in each stitch (7)
Round 11:
inc, sc in next 6sts (8)
Rounds 12-13:
sc in each stitch (8)
Round 14:
inc, sc in next 7sts (9)
Rounds 15-16:
sc in each stitch (9)
Round 17:
inc, sc in next 8sts (10)
Rounds 18-19:
sc in each stitch (10)
Round 20:
inc, sc in next 9sts (11)
Rounds 21-22:
sc in each stitch (11)
Round 23:
inc, sc in next 10sts (12)
Rounds 24-25:
sc in each stitch (12)
Round 26:
inc, sc in next 11sts (13)
Rounds 27-28:
sc in each stitch (13)
Round 29:
inc, sc in next 12sts (14)
Rounds 30-31:
sc in each stitch (14)
Round 32:
inc, sc in next 13sts (15)
Rounds 33-34:
sc in each stitch (15)
Round 35:
inc, sc in next 14sts (16)
Rounds 36-38:
sc in each stitch (16)
Round 39:
inc, sc in next 15sts (17)
Rounds 40-42:
sc in each stitch (17)
Round 43:
inc, sc in next 16sts (18)
Rounds 44-46:
sc in each stitch (18)
Round 47:
inc, sc in next 17sts (19)
Rounds 48-50:
sc in each stitch (19)
Round 51:
inc, sc in next 18sts (20)
Rounds 52-54:
sc in each stitch (20)
Round 55:
inc, sc in next 19sts (21)
Rounds 56-57:
sc in each stitch (21)
Round 58:
inc, sc in next 20sts (22)
Rounds 59-60:
sc in each stitch (22)
Round 61:
inc, sc in next 21sts (23)
Rounds 62-63:
sc in each stitch (23)
Round 64:
inc, sc in next 22sts (24)
Rounds 65-66:
sc in each stitch (24)
Round 67:
inc, sc in next 23sts (25)
Round 68:
sc in each stitch (25)
Round 69:
inc, sc in next 24sts (26)
Round 70:
sc in each stitch (26)
Round 71:
inc, sc in next 25sts (27)
Round 72:
sc in each stitch (27)
Round 73:
inc, sc in next 26sts (28)
Round 74:
sc in each stitch (28)
Round 75:
inc, sc in next 27sts (29)
Round 76:
sc in each stitch (29)
Round 77:
inc, sc in next 28sts (30)
Round 78:
sc in each stitch (30)
Round 79:
inc, sc in next 29sts (31)
Round 80:
sc in each stitch (31)
— The Wing Membrane (Make 2)
Info:
Using Pale Blue, Turquoise and 4mm hook. Start with Pale Blue
Row 1:
ch15, sc in 2nd ch from hook, sc, hdc, dc in next 11chs, turn (14)
Row 2 (BLO):
(2dc in next st) x 2, dc in next 9sts, hdc, sc in last 2sts, ch1, turn (16)
Row 3 (BLO):
sc in next 2sts, hdc, dc in next 11sts, (2dc in next st) x 2, turn (18)
Row 4 (BLO):
(2dc in next st) x 2, dc in next 13sts, hdc, sc in last 2sts, ch1, turn (20)
Row 5 (BLO):
sc in next 2sts, hdc, dc in next 15sts, (2dc in next st) x 2, turn (22)
Info:
Change to Turquoise, carry Pale Blue
Row 6 (BLO):
ch1, sc in all 22sts, ch1, turn (22)
Row 7:
sc in next 2sts, hdc in next 20sts, turn (22)
Info:
Change to Pale Blue, cut Turquoise
Row 8 (BLO):
dc2tog x 2, dc in next 15sts, hdc, sc in last 2sts, ch1, turn (20)
Row 9 (BLO):
sc in next 2sts, hdc, dc in next 13sts, dc2tog x 2, turn (18)
Row 10 (BLO):
dc2tog x 2, dc in next 11sts, hdc, sc in last 2sts, ch1, turn (16)
Row 11 (BLO):
sc in next 2sts, hdc, dc in next 9sts, dc2tog x 2, turn (14)
Row 12 (BLO):
3dc in next st, 2dc in next st, dc in next 9sts, hdc, sc in last 2sts, ch1, turn (17)
Row 13 (BLO):
sc in next 2sts, hdc, dc in next 12sts, 2dc in next st, 3dc in last st, turn (20)
Row 14 (BLO):
3dc in next st, 2dc in next st, dc in next 15sts, hdc, sc in last 2sts, ch1, turn (23)
Row 15 (BLO):
sc in next 2sts, hdc, dc in next 18sts, 2dc in next st, 3dc in last st, turn (26)
Info:
Change to Turquoise, carry Pale Blue
Row 16 (BLO):
ch1, sc in all 26sts, ch1, turn (26)
Row 17:
sc in next 2sts, hdc in next 24sts, turn (26)
Info:
Change to Pale Blue, cut Turquoise
Row 18 (BLO):
dc2tog x 2, dc in next 19sts, hdc, sc in last 2sts, ch1, turn (24)
Row 19 (BLO):
sc in next 2sts, hdc, dc in next 17sts, dc2tog x 2, turn (22)
Row 20 (BLO):
dc2tog x 2, dc in next 15sts, hdc, sc in last 2sts, ch1, turn (20)
Row 21 (BLO):
sc in next 2sts, hdc, dc in next 13sts, dc2tog x 2, turn (18)
Row 22 (BLO):
(2dc in next st) x 2, dc in next 13sts, hdc, sc in last 2sts, ch1, turn (20)
Row 23 (BLO):
sc in next 2sts, hdc, dc in next 15sts, (2dc in next st) x 2, turn (22)
Row 24 (BLO):
(2dc in next st) x 2, dc in next 17sts, hdc, sc in last 2sts, ch1, turn (24)
Row 25 (BLO):
sc in next 2sts, hdc, dc in next 19sts, (2dc in next st) x 2, turn (26)
Info:
Fasten off Pale Blue, weave ends. Join Turquoise in last stitch of row 25
Border:
Sc along row 25 making 1sc in each st until 1 st left. 3sc in last st. Sc along edge making sc2tog for each 2 rows until 1 row left, sc in that row. 3sc in first st of bottom, sc in each st until 1 st left, 3sc in last st. Work along dc edge: 5sc for each 2 Pale Blue rows, sc in 1st Turquoise row, ch3, sc in 2nd ch from hook, sc in next ch, sc in 2nd Turquoise row. Continue pattern. Sl st in first sc to close.
Info:
Repeat for second wing membrane symmetrically
— The Wing Bones (Make 2)
Info:
Using Turquoise and 3.5mm hook. Fill firmly as you work
Round 1:
8sc into magic ring, pull tail to close (8)
Rounds 2-71:
sc in each st (8)
Info:
Adjust rounds to match wing membrane length (approximately 38cm). Fasten off, close hole after stuffing
Assembling Wing:
Pin wing membrane to bone from tip to middle of bottom row. Sew membrane to bone.
— The Blanket
Info:
Using Pale Blue and 5mm hook. Ch103 (or adjust for gauge: multiples of 6ch + 1ch)
Row 1 - Lattice:
2dc in 5th ch from hook, ch1, sk2, 2dc in following ch, repeat until 2ch left, sk1, dc in last ch
Row 2 - Leaf:
Ch1, turn, sc in first st. Turn to RS make leaf in next cluster (5dc around first dc post, ch3, sl st in base, 5dc around second dc post, sl st between 2dc of next cluster), repeat until last cluster. In last cluster make leaf but sc in 3rd ch instead of sl st. Change to Turquoise
Row 3 - Lattice:
Ch4 (counts as dc+ch). 2dc between 2dc of following cluster. Ch2, 2dc between following cluster, repeat until last cluster. Ch1, dc in sc below
Row 4 - Leaf:
Ch1, turn, sc in first st, ch1, sl st between 2dc of first cluster. Turn to RS make leaf in next cluster, repeat until last cluster. Ch1, sc in 3rd ch of ch3. Change to White
Row 5 - Lattice:
Ch4. 2dc between 2dc of following cluster. Ch2, 2dc between following cluster, repeat until last cluster. Ch1, dc in sc below
Row 6 - Leaf:
Ch1, turn, sc in first st. Turn to RS make leaf in next cluster, repeat until last cluster. In last cluster make leaf but sc in 3rd ch instead of sl st. Don't fasten off
Info:
Repeat rows 3-6 alternating colors (Pale Blue, Turquoise, White) until blanket is approximately 90cm long (49 leaf rows total). Finish on Pale Blue leaf row. Bring White through loop, cut other colors
— Blanket Border
Info:
Using White and 5mm hook, RS facing
Round 1:
Ch1, 3sc in first st (corner). Along top: 2sc in ch2 space, 1sc between 2dc of cluster, repeat until last space, 3sc in last st (corner). Along side: 2sc around dc post, 1sc in sc row, 2sc around next dc post, repeat to bottom (skip leaf rows). Along bottom: 3sc in first ch (corner), sc in each ch until 1 ch left, 3sc in last ch (corner). Along other side: same as first side. Sl st in first sc to close
Round 2:
Hdc around border, 1hdc in each st and 3hdc in each corner st (middle of 3sc from round 1)
Info:
Fasten off, weave in ends
— The Loops & Buttons
Loops (Make 3):
Using White and 3.5mm hook. Place 1 in each corner and 1 in middle of same long side. Make slip knot, pull through stitch, ch5, sl st in next stitch, fasten off
Buttons (Make 3):
Using White and 3.5mm hook. Magic ring, 8hdc in ring, sl st, fasten off. Attach on opposite side from loops: 2 in corners, 1 midway between them
This enchanting 3-in-1 Ice Dragon Baby Blanket pattern brings together the best of functionality and fantasy! Designed by Crafting Happiness, this intermediate project creates a cozy blanket that magically transforms into an adorable dragon companion. The intricate lattice work with pointy leaves, dimensional dragon features, and thoughtful construction make this a truly special piece that will be treasured for years. Whether displayed as nursery decor or used as a snuggle blanket, this pattern offers endless charm and versatility. 🐉💙 Happy crocheting! 🧶✨