๐Ÿงถ Beautiful โœจ Detailed ๐Ÿ’ Adorable

Bunny Bag Pattern

Bunny Bag Pattern
3.9โ˜… Rating
2-3 Hours Time Needed
2.9K Made This
โœ‚๏ธ

Beginner Friendly Level

Perfect for those just starting their sewing journey, with clear instructions and simple techniques

โฑ๏ธ

Bite-Sized Project

Complete in under 2 hoursโ€”quick, fun, and perfect for a little creative escape.

๐Ÿงฃ

Snug Essential

Everyday comfort with practical charm, designed for both functionality and style through changing seasons.

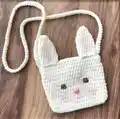
About This Bunny Bag Pattern

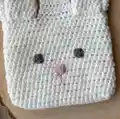
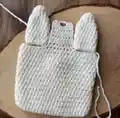
This sweet bunny bag pattern combines simple crochet techniques with adorable design elements to create a functional accessory perfect for little ones or anyone who loves cute companions. The pattern features a rectangular bag body worked in half double crochet, topped with floppy bunny ears that give it personality and charm. With embroidered facial details and optional blush coloring, you can customize your bunny's expression to make it uniquely yours.

Bunny Bag Pattern crochet pattern - detailed view of completed project

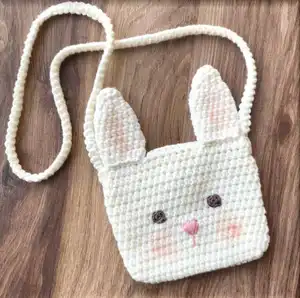
The finished bag measures approximately 11cm in length and 13cm in width, making it the perfect size for carrying small treasures like coins, keys, or tiny toys. The included cord-technique strap creates a sturdy, comfortable crossbody option that's both stylish and durable.

Why You'll Love This Bunny Bag Pattern

I absolutely adore this bunny bag pattern because it transforms basic stitches into something magical and functional at the same time. What I love most is how quickly it works upโ€”you can start crocheting in the morning and be carrying your new companion by afternoon. The cord technique for the strap was something new I learned while creating this pattern, and now I use it for all my bag projects because it creates such a professional, sturdy finish. I also appreciate how customizable it isโ€”you can leave the face simple or add as much personality as you want with the optional cheek coloring. Every time I make one, it feels like bringing a little friend to life, and the joy on people's faces when they see it makes every stitch worthwhile.

Bunny Bag Pattern step 1 - construction progress Bunny Bag Pattern step 2 - assembly progress Bunny Bag Pattern step 3 - details and accessories Bunny Bag Pattern step 4 - final assembly and finishing

Switch Things Up

I love experimenting with this bunny bag pattern because it's such a perfect canvas for creativity and personal touches. You can easily transform the entire look by switching up your color paletteโ€”imagine a soft gray bunny with pink accents, or a bold black bunny with white details for a modern twist. I've even tried working with variegated yarn that creates a magical rainbow effect across the bag body, giving it a whimsical fairy-tale quality.

For a more seasonal approach, I sometimes add small embroidered flowers around the bunny's face in spring, or tiny snowflakes in winter. You could also experiment with different facial expressions by changing the eye placement or adding embroidered details like eyelashes or a smile. I've found that using safety eyes instead of crocheted ones gives a completely different character to the bunny, making it look more like a plush toy.

The strap is another area where I love to get creativeโ€”try making it in a contrasting color, or add beads along its length for extra personality. You could even make two shorter straps instead of one long one to create a backpack-style bag. I've also experimented with adding a small pompom tail to the back of the bag, which adds an extra adorable touch that makes people smile. The possibilities are truly endless with this versatile little pattern!

Common Mistakes & How to Fix Them

โœ— Forgetting to count stitches carefully during the body rounds can lead to a misshapen bag that won't close properly or lay flat โœ— Placing the ears too far apart or unevenly can throw off the entire bunny face proportions and make it look unbalanced โœ— Rushing through the cord strap technique without watching the tutorial video often results in a twisted or loose strap that won't hold โœ— Sewing the eyes too high or too low on the bag body disrupts the sweet bunny expression and makes positioning other features difficult

Bunny Bag Pattern

Create your own adorable bunny-shaped crossbody bag with this delightful crochet pattern. Perfect for carrying small essentials, this charming bunny bag features sweet ears, embroidered facial details, and a comfortable shoulder strap. Using simple half double crochet techniques and a unique cord-style strap, you'll craft a functional accessory that's as cute as it is practical. Whether you're making it for yourself or as a heartfelt gift, this little companion will bring smiles wherever it goes.

Beginner Friendly 2-3 Hours

Materials Needed for Bunny Bag Pattern

โ€” Main Fabric

  • 01
    Alize cotton gold pratica yarn in cream color (color 63) - 220m/100gr
  • 02
    Small amount of Catania brand pink yarn for nose embroidery
  • 03
    Small amount of Catania brand brown yarn for eyes

โ€” Tools Required

  • 01
    3mm crochet hook
  • 02
    3.5mm crochet hook
  • 03
    2.2mm crochet hook
  • 04
    Wooden button
  • 05
    Needle for sewing
  • 06
    Scissors
  • 07
    Stitch marker or different colored yarn
  • 08
    Powder crayon or powder blush for cheek and ear coloring (optional)

Progress Tracker

0% Complete

โ€” Bunny Body :

Info :

Make a slst at the end of each round and begin with ch2 at the beginnings new round. With cream color yarn and 3mm hook

Foundation :

Ch22, turn back and starting from 3rd

Round 1 :

19hdc, into same st; 4hdc, Continue with otherside 18hdc, into last st; 3hdc (44)

Round 2 :

(20hdc, 2hdcinc)*2 (48)

Round 3-14 :

48hdc (48)

Info :

Fasten off and cut the yarn

โ€” Closure Piece :

Info :

Make a slst at the end of each round and begin with ch2 at the beginnings new round. Count back at the finishing point and add yarn to the 15th stitch

Round 1-6 :

8hdc (8)

Round 7 :

2hdc, ch3 (skip 3sts) starting from 4th; 3hdc

Info :

Now sew a wooden button on the back. Now you can close your bag whenever you want

โ€” Bunny Ears :

Info :

Make 2 of them. With cream color yarn and 3mm hook. Make a slst at the end of each round and begin with ch2 at the beginnings new round

Round 1 :

Into MR 6hdc (6)

Round 2 :

(2hdc, 1hdcinc)*2 (8)

Round 3 :

(3hdc, 1hdcinc)*2 (10)

Round 4 :

(1hdc, 1hdcinc)*5 (15)

Round 5-10 :

15hdc (15)

Info :

Fasten off with a slst and cut the yarn long for sewing. Fasten the ears to the 7 loops on both sides of the tiny flap in the middle of the bag. Sew the back of the ear to the back loop and the front to the front loop

โ€” Bag Strap :

Info :

With cream color yarn and 3.5mm hook. Crochet with cord technique

Instructions :

When starting, leave enough yarn for sewing. Ch2, skip first st and crochet 1sc. Rotate the cord and crochet 1sc into the loop. Turn it again and from two loops insert your hook under them, crochet 1sc. Continue the same until you reach 85cm in length

Info :

Reference video available at https://youtu.be/9VfL0iB7308. Sew the strap just side the ears. Don't cut the yarn! Sew the strap with two rows of ears and fasten them together. This way the ears will not fall off

โ€” Bunny Eyes :

Info :

Make 2 of them. With brown color yarn and 2.2mm hook

Round 1 :

Into MR 6sc

Info :

Fasten off and cut the yarn long for sewing. Count from top to bottom. Sew the eyes to the 7th row with a distance of 7hdc

โ€” Nose :

Instructions :

Embroider a tiny nose as in the photo with pink yarn and needle

Info :

Finally, you can color the cheeks and ears if you want

Assembly Instructions

  • After completing the bunny body, add the closure piece by counting back 15 stitches from the finishing point and crocheting 6 rounds of 8hdc, finishing with a buttonhole round.
  • Sew a wooden button to the back of the bag body, directly opposite the closure piece buttonhole for secure fastening.
  • Attach both ears to the 7 loops on either side of the closure flap, sewing the back of each ear to back loops and front to front loops for dimensional positioning.
  • Create an 85cm long cord-technique strap and sew it securely beside the ears on both sides of the bag.
  • Reinforce the strap attachment by sewing through two rows of the ears to prevent them from falling off during use.
  • Embroider or sew brown crocheted eyes to the 7th row of the bag body, spacing them 7hdc apart for proper bunny face proportions.
  • Add final touches by embroidering a small pink nose and optionally applying powder blush or crayon to the cheeks and inner ears for a rosy glow.

Important Notes

  • ๐Ÿ’กChains at the beginning of rounds are not counted as half double crochet stitches throughout this pattern
  • ๐Ÿ’กUse a stitch marker or contrasting colored yarn to mark the beginning of each round for accurate stitch counting
  • ๐Ÿ’กThe finished bag dimensions are approximately 11cm length and 13cm width when using the specified yarn and hook sizes
  • ๐Ÿ’กLeave long yarn tails when fastening off pieces that need to be sewn, making assembly much easier and more secure
  • ๐Ÿ’กWatch the referenced YouTube video for the cord strap technique if you're unfamiliar with this method before starting
  • ๐Ÿ’กOptional coloring with powder blush or crayon is not permanent and can be refreshed as needed or left natural

This charming bunny bag pattern brings together simple crochet techniques with irresistible cuteness to create a functional accessory everyone will adore. The combination of basic stitches, adorable facial features, and a unique cord-technique strap makes this project both accessible and rewarding. Whether you're crafting for a little one or treating yourself to something sweet, this bunny companion is ready to hop into your heart and your wardrobe. The quick completion time and customizable features mean you can make multiples in different colors for gifts or personal collection. Happy crocheting, and enjoy watching your bunny come to life! ๐Ÿฐโœจ

You ask,

we answer.

FAQs

Can I use a different yarn weight for this bunny bag pattern?

Yes, you can use different yarn weights, but keep in mind that changing yarn weight will affect the final size of your bag. If you use thicker yarn with a larger hook, your bag will be bigger, and thinner yarn with a smaller hook will create a smaller bag. Adjust your expectations accordingly and consider making a gauge swatch first.

What is the cord technique for the strap and is it difficult?

The cord technique creates a sturdy, round strap by continuously rotating your work and crocheting into specific loops. While it might seem confusing at first, the pattern includes a link to a helpful YouTube tutorial. Once you get the rhythm, it's quite simple and creates a professional-looking strap that's much sturdier than a chain strap.

How do I prevent the ears from flopping over or falling off?

The pattern instructs you to sew the ears to both the front and back loops of the closure flap, which gives them structure. Additionally, when attaching the strap, you sew through the ear rows as well, which reinforces them significantly. This double-securing method keeps the ears standing upright and prevents them from detaching.

Can I make this bag larger to hold more items?

Absolutely! To make a larger version, start with more foundation chains (instead of 22) and add more stitches in your increase rounds proportionally. You'll also want to work additional rounds in the body section. Just remember that you'll need more yarn, and you might want to use a slightly larger hook for a bigger project.

Do I need to add the cheek coloring or is it optional?

The cheek and ear coloring is completely optional! The pattern specifically mentions using powder blush for a non-permanent option. You can skip this step entirely for a classic look, use permanent fabric markers for lasting color, or use the powder method so you can refresh it whenever needed. The bunny will be adorable regardless of your choice.