🧶 Beautiful ✨ Detailed 💝 Adorable

Bumble the Bee Amigurumi Pattern

Bumble the Bee Amigurumi Pattern
4.9★ Rating
7-9 Hours Time Needed
3.8K Made This
✂️

Intermediate Level

Ideal for those with basic knitting experience, featuring slightly more advanced stitches and techniques to expand your skills.

⏱️

All-Day Adventure

Requires 8-10 hours, ideal for a full day of immersive knitting.

🐝

Charming Critter

Delightful animal designs with sweet details that capture the essence of your favorite woodland and farmyard friends.

About This Bumble the Bee Amigurumi Pattern

Bumble the Bee is an absolutely enchanting amigurumi design that transforms the beloved garden pollinator into the sweetest striped companion imaginable! This pattern features a spectacular rainbow-striped body using six different vibrant colors that create stunning visual impact and showcase your color-changing skills. The unique four-wing design creates a beautiful layered effect that looks like Bumble is ready to take flight at any moment. What really sets this pattern apart is the attention to adorable details—from the tiny crown that sits perfectly between the antennae to the little stinger on the back, every element contributes to Bumble's royal personality.

Bumble the Bee Amigurumi Pattern crochet pattern - detailed view of completed project

The pattern provides clear guidance on working through multiple color changes to create those signature bee stripes, plus special instructions for joining wing pairs together for a dimensional effect. Optional embroidered freckles and rosy blushed cheeks add the finishing touches that transform Bumble from cute to absolutely irresistible.

Why You'll Love This Bumble the Bee Amigurumi Pattern

I'm completely in love with this bee pattern because Bumble is just bursting with joyful personality and vibrant color! Working through all those color changes for the rainbow stripes is incredibly satisfying—it's like watching a rainbow come to life stitch by stitch. What I adore most is how the four-wing design creates such beautiful dimension when you crochet them together in pairs, making Bumble look like she's genuinely ready to buzz around the garden. The tiny crown is such a precious detail that makes Bumble feel like the queen bee she deserves to be! I love how the pattern encourages you to add personal touches like embroidered freckles or fabric marker dots on the cheeks—these tiny details make each Bumble completely unique. The combination of bright yellow with all those accent colors creates such a cheerful, happy vibe that makes me smile every time I look at the finished project. Plus, the optional stinger on the back is adorable rather than scary, adding just the right amount of authentic bee character without being intimidating at all!

Bumble the Bee Amigurumi Pattern step 1 - construction progress Bumble the Bee Amigurumi Pattern step 2 - assembly progress Bumble the Bee Amigurumi Pattern step 3 - details and accessories Bumble the Bee Amigurumi Pattern step 4 - final assembly and finishing

Switch Things Up

I absolutely adore experimenting with different color combinations for Bumble's rainbow stripes! While the original six-color rainbow is stunning, I've created versions using just yellow and black for a classic bumblebee look that's equally adorable. You could also try pastel rainbow stripes with soft pink, lavender, mint, and baby blue for a dreamy spring aesthetic that's absolutely enchanting.

For a seasonal twist, try autumn colors with yellow, orange, rust, and brown stripes for a harvest bee, or winter colors with white, silver, and icy blue for a magical snow bee. I've even made a Halloween version with orange and black stripes that looks fantastic as seasonal decor! The wings are another area where you can get creative—try sparkly or metallic yarn to make them shimmer, or use variegated yarn for a tie-dye rainbow effect.

The crown is such a fun element to customize! Instead of pink, try making it in gold or silver yarn for true royal bee vibes, or add tiny crocheted flowers around the base of the crown for a garden queen look. You could also skip the crown entirely and add tiny crocheted flowers to the head, or make a small flower crown that wraps around between the antennae.

For the freckles, experiment with different placements and sizes to create unique facial expressions—clusters of small dots create a sweet innocent look, while fewer larger dots give a bolder appearance. I've also tried adding embroidered eyelashes above the eyes for an extra feminine touch, or small heart shapes on the cheeks instead of freckles for Valentine's Day versions. Some makers have added tiny embroidered patterns to the body stripes like flowers or hearts for extra personalization. You could even make the stinger in a contrasting bright color like hot pink or turquoise for a punk rock bee with attitude!

Common Mistakes & How to Fix Them

✗ Not maintaining consistent tension through the multiple color changes which can create uneven stripes and affect the overall shape and appearance of the body segments ✗ Stuffing the wings when they should remain flat causing them to puff out unnaturally and preventing the layered wing pairs from laying properly against each other ✗ Forgetting to join the third and fourth wings before working round six which is essential for creating the proper four-wing layered dimensional effect ✗ Sewing the wings only at the center point instead of along the recommended corner and three stitches on each side which causes them to flop or hang incorrectly

Bumble the Bee Amigurumi Pattern

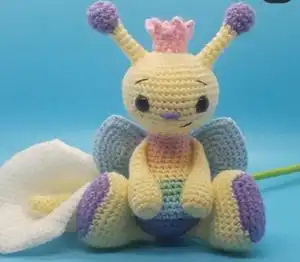
Create your own adorable Bumble the Bee with this delightful rainbow-striped amigurumi pattern! Standing 11 inches tall, this charming buzzy friend features colorful striped body segments, beautiful translucent wings, a cute little stinger, and an adorable crown. Perfect for spring decor or year-round bee lovers, Bumble combines bright yellow with purple, blue, green, orange, and pink stripes for a cheerful, whimsical appearance. This comprehensive pattern includes detailed instructions for creating every sweet element, from the antenna with pom-pom tips to those embroidered freckled cheeks that give Bumble irresistible personality and charm.

Intermediate 7-9 Hours

Materials Needed for Bumble the Bee Amigurumi Pattern

— Main Fabric

  • 01
    Worsted Weight #4 yarn approximately 50g of main color yellow
  • 02
    Worsted Weight #4 yarn approximately 25-50g accent colors including purple blue green orange pink and light blue
  • 03
    I love this yarn Buttercup for main yellow body
  • 04
    Red Heart Lavender for purple stripe sections
  • 05
    Red Heart Aqua for blue body stripes
  • 06
    I love this yarn Menthe for green accent sections
  • 07
    I love this yarn Coral for orange body stripes
  • 08
    Red Heart Bubblegum for pink decorative elements
  • 09
    Red Heart Light Blue for translucent-look wings

— Tools Required

  • 01
    D Hook or 3.25 mm crochet hook
  • 02
    12 mm safety eyes
  • 03
    14 mm oval nose
  • 04
    Scissors
  • 05
    Sewing needle
  • 06
    Stitch marker
  • 07
    Fiberfill stuffing
  • 08
    Black embroidery thread
  • 09
    White embroidery thread
  • 10
    Pipe cleaner optional for antennae structure
  • 11
    Fabric marker optional for freckle details

Progress Tracker

0% Complete

— Head :

Round 1 :

Make 6 sc into a magic ring (6)

Round 2 :

Increase in each st around (12)

Round 3 :

(sc, inc) x 6 (18)

Round 4 :

sc, inc, (2 sc, inc) x 5, sc (24)

Round 5 :

(3 sc, inc) x 6 (30)

Round 6 :

2 sc, inc, (4 sc, inc) x 5, 2 sc (36)

Round 7 :

(5 sc, inc) x 6 (42)

Round 8 :

3 sc, inc, (6 sc, inc) x 5, 3 sc (48)

Round 9-14 :

sc in each st around (48)

Infos :

Place eyes between rounds 12 and 13, leaving 10 holes between them. Place nose in between eyes between rounds 13 and 14. You may have to adjust the eye placement depending on yarn and hook size you use.

Round 15 :

3 sc, dec, (6 sc, dec) x 5, 3 sc (42)

Round 16 :

(5 sc, dec) x 6 (36)

Info :

Start stuffing the head

Round 17 :

2 sc, dec, (4 sc, dec) x 5, 2 sc (30)

Round 18 :

(3 sc, dec) x 6 (24)

Round 19 :

(2 sc, dec) x 6 (18)

Info :

F/O and leave a tail (the tail does not need to be long)

— Body :

Info :

Starting with Color B

Round 1 :

Make 6 sc into a magic ring (6)

Round 2 :

Increase in each st around (12)

Round 3 :

(sc, inc) x 6 (18)

Round 4 :

(inc, 2 sc) x 6 (24)

Round 5 :

(3 sc, inc) x 6 (30)

Round 6 :

2 sc, inc, (4 sc, inc) x 5, 2 sc (36)

Round 7-8 :

sc in each st around (36)

Info :

Change to Color C

Round 9-11 :

sc in each st around (36)

Info :

Change to Color D

Round 12-13 :

sc in each st around (36)

Round 14 :

(5 sc, dec) x 4, 8 sc (32)

Info :

Change to Color A

Round 15 :

(4 sc, dec) x 3, 14 sc (29)

Round 16 :

(dec, 7 sc) x 2, dec, 9 sc (26)

Round 17 :

3 sc, dec, 16 sc, dec, 3 sc (24)

Info :

Start stuffing the body. Change to Color E

Round 18 :

sc in each st around (24)

Round 19 :

8 sc, dec, 4 sc, dec, 8 sc (22)

Round 20 :

sc in each st around (22)

Info :

Change to Color F

Round 21 :

dec, 8 sc, dec, 10 sc (20)

Round 22 :

sc in each st around (20)

Round 23 :

(dec, 8 sc) x 2 (18)

Info :

F/O and leave a long tail for sewing

— Arms (Make 2) :

Round 1 :

Make 6 sc into a magic ring (6)

Round 2 :

Increase in each st around (12)

Round 3-6 :

Sc in each st around (12)

Info :

Stop stuffing the arms

Round 7 :

5 sc, dec, 5 sc (11)

Round 8 :

Sc in each st around (11)

Round 9 :

4 sc, dec, 3 sc, dec (9)

Round 10 :

Sc in each st around (9)

Round 11 :

7 sc, dec (8)

Round 12-16 :

Sc in each st around (8)

Infos :

F/O and leave a long tail for sewing. Tip: If you fold the arms in half and sc closed, you will have an easier time when sewing them.

— Stinger :

Round 1 :

Make 4 sc into a magic ring (4)

Round 2 :

sc in each st around (4)

Round 3 :

(inc, sc) x 2 (6)

Round 4 :

sc in each st around (6)

Round 5 :

(inc, 2 sc) x 2 (8)

Round 6-7 :

sc in each st around (8)

Info :

Start stuffing the stinger

Round 8 :

(inc, 3 sc) x 2 (10)

Round 9-10 :

sc in each st around (10)

Info :

F/O and leave a long tail for sewing

— Legs (Make 2) :

Info :

Starting with Color B: Ch 6

Round 1 :

inc in 2nd chain from hook, 3 sc, 4 sc in the last chain, working on the opposite side of the chain: 3 sc, inc (14)

Round 2 :

Inc3, 4 sc, inc3, 2 sc, inc3, 5 sc (20)

Round 3 :

inc x 3, 5 sc, inc3, 4 sc, inc3, 6 sc (27)

Info :

Change to Color A

Round 4 :

sc, inc x 3, 8 sc, inc3, 6 sc, inc3, 7 sc (34)

Round 5-7 :

sc in each st around (34)

Round 8 :

17 sc, dec x 6, 5 sc (28)

Info :

Stuff the legs as you work

Round 9 :

16 sc, dec x 4, 4 sc (24)

Round 10 :

15 sc, dec x 4, sc (20)

Round 11 :

12 sc, dec x 4 (16)

Info :

Stop stuffing the legs

Round 12 :

(dec, 6 sc) x 2 (14)

Round 13 :

sc in each st around (14)

Round 14 :

(dec, 5 sc) x 2 (12)

Round 15 :

sc in each st around (12)

Round 16 :

(dec, 4 sc) x 2 (10)

Round 17 :

sc in each st around (10)

Info :

F/O and leave a long tail for sewing

— Antennae (Make 2) :

Round 1 :

Make 6 sc into a magic ring (6)

Round 2 :

Increase in each st around (12)

Round 3-4 :

sc in each st around (12)

Round 5 :

Dec x 6 (6)

Info :

Change to Color A. Do not stuff the antennae from here on

Round 6-12 :

sc in each st around (6)

Info :

F/O and leave a long tail for sewing

— Wings (Make 4) :

Round 1 :

Make 6 sc into a magic ring (6)

Round 2 :

(inc3, sc) x 3 (12)

Round 3 :

sc, (inc3, 3 sc) x 2, inc3, 2 sc (18)

Round 4 :

2 sc, (inc3, 5 sc) x 2, inc3, 3 sc (24)

Round 5 :

3 sc, (inc3, 7 sc) x 2, inc3, 4 sc (30)

Infos :

Do not F/O the 3rd and 4th wings. Place the wings together with the back sides of each of them facing each other. Start crocheting the wings together with the next round

Round 6 :

4 sc, (inc3, 9 sc) x 2, inc3, 5 sc (36)

Info :

F/O and leave a long tail for sewing

— Crown :

Info :

Ch 12, join with a sl st to the 1st chain to make a ring. Make sure not to get your chain twisted when making a ring

Round 1-2 :

sc in each st around (12)

Round 3 :

(Ch 3, sl st in the 2nd chain from hook, sc in the next chain, sc in the next st on the crown) Repeat around

Infos :

You will have 6 crown points total. F/O and leave a long tail for sewing

Assembly Instructions

  • Cut a long strand of white embroidery thread and insert the needle into a hole on the side of the head, bring it up to a corner on the bottom of the eye, insert into a hole around the top of the eye without pulling too tightly, repeat on the second eye for highlights
  • Sew the head to the body adding stuffing when you get to the last few stitches to close properly and create smooth connection
  • Optional: Cut a piece of pipe cleaner in half, fold the half in half again and twist, then insert into the lower half of the antennae cutting excess off, or stuff them instead
  • Pin the antennae onto the head approximately between rounds 6 and 8, then sew them securely onto the head with even spacing
  • Pin the arms to the side of the body approximately between rounds 21 and 22, then sew the arms onto the body in a forward facing angle
  • Turn the body upside down with the front of the face facing away from you, pin the legs onto the bottom of the body approximately between rounds 4 and 5, then sew them on
  • Pin the crown onto the head in between the antennae positioning it centered, then sew the crown securely onto the head
  • Pin the stinger onto the back of the body approximately between rounds 6 and 8, then sew the stinger onto the back of the body
  • Bring the tail of the yarn to a corner on the wings any corner will work, pin the wings onto the back of the body approximately between rounds 15 and 16
  • Sew the wings onto the back of the body only at the one corner and three stitches on each side ensuring they are sturdy before weaving in yarn tail
  • Thread your needle with black thread and embroider eyebrows about four rounds above each eye and a small smile below the nose
  • Add rosy cheeks with actual makeup blush next to the eyes, then optionally add black freckles with fabric marker or French knots on the cheeks

Important Notes

  • 💡Use a stitch marker consistently to mark the beginning of each round for accurate stitch counts especially through color changes
  • 💡Do not join rounds unless specifically stated in the pattern, work in a continuous spiral throughout for seamless results
  • 💡All stitches are worked in both loops unless the pattern states otherwise for maintaining proper structure and tension
  • 💡Eye and nose placement may need adjustment depending on the specific yarn brand and hook size you choose to use
  • 💡Keep consistent tension through all the color changes in the body to maintain even stripes and proper shaping
  • 💡Do not stuff the wings as they need to remain flat for proper layered appearance when joined together in pairs
  • 💡The third and fourth wings must be joined together before fastening off to create the proper four-wing dimensional effect
  • 💡When sewing wings attach only at the corner and three stitches on each side not across the entire back for proper wing movement

This enchanting Bumble the Bee pattern was lovingly designed to bring a burst of rainbow joy and sweet buzzy charm into your life! The vibrant multi-colored stripes showcase your color-changing skills while creating a truly eye-catching piece that stands out from traditional bee patterns. With special features like the four-wing layered design, adorable crown, and optional embroidered freckles, Bumble is packed with personality and charm. Whether displayed as spring decor or cuddled as a beloved companion, this cheerful bee is guaranteed to brighten any space and bring smiles to all who see it. 🐝✨ Happy crocheting! 🧶💛

You ask,

we answer.

FAQs

Can I simplify the color scheme if I don't have all these colors?

Absolutely! You can make a traditional bee with just yellow and black stripes, or choose any 2-3 colors you prefer. Just maintain the same stitch counts and follow the pattern structure with your simplified color changes.

Why do I need to join the wings in pairs?

Joining the third and fourth wings together in round 6 creates a beautiful layered four-wing effect that gives Bumble realistic bee anatomy and adds wonderful dimension to the finished piece.

Do the antennae need pipe cleaners?

No, pipe cleaners are optional! They add structure and allow you to pose the antennae, but you can simply stuff them with fiberfill for a softer finish, especially if making this for young children.

How do I add the freckles?

You can use a fabric marker to draw small dots on the cheeks, or embroider them using French knots with black thread. There's a helpful YouTube tutorial link in the pattern for the French knot technique.

Can I make the wings in a different color?

Yes! While light blue creates that translucent wing effect, you could use white, sparkly yarn, or even iridescent yarn for magical fairy-like wings. The structure remains the same regardless of color.

Is the stinger safe for children?

Yes! The crocheted stinger is soft and squishy, not sharp or dangerous. It's securely sewn to the back and adds authentic bee character without any safety concerns.