About This Bumble Blossom Flower Amigurumi Pattern

It makes a fantastic 'everlasting' gift for teachers or coworkers who might not have a green thumb. It stays perfectly in bloom all year round without a drop of water!
Ideal for those with basic crocheting experience, featuring slightly more advanced stitches and techniques to expand your skills.
Takes 5-7 hours, making it an enjoyable project to finish over a couple of days.
Playful characters full of personality, designed to spark imagination and become cherished playtime favorites.
It makes a fantastic 'everlasting' gift for teachers or coworkers who might not have a green thumb. It stays perfectly in bloom all year round without a drop of water!
I’m a sucker for details, and the way the dirt has a little hole specifically for the stem to sit in is just so satisfying. It feels like real gardening but without the messy fingernails, and seeing the whole piece come together is pure magic.
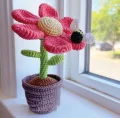
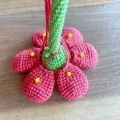
I’ve always felt that there’s something so special about crochet flowers. They never wilt, they don’t need sunlight, and they bring a permanent pop of color to any corner of the house. When I first sat down to design the Bumble Blossom, I wanted it to feel like a complete little scene rather than just a single bloom. Adding the tiny bee was a last-minute decision that ended up being my favorite part of the whole project!
One thing I really want to emphasize while you're working on this is the importance of the cardboard base. I know it’s tempting to skip the non-yarn steps, but that little circle of cardboard in the bottom of the pot makes such a huge difference in how the flower sits on a shelf. It keeps the bottom flat so it doesn't roll around like a ball! Also, if you find your stem is a bit wobbly, don't be afraid to use a bit of floral wire or even a pipe cleaner inside. It gives the flower that 'reaching for the sun' look that makes it feel alive. I hope you enjoy making this as much as I did—it’s the perfect companion for a quiet afternoon and a hot cup of tea.
This cheery little blossom is exactly what your desk or windowsill needs to brighten things up! I loved designing this because it combines the texture of a potted plant with the sweetness of a tiny bee friend. You'll get to play with some fun construction techniques, especially when putting the pot and dirt together. It's a satisfying project that results in a sturdy, self-standing decoration you'll be proud to display.
Using pink yarn, start by placing 6 sc into a mr (6)
Increase in every stitch around the circle (12)
Work a pattern of 1 sc followed by an inc, repeating 6 times (18)
Complete 6 repeats of 2 sc and then an inc (24)
Work 1 sc into every stitch across for these three rounds (24)
Cycle through 2 sc and a dec 6 times (18)
Crochet 1 sc in each stitch around for these three rounds (18)
Perform 6 sets of 1 sc and 1 dec (12)
sc in each stitch around (12)
Cut your yarn and fasten off, making sure to leave a long tail for sewing later. These petals do not require any stuffing.
Using green yarn, create a mr and work 8 sc into it (8)
Work 1 sc in every stitch around for the next 29 rounds (8)
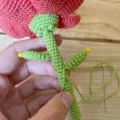
As you progress, stuff the stem very firmly. You may add a wire here for extra stability if your stitches are on the looser side.
Working in BLO, repeat a sequence of 1 sc and 1 inc 4 times (12)
Work an inc in every stitch around (24)
Repeat a pattern of 3 sc and 1 inc 6 times (30)
Work a sequence of 9 sc and 1 inc 3 times (33)
sc in every stitch around (33)
Fasten off using an invisible join. Now we will add the sepals.
Hold the stem facing upward. Attach green yarn to the remaining loops from Round 31. Work: ch 4, 3-ch picot, ch 1, then slst into the next loop. Repeat this 7 more times until you have 8 sepals in total. Fasten off and hide the ends.
Using light yellow yarn, work 6 sc into a mr (6)
Increase in every stitch around (12)
Repeat a sequence of 1 sc and 1 inc 6 times (18)
Repeat a sequence of 2 sc and 1 inc 6 times (24)
Repeat a sequence of 3 sc and 1 inc 6 times (30)
Repeat a sequence of 9 sc and 1 inc 3 times (33)
sc in every stitch around for these two rounds (33)
Fasten off and leave a long length of yarn for sewing the center to the stem.
Using green yarn, work 5 sc into a mr (5)
Work (1 sc, 1 inc) twice, then 1 sc (7)
Work (2 sc, 1 inc) twice, then 1 sc (9)
Repeat (2 sc, 1 inc) 3 times (12)
sc in every stitch around for three rounds (12)
Repeat (2 sc, 1 dec) 3 times (9)
Repeat (1 sc, 1 dec) 3 times (6)
Fasten off and leave a tail for assembly. Do not stuff the leaves.
Using light brown yarn, work 6 sc into a mr (6)
inc in every stitch (12)
Repeat (1 sc, 1 inc) 6 times (18)
Repeat (2 sc, 1 inc) 6 times (24)
Repeat (3 sc, 1 inc) 6 times (30)
Repeat (4 sc, 1 inc) 6 times (36)
Repeat (5 sc, 1 inc) 6 times (42)
Working in BLO, sc in each stitch around (42)
sc in each stitch around for three rounds (42)
Repeat (13 sc, 1 inc) 3 times (45)
sc in each stitch around for three rounds (45)
Repeat (14 sc, 1 inc) 3 times (48)
sc in each stitch around for three rounds (48)
Working in FLO, repeat (7 dc, 1 dcinc) 6 times (54)
sc in every stitch around (54)
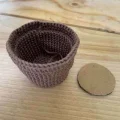
Fasten off and join invisibly. Cut a cardboard circle to fit the base of the pot for stability.
Using brown yarn, work 6 sc into a mr (6)
inc in every stitch (12)
sc in each stitch around for 12 rounds (12)
Fasten off and hide the tail. This creates the hole for the stem. Now, hold this piece with the opening up and insert your hook from the inside out to re-attach the brown yarn.
Repeat (1 sc, 1 inc) 6 times (18)
Repeat (2 sc, 1 inc) 6 times (24)
Repeat (3 sc, 1 inc) 6 times (30)
Repeat (4 sc, 1 inc) 6 times (36)
Repeat (5 sc, 1 inc) 6 times (42)
Repeat (6 sc, 1 inc) 6 times (48)
Fasten off, leaving a long tail to sew the dirt into the pot.
Using white yarn, ch 4. Starting in the 2nd ch from the hook, work: 1 sc, 1 hdc, then 5 dc in the next stitch, 1 hdc, and 1 sc (9)
Fasten off and leave a sewing tail.
Using black yarn, work 6 sc into a mr (6)
inc in every stitch around (12)
sc in each stitch around (12)
Switch to yellow yarn and sc in each stitch around for two rounds (12)
Switch to black yarn and sc in each stitch around for two rounds (12)
Add a bit of stuffing to the bee body.
Switch to yellow yarn and work 6 dec (6)
Fasten off and use the tail to cinch the remaining stitches closed.
I can't wait to see your Bumble Blossoms popping up! This project is such a joy to assemble, and that little bee is just the icing on the cake. Whether you keep it for yourself or gift it to a friend, it's sure to bring a smile to anyone's face. The way the dirt fits into the pot is such a clever bit of construction, isn't it? Happy hooking, and don't forget to share your finished photos with the community! 🧶 🌸 ✨
You certainly can! Using worsted weight yarn will result in a much larger flower (roughly 15-20cm tall). Just remember to adjust your hook size accordingly to keep the stitches tight.
The combination of the cardboard base in the pot and very firm stuffing in both the stem and the pot is key. If it still feels top-heavy, you can add some clean pebbles or glass beads to the bottom of the pot before stuffing.
It's optional! If you crochet tightly and stuff the stem firmly with fiberfill, it should stand up on its own. However, if you want to be able to bend the flower slightly, wire is a great addition.
Try using a slightly smaller hook for the wings to create a stiffer fabric, or you can use a tiny bit of fabric stiffener or hairspray to help them hold their shape once sewn on.
