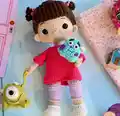
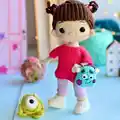
Create your own adorable Boo doll from Monsters Inc with this comprehensive crochet pattern! This detailed pattern includes instructions for making Boo complete with her iconic purple dress, Mike Wazowski, and Sullivan backpack. Perfect for Disney fans and amigurumi enthusiasts, this pattern combines multiple characters and accessories into one magical project that will bring the beloved Monsters Inc world to life in your hands.
Progress Tracker
0% Complete
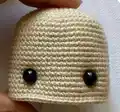
— Head :
Round 3 :
(1 sc, inc) х6 (18)
Round 4 :
(2 sc, inc) х6 (24)
Round 5 :
(3 sc, inc) х6 (30)
Round 6 :
(4 sc, inc) х6 (36)
Round 7 :
(5 sc, inc) х6 (42)
Round 8 :
(6 sc, inc) х6 (48)
Round 9 :
(7 sc, inc) х6 (54)
Round 10 :
(8 sc,inc)х6 (60)
Round 11 :
(9 sc, inc)х6 (66)
Round 12-27 :
60 sc (16 rounds)
Info :
Insert eyes between 21-22 rows in the distance of 13 sc
Round 28 :
(9 sc,dec)х6 (60)
Round 29 :
(8 sc,dec)х6 (54)
Round 30 :
(7 sc, dec) х6 (48)
Round 31 :
(6 sc, dec) х6 (42)
Round 32 :
(5 sc, dec) х6 (36)
Round 31 :
(4 sc, dec) х6 (30)
Round 32 :
(3 sc, dec) х6 (24)
Round 33 :
(2 sc, dec) х6 (18)
Info :
Cut the yarn. Hide the thread.
— Hairstyle (2 pcs) :
Round 3 :
(1 sc, inc) х6 (18)
Round 4 :
(2 sc, inc) х6 (24)
Round 5 :
(3 sc, inc) х6 (30)
Round 6 :
(4 sc, inc) х6 (36)
Round 7 :
(5 sc, inc) х6 (42)
Round 8 :
(6 sc, inc) х6 (48)
Round 9 :
(7 sc, inc) х6 (54)
Round 10 :
(8 sc, inc)х6 (60)
Round 11 :
(9 sc, inc) х6 (66)
Round 12 :
(10 sc , inc) х6 (72)
Round 13-15 :
72 sc (3 rounds)
Info :
Leave a long end for sewing.
— Bang (2 pcs) :
Round 1 :
11 ch, from second 10 sc ,ch,turn
Info :
Next, we always crochet BLO, turning rounds
Round 2-17 :
10 sc,ch,turn (16 rounds)
Info :
Leave a long end for sewing.
— Ponytail (2 pcs) :
Round 2 :
(9 sc,from second 8 sc,1 sc about 1 rnd of MR)х4
Info :
Leave a long end for sewing.
— Ears (2 pcs) :
Round 1 :
3 ch in MR, 4 hdc
Info :
Leave a long end for sewing.
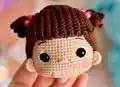
— Face Decoration :
Infos :
1. Needle sculpting for the eyes area and the eyes details. 2. Making the nose we make a stitch 3 sc long between 21-22 rows, the distance from the eye to the nose on each side is 5 sc
— Hands (2 pcs) :
Round 4 :
5 sc, bubble, 4 sc (10)
Round 5 :
(3 sc,dec)х2 (8)
Round 6-18 :
8 sc (13 rounds)
Info :
Cut the thread and hide.
— Legs (2 pcs) :
Round 1 :
8 ch, from second 6 sc, 3sc in the last chain, on the other side of the chain 5 sc, inc (16)
Round 2 :
inc, 5 sc, inc.1 sc, inc, 5 sc,inc, 1 sc (20)
Round 3 :
1 sc, inc, 5 sc,inc, 3 sc,inc, 5 sc, inc,2 sc (24)
Round 4 :
2 sc, inc, 5 sc,inc, 5 sc,inc, 5 sc, inc,3 sc (28)
Info :
Prepare the insoles. On thick cardboard or plastic, we circle the part, cut it out, try it on and put it aside. We make 2 insoles for 2 shoes at once, glue after we crochet the fifth row
Round 6-7 :
For both loops 28 sc
Round 8 :
8 sc,6 dec, 8 sc (22)
Round 9 :
7 sc, 4 dec, 7 sc (18)
Round 11 :
BLO, Change color for main (4 sc,dec)х3 (15)
Round 12-15 :
For both loops 15 sc (4 rounds)
Info :
Change color for lilac
Round 16 :
(4 sc,inc)х3 (18)
Round 18 :
For both loops 18 sc
Round 19 :
4 sc,inc,8 sc,inc, 4 sc (20)
Round 20-21 :
20 sc (2 rounds)
Round 22 :
dec,16 sc,dec (18)
Info :
Next, we crochet knees inc strictly in the center
Round 23 :
2 sc,dec, 3 sc,4 inc, 3 sc,dec, 2 sc (20)
Round 25 :
2 sc,inc, 3 sc,4 dec, 3 sc,inc, 2 sc (18)
Round 26-27 :
18 sc (2 rounds)
Round 28 :
(8 sc,inc)х2 (20)
Round 29-32 :
20 sc (4 rounds)
Info :
Cut the thread and hide.
— Legs Decoration :
Info :
We crochet the front loops of the 16th row with a purple thread, keep the foot with the foot away from us: 16 rnd: 18 sc, Cut the thread and hide. We crochet the front loops of the 10th row with a white thread, keep the foot with the foot towards us: 10 rnd: 18 sc, Cut the thread and hide.
— Body :
Round 3 :
(1 sc,inc)х6 (18)
Info :
Next, we crochet the legs, as in the photo
Round 4 :
2 sc in a circle, 4 sc with the leg (so that the legs are facing straight ahead) 6 sc in a circle, 4 sc with the leg, 2 sc in a circle (18)
Round 5 :
2 sc in a circle, on the remaining 16 sc of the legs, 6 sc in a circle, on the remaining 16 sc of the legs, 2 sc in a circle (42)
Round 6-12 :
42 sc (7 rounds)
Info :
Change color for main
Round 13 :
(12 sc,dec)х3 (39)
Round 14-17 :
39 sc (4 rounds)
Round 18 :
7 sc in a circle, 4 sc in a circle, 16 sc in a circle, 4 sc in a circle, 8 sc in a circle (39)
Round 19 :
7 sc in a circle, in the remaining 4 sc of the hand, 16 sc in a circle, in the remaining 4 sc of the hand,8 sc in a circle (39)
Round 21 :
(11 sc,dec)х3 (36)
Round 22 :
(1 sc, dec)х12 (24)
Round 23 :
(2 sc, dec) х6 (18)
Round 24-26 :
18 sc (3 rounds)
Info :
And we insert the wire frame into our hands, how to do this can be seen by clicking on the icon. Leave a long tail thread for piece attaching
— Dress :
Sleeves (2 pcs) :
Round 1 :
18 ch,sl st, close in a circle
Round 2-4 :
18 sc (3 rounds)
Round 5 :
(7 sc,dec)х2 (16)
Round 6-7 :
16 sc (2 rounds)
Info :
Cut the thread and hide
Dress Body :
Round 1 :
54 ch,sl st, close in a circle
Round 3 :
(16 sc,dec)х3 (51)
Round 5 :
(15 sc,dec)х3 (48)
Round 6-15 :
48 sc (10 rounds)
Info :
Next tie the sleeves
Round 16 :
9 sc, 6 sc with sleeve, 18 sc, 6 sc with sleeve,9 sc (48)
Round 17 :
9 sc, 10 sc in remaining sleeve loops, 18 sc, 10 sc in remaining sleeve loops, 9 sc (56)
Round 19 :
6 sc,2 dec, 8 sc,2 dec,12 sc, 2 dec, 8 sc,2 dec, 6 sc (48)
Round 20 :
5 sc,2 dec, 6 sc,2 dec,12 sc,2 dec,6 sc, 2 dec, 5 sc (40)
Info :
Cut the thread and hide. Crochet the dress in the first row, keep as shown in the photo. 1 rnd: 54 sc. Cut the thread and hide.
— Mike Wazowski :
Head + Body :
Round 3 :
(1 sc, inc) х6 (18)
Round 4 :
(2 sc, inc) х6 (24)
Round 5 :
(3 sc, inc) х6 (30)
Round 6-7 :
30 sc (2 rounds)
Round 8 :
(9 sc,inc) х3 (33)
Round 9-10 :
33 sc (2 rounds)
Round 11 :
(10 sc,inc)х3 (36)
Round 12-13 :
36 sc (2 rounds)
Round 14 :
(2 sc,dec)х9 (27)
Round 15 :
(1 sc,dec)х9 (18)
Round 16 :
(1 sc,dec)х6 (12)
Info :
Pull the hole through the front loops, cut the thread and hide.
Eye :
Round 3 :
(1 sc, inc) х6 (18)
Round 4-5 :
18 sc (2 rounds)
Info :
Leave a long end for sewing. We insert the eye into the center of the MR, burn the leg with a lighter. Sew the eye to the body, fill during sewing.
Horns (2 pcs) :
Round 1 :
14 ch ,from third 3 dc, 2 hdc,8 sc
Info :
Leave a long end for sewing.
Hands (2 pcs) :
Round 1 :
14 ch ,from second 3 sc,sl st, ( 4 ch,from second 3 sc, sl st into the loop from where they typed ch) x2, 8 sc along the remaining loops of the CH.
Info :
Leave a long end for sewing.
Legs (2 pcs) :
Round 1 :
4 ch ,from second 1 sl st, 2 hdc.
Info :
Leave a long end for sewing.
Mike Wazowski Attachment :
Infos :
We sew the eye between 3-10 rounds; We sew hands between 8-9 rounds; We sew the legs between 13-14 rounds; We sew the horns between 5-6 rounds. Embroider the mouth with a dark green thread.
— Sullivan Backpack :
Front Detail :
Round 1 :
8 ch, from second 6 sc,3 sc in the last chain, on the other side of the chain 6 sc, ch,turn (15)
Round 2 :
6 sc,inc,1 sc,inc,6 sc,ch,turn (17)
Round 3 :
6 sc,inc,3 sc,inc,6 sc,ch,turn (19)
Round 4 :
6 sc,inc,5 sc,inc,6 sc (21)
Info :
Next, we crochet the bottom side of 8 sc and now we crochet 21 sc+8 sc= 29 BLO ,crochet in a circle
Round 6-8:
For both loops 29 sc (3 rounds)
Info :
Cut the thread and hide.
Back Detail :
Round 1 :
8 ch, from second 6 sc,3 sc in the last chain, on the other side of the chain 6 sc, ch,turn (15)
Round 2 :
6 sc,inc,1 sc,inc,6 sc,ch,turn (17)
Round 3 :
6 sc,inc,3 sc,inc,6 sc,ch,turn (19)
Round 4 :
6 sc,inc,5 sc,inc,6 sc (21)
Info :
Next, we crochet the bottom side of 8 sc ,it should now only be 29 sc. Leave a long end for sewing.
Backpack Attachment :
Info :
We turn the front part inside out, then sew the back part to the front, as shown in the photo. Fill tightly.
Eyes (2 pcs) :
Round 1 :
6 sc in MR,put an eye in the center.
Info :
Leave a long end for sewing.
Horns (2 pcs) :
Round 1 :
6 ch,from second 1 sc, 2 hdc, 2 dc
Info :
Leave a long end for sewing.
Eyebrows (2 pcs) :
Round 1 :
5 ch,from third 2 hdc, sl st.
Info :
Leave a long end for sewing.
Big Spot :
Info :
Leave a long end for sewing.
Small Spot :
Info :
Leave a long end for sewing.
Loop on Top :
Info :
5 ch ,cut the thread and hide.
Side Straps (2 pcs) :
Round 1 :
21 ch,from second 20 sc
Info :
Leave a long end for sewing.
— Boo Final Assembly :
Infos :
Sew ears between 22-26 rows; We sew the head after we put on the dress. Sew the body behind the last row of the head.
This enchanting Boo doll pattern brings the beloved Monsters Inc character to life with incredible attention to detail and authentic Disney magic. The comprehensive design includes not only Boo herself with her adorable purple dress and signature hairstyle, but also mini companions Mike Wazowski and a Sullivan backpack that capture the heart of the movie. Perfect for Disney collectors and amigurumi enthusiasts who appreciate complex patterns with rewarding results, this project combines advanced techniques like needle sculpting, wire armature work, and multi-piece assembly into one showstopping creation. 🧸✨ Happy crocheting! 🧶💜