🧢 Beautiful ✨ Detailed πŸ’ Adorable

Cuddy Elephant Amigurumi Pattern

Cuddy Elephant Amigurumi Pattern
3.9β˜… Rating
3-4 Hours Time Needed
3.4K Made This
βœ‚οΈ

Intermediate Level

Ideal for those with basic knitting experience, featuring slightly more advanced stitches and techniques to expand your skills.

⏱️

Weekend Treat

Takes 5-7 hours, making it an enjoyable project to finish over a couple of days.

🧸

Cute Companion

An adorable friend to cherish, handcrafted with love to bring comfort and joy for years to come.

About This Cuddy Elephant Amigurumi Pattern

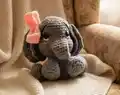
This delightful elephant amigurumi pattern brings together classic crochet techniques with adorable design details. The pattern creates a unified head and body structure, with a charming trunk that features a gentle curve. Large, expressive ears frame the face beautifully, while carefully positioned plastic eyes and embroidered details bring this little elephant to life. The addition of a sweet pink ribbon bow adds a finishing touch of whimsy that makes this elephant perfect for display or cuddles.

Cuddy Elephant Amigurumi Pattern crochet pattern - detailed view of completed project

Working in continuous spiral rounds, you'll build this elephant from the magic ring up, creating well-proportioned limbs and features. The medium difficulty level comes from shaping the trunk opening and creating the distinctive large ears that give this elephant its signature look.

Why You'll Love This Cuddy Elephant Amigurumi Pattern

I absolutely love this elephant pattern because it creates such an endearing character in a perfectly compact size! The way the trunk curves and connects to the face opening is ingenious, giving the elephant authentic proportions without complicated shaping. I appreciate how the large ears add so much personality while remaining simple to construct. The finished size makes it ideal for little hands to hold or as a charming desk decoration. What really captures my heart is how those embroidered eyebrows and rosy cheeks transform simple stitches into a face full of gentle expression. It's a pattern that rewards you with a treasured keepsake that feels both classic and utterly unique.

Cuddy Elephant Amigurumi Pattern step 1 - construction progress Cuddy Elephant Amigurumi Pattern step 2 - assembly progress Cuddy Elephant Amigurumi Pattern step 3 - details and accessories Cuddy Elephant Amigurumi Pattern step 4 - final assembly and finishing

Switch Things Up

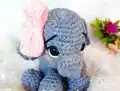
I love experimenting with this elephant pattern to create unique variations! One of my favorite modifications is changing the ribbon placement - instead of a bow on the head, I sometimes crochet a small vest or scarf around the neck for a completely different look. You could also play with the ear size by adding or removing rounds to create baby elephants with smaller ears or adding extra ruffles for even more dramatic floppy ears.

Color choices open up endless possibilities too! I've made pastel pink elephants for baby showers, bright rainbow elephants for children, and even elegant ivory elephants with gold ribbons for sophisticated dΓ©cor. Consider adding embroidered details like flowers on the ears or creating patterned ribbons with color changes. Some crafters add tiny tusks using white yarn for a more realistic touch, though I find the sweet, tuskless version perfect for gifting to young children.

For a personalized touch, try embroidering the recipient's initial on the ribbon or body. You could also create a whole elephant family by adjusting hook sizes - use a smaller hook for baby elephants or go larger for a mama elephant. The pattern works beautifully at different scales!

Common Mistakes & How to Fix Them

βœ— Forgetting to leave the 6-stitch opening in round 12 for the trunk attachment - mark these stitches with stitch markers before continuing to avoid having to undo work later βœ— Overstuffing the trunk which makes it too stiff and prevents the natural curve - the pattern specifically notes not to fill the trunk so it can drape naturally βœ— Placing the eyes too early before the trunk is attached - wait until after trunk assembly to ensure proper spacing around the trunk opening as noted in round 16 βœ— Not pinning the ears before sewing them on which can result in uneven or asymmetrical placement - take time to position and pin both ears to check balance before final attachment

Cuddy Elephant Amigurumi Pattern

Create your own adorable cuddy elephant with this charming amigurumi crochet pattern! Standing at 10cm tall, this sweet elephant features a curved trunk, large floppy ears, and a decorative pink ribbon that adds the perfect finishing touch. The pattern guides you through creating a complete elephant with detailed limbs, expressive eyes, and rosy cheeks that give it an irresistible personality. Perfect for gifting or keeping as a desk companion, this little grey elephant will bring smiles wherever it goes. The step-by-step instructions make crocheting this precious pachyderm an enjoyable and rewarding experience for crafters ready to tackle a medium-level project.

Intermediate 3-4 Hours

Materials Needed for Cuddy Elephant Amigurumi Pattern

β€” Main Fabric

  • 01
    Cotton or wool thread in Grey (main color)
  • 02
    Cotton or wool thread in White
  • 03
    Cotton or wool thread in Black
  • 04
    Cotton or wool thread in Pink

β€” Tools Required

  • 01
    Crochet hook 2.5mm
  • 02
    Wool needle
  • 03
    Plastic eyes No. 10
  • 04
    Fiberfill or padding
  • 05
    Stitch markers
  • 06
    Scissors
  • 07
    Pins
  • 08
    Blush or pink chalk for cheeks

Progress Tracker

0% Complete

β€” HEAD + BODY :

Grey

Start with grey yarn

Round 1 :

Magic ring 6sc (6)

Round 2 :

1inc at all stitches (12)

Round 3 :

(1sc, 1inc) x6 (18)

Round 4 :

(2sc, 1inc) x6 (24)

Round 5 :

(3sc, 1inc) x6 (30)

Round 6 :

(4sc, 1inc) x6 (36)

Round 7-11 :

36sc (36)

Round 12 :

9sc, (1inc) x3, 3sc, 6ch (leave 6 free stitches), 3sc, (1inc) x3, 9sc (42)

Round 13-15 :

42sc (42)

Round 16 :

(5sc, 1dec) x6 (36)

Info :

Place eyes in Round No. 10, on the sides of the opening made

Round 17 :

(4sc, 1dec) x6 (30)

Round 18 :

(3sc, 1dec) x6 (24)

Round 19 :

(2sc, 1dec) x6 (18)

Info :

Fill with stuffing

Round 20 :

(1sc, 1dec) x6 (12)

Round 21 :

(1sc, 1inc) x6 (18)

Round 22 :

(2sc, 1inc) x6 (24)

Round 23-28 :

24sc (24)

Round 29 :

(2sc, 1dec) x6 (18)

Info :

Fill with stuffing

Round 30 :

(1sc, 1dec) x6 (12)

Round 31 :

(1dec) x6 (6)

Info :

Fasten off

β€” TRUNK :

Grey

Start with grey yarn

Round 1 :

Magic ring 4sc (4)

Round 2 :

(1sc, 1inc) x2 (6)

Round 3 :

6sc (6)

Round 4 :

(2sc, 1inc) x2 (8)

Round 5 :

8sc (8)

Round 6 :

(3sc, 1inc) x2 (10)

Round 7 :

10sc (10)

Round 8 :

(4sc, 1inc) x2 (12)

Info :

Do not fill with stuffing

Info :

Leave a long yarn for sewing

Info :

Join the edge of the trunk as shown in the images, then join the trunk to the face in the opening that was left previously

Info :

Embroider the eyes and eyebrows as shown in the images

Info :

Shape the face as shown in the images

β€” EARS (x2) :

Grey

Make 2 pieces with grey yarn

Round 1 :

Magic ring 6sc (6)

Round 2 :

1inc at all stitches (12)

Round 3 :

(1sc, 1inc) x6 (18)

Round 4 :

(2sc, 1inc) x6 (24)

Round 5 :

(3sc, 1inc) x6 (30)

Round 6 :

(1dec) x2, 1sc, (3sc in the same stitch) x22, 1sc, (1dec) x2 (66)

Info :

Leave a long yarn for sewing

Info :

Pin the top to shape the ear, then pin the ears to the head

β€” LEGS (x2) :

Grey

Make 2 pieces with grey yarn

Round 1 :

Magic ring 6sc (6)

Round 2 :

1inc at all stitches (12)

Round 3 :

(1sc, 1inc) x6 (18)

Round 4 :

Taking the back chain: 18sc (18)

Round 5 :

(1sc, 1dec) x6 (12)

Info :

Fill with stuffing

Round 6 :

(1dec) x6 (6)

Round 7 :

6sc (6)

Info :

Leave a long yarn for sewing

Info :

Join the legs to the body from Round No. 25

β€” ARMS (x2) :

Grey

Make 2 pieces with grey yarn

Round 1 :

Magic ring 6sc (6)

Round 2 :

1inc at all stitches (12)

Round 3 :

(1sc, 1inc) x6 (18)

Round 4 :

Taking the back chain: 18sc (18)

Round 5 :

(1sc, 1dec) x6 (12)

Info :

Fill with stuffing

Round 6 :

(2sc, 1dec) x3 (9)

Round 7 :

9sc (9)

Round 8 :

(1sc, 1dec) x3 (6)

Round 9 :

6sc (6)

Info :

Leave a long yarn for sewing

Info :

Join the arms to the body from Round No. 21

β€” TAIL :

Grey

Start with grey yarn

Row 1 :

8ch

Row 2 :

8 slip stitches

Info :

Attach the tail to the body

β€” RIBBON :

Pink

Start with pink yarn

Round 1 :

Ring of 26ch

Round 2 :

26sc (26)

Round 3-5 :

26sc (26)

Round 6 :

8ch

Info :

Shape the ribbon by joining the last chain with the first chain as shown in the images

β€” FINISHING TOUCHES :

Info :

Apply blush on the cheeks and on the trunk as seen in the images

Info :

Join the ribbon to the head

Assembly Instructions

  • Flatten the trunk opening and sew it closed as shown in the pattern images before attaching it to the face opening created in round 12
  • Attach the trunk securely to the face opening, ensuring it's centered between the eye placements
  • Embroider white highlights on the plastic eyes and add black eyebrows above the eyes for expression
  • Pin both ears to the head to check symmetry, then sew them securely on either side of the head
  • Attach legs to the body at round 25, positioning them evenly for balance
  • Attach arms to the body at round 21, angled slightly forward for a natural pose
  • Sew the simple chain tail to the back of the body, and attach the pink ribbon bow to the top of the head between the ears

Important Notes

  • πŸ’‘Work in continuous spiral rounds without joining unless otherwise specified
  • πŸ’‘The trunk should not be stuffed so it maintains a natural curved drape
  • πŸ’‘Use stitch markers to track the 6-stitch opening in round 12 for trunk placement
  • πŸ’‘Place eyes in round 10 only after the trunk is attached to ensure proper spacing
  • πŸ’‘Pin all pieces before final sewing to check proportions and symmetry
  • πŸ’‘Stuff the body firmly but leave the neck area slightly softer for better head movement
  • πŸ’‘Apply blush or pink chalk gently with a brush for soft, natural-looking cheeks

This adorable Cuddy Elephant pattern brings gentle charm and personality to your amigurumi collection! With its distinctive curved trunk, oversized floppy ears, and sweet pink ribbon, this 10cm companion is designed to steal hearts. The pattern cleverly combines continuous rounds with thoughtful construction techniques to create authentic elephant proportions in a perfectly cuddly size. Whether you're making it as a gift for someone special or adding to your own collection of handmade treasures, this little grey elephant promises to become a beloved keepsake. 🐘🧢✨

You ask,

we answer.

FAQs

Why shouldn't I stuff the trunk?

The trunk is left unstuffed intentionally so it can have a natural curve and drape realistically. Stuffing it would make it stiff and stick straight out, losing the authentic elephant trunk appearance.

When should I attach the safety eyes?

Wait until after you've created the trunk opening in round 12 and attached the trunk to the face. This ensures proper eye placement on either side of the trunk opening, as specified in round 16 of the pattern.

How do I create the distinctive large ears?

The ears are created by working 22 sets of 3 single crochets in the same stitch around round 6, creating a ruffled edge that gives the ears their characteristic large, floppy appearance. Pin them before sewing to ensure symmetrical placement.

What does 'taking the back chain' mean in rounds 4 of the limbs?

This means you work into only the back loops of your stitches, creating a defined ridge that forms the bottom of the feet/hands. This technique gives the limbs a more finished, three-dimensional appearance.

Can I make the elephant in different colors?

Absolutely! While the pattern uses grey as the main color, you can create your elephant in any color you like. Pink elephants, blue elephants, or even rainbow elephants would all be adorable variations of this pattern.