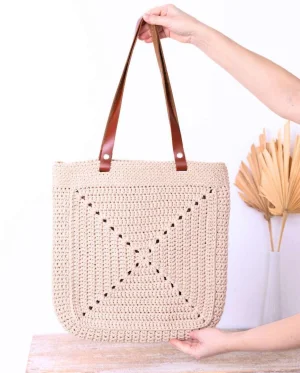
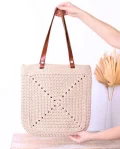
There is something so satisfying about watching a classic granny square grow into a functional, sturdy tote. I designed this pattern for those of you who want a bag that actually holds its shape without losing that handmade charm. You are going to love how the thick cord works up into a crisp, modern fabric that looks like it came straight from a high-end boutique. Whether you are heading to the beach or the local flower market, this bag is about to become your new favorite companion for every outing.
Progress Tracker
0% Complete
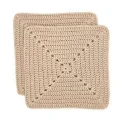
— 1. The Main Squares (Make 2) :
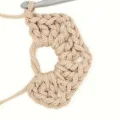
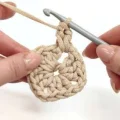
Round 1 :
Start with a MR. Inside the ring, ch3 (counts as 1dc), 2dc, [ ch2, 3dc ] repeat 3 times, ch1. Pull the ring tight and join with a sl st into the 3rd ch of your starting ch3 (12)
Info :
The ch2 spaces created in the previous round are your corners. For the next rounds, 1sc and ch1 at the start will count as 1dc.
Round 2 :
Work into the corner space directly behind your hook: (1sc, ch1, 1dc). [ 1dc in each of the next 3 st, in the corner space work (2dc, ch2, 2dc) ] repeat 3 times. 1dc in each of the next 3 st, in the final corner work (2dc, ch1, sl st into the first ch1) (28)
Round 3 :
In the corner space behind you: (1sc, ch1, 1dc). [ 1dc in each of the next 7 st, in the corner work (2dc, ch2, 2dc) ] repeat 3 times. 1dc in each of the next 7 st, in the final corner work (2dc, ch1, sl st) (44)
Round 4 :
In the corner space behind you: (1sc, ch1, 1dc). [ 1dc in each of the next 11 st, in the corner work (2dc, ch2, 2dc) ] repeat 3 times. 1dc in each of the next 11 st, in the final corner work (2dc, ch1, sl st) (60)
Round 5 :
In the corner space behind you: (1sc, ch1, 1dc). [ 1dc in each of the next 15 st, in the corner work (2dc, ch2, 2dc) ] repeat 3 times. 1dc in each of the next 15 st, in the final corner work (2dc, ch1, sl st) (76)
Round 6 :
In the corner space behind you: (1sc, ch1, 1dc). [ 1dc in each of the next 19 st, in the corner work (2dc, ch2, 2dc) ] repeat 3 times. 1dc in each of the next 19 st, in the final corner work (2dc, ch1, sl st) (92)
Round 7 :
In the corner space behind you: (1sc, ch1, 1dc). [ 1dc in each of the next 23 st, in the corner work (2dc, ch2, 2dc) ] repeat 3 times. 1dc in each of the next 23 st, in the final corner work (2dc, ch1, sl st) (108)
Round 8 :
In the corner space behind you: (1sc, ch1, 1dc). [ 1dc in each of the next 27 st, in the corner work (2dc, ch2, 2dc) ] repeat 3 times. 1dc in each of the next 27 st, in the final corner work (2dc, ch1, sl st) (124)
Round 9 :
In the corner space behind you: (1sc, ch1, 1dc). [ 1dc in each of the next 31 st, in the corner work (2dc, ch2, 2dc) ] repeat 3 times. 1dc in each of the next 31 st, in the final corner work (2dc, ch1, sl st) (140)
Finishing :
Cut the cord leaving a 15cm tail. Pull the tail through the last loop, use a needle to create an invisible join, and weave the end into the wrong side. Repeat all steps for a second square.
— 2. Side Panel (Gusset) :
Row 1 :
Starting in the 2nd ch from hook, work 10sc, ch1, turn (10)
Row 2 :
skip the first st, 8sc, inc in the last st, ch1, turn (10)
Row 3-109 :
skip the very first st, work 10sc (ensure the 10th sc is worked slightly into the side to keep the edge straight), ch1, turn (10)
Note :
Do not cut the cord after finishing Row 109; you will use it for assembly.
— 3. Bag Assembly :
Info :
Steam your pieces flat before joining to ensure the edges match up perfectly.
Joining Square 1 :
Place one square right-side up. Using sl st, join the side panel to three sides of the square, working through both thicknesses (109 sl st)
Bottom Transition :
Work 1 sl st, turn to the wrong side, and work 9sc across the short end of the side panel to reach the other side of the bag.
Joining Square 2 :
Take the second square and join it to the other side of the panel using sl st (110 sl st)
— 4. Top Edging & Finish :
Round 1 :
Work sc evenly all around the top opening of the bag.
Round 2-7 :
Work in a continuous spiral. Crochet 6 rounds of sc BLO. For a sturdier finish, insert your hook through both the back loop and the 3rd loop directly behind it.
Finishing :
At the end of the final round, work 4 sl st to level the height. Cut the cord, weave in the ends invisibly with a needle, and secure on the inside.
— 5. Handle Variant 1 (Crochet) :
Placement :
Lay the bag flat and place 4 markers for the handles. Leave a gap of 24 stitches between the markers on each side.
Round 1 :
Work sc until the first marker, ch60, skip to the second marker and sc into the next st. sc until the third marker, ch60, skip to the fourth marker and sc into the next st. sc to the end of the round.
Round 2-4 :
Work 3 rounds of sc BLO across all stitches and chains. Finish at the side fold with 4 sl st and weave in ends.
— 6. Handle Variant 2 (Holes for Handles) :
Round 1-3 :
Work 3 rounds of sc BLO around the top of the bag.
Round 4 :
Work sc BLO to the first handle marker. ch3, skip 3 st, then sc BLO to the next marker. Repeat for all 4 handle markers to create holes.
Round 5-6 :
Work 2 more rounds of sc BLO. Finish on the side and insert your leather or button-on handles through the holes.
— 7. Handle Variant 3 (Sewn Handles) :
Round 1-6 :
Work 6 rounds of sc BLO around the top of the bag.
Finishing :
Fasten off and sew your leather handles directly onto the bag fabric using a sturdy needle and matching cord.
You have just finished a truly beautiful piece of functional art! There is nothing quite like the feeling of carrying a bag you made with your own two hands, especially one as sturdy and stylish as this. I hope this pattern brought you a few hours of peaceful stitching and that your new tote accompanies you on many wonderful adventures. Don't forget to show it off—you've earned all the compliments coming your way! Happy making, and I can't wait to see what colors you chose for your masterpiece. 🧶 ✨ 👜