๐Ÿงถ Beautiful โœจ Detailed ๐Ÿ’ Adorable

Mini Crossbody Bag Crochet Pattern

Mini Crossbody Bag Crochet Pattern
4.4โ˜… Rating
6-8 Hours Time Needed
3.2K Made This
โœ‚๏ธ

Intermediate Level

Ideal for those with basic knitting experience, featuring slightly more advanced stitches and techniques to expand your skills.

โฑ๏ธ

Weekend Treat

Takes 5-7 hours, making it an enjoyable project to finish over a couple of days.

โœจ

Stylish Touch

An elegant detail to elevate any look, combining traditional techniques with contemporary design sensibilities.

About This Mini Crossbody Bag Crochet Pattern

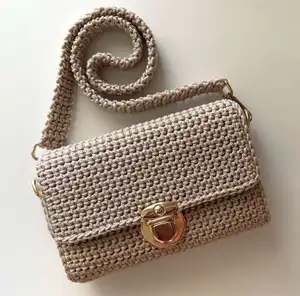
This mini crossbody bag pattern uses a special technique where you crochet through both the back loop of the current row and the back loop of the previous row, creating a gorgeous ribbed texture that's sturdy and professional-looking. The bag is worked in rows to create a long rectangular piece that's then folded and assembled with separately crocheted side panels. The result is a structured, fashionable accessory with clean lines and a modern aesthetic that you'll be proud to carry or gift.

Mini Crossbody Bag Crochet Pattern crochet pattern - detailed view of completed project

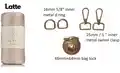
The pattern uses durable macrame cord for structure and longevity, with metal hardware including D-rings and a bag lock closure for a polished, store-bought finish. The adjustable handle can be customized to your preferred length for comfort.

Why You'll Love This Mini Crossbody Bag Crochet Pattern

I absolutely love this pattern because it teaches you a stunning textured stitch technique that looks incredibly professional once completed. The ribbed fabric has such beautiful structure and drape, and working with macrame cord means your finished bag will hold its shape perfectly for years to come. I'm always impressed by how the simple single crochet technique transforms into something so elegant and modern. Plus, there's something so satisfying about adding the metal hardware and seeing your handmade creation look like it came from a boutique. This is one of those patterns that really showcases what crochet can do beyond traditional projects!

Mini Crossbody Bag Crochet Pattern step 1 - construction progress Mini Crossbody Bag Crochet Pattern step 2 - assembly progress Mini Crossbody Bag Crochet Pattern step 3 - details and accessories Mini Crossbody Bag Crochet Pattern step 4 - final assembly and finishing

Switch Things Up

I love experimenting with different color combinations for this crossbody bag pattern! While the original uses a neutral single-color approach, you could create stunning color-blocked versions by switching colors every 15-20 rows on the main piece. Imagine a gradient effect from cream to dusty rose, or bold stripes in black and white for a modern graphic look.

For a more bohemian vibe, I've tried using natural jute or hemp cord instead of polypropylene, which gives the bag an earthy, rustic texture perfect for summer. You could also add embellishments like crocheted flowers, tassels on the bottom corners, or even embroider patterns onto the flap before attaching the hardware.

If you want to make it more casual, skip the metal clasp and use a simple button closure with a crocheted loop instead. For an evening bag version, I'd recommend using metallic cord or adding beads to the handle for extra sparkle. The side panels are also a great place to experiment - try making them in a contrasting color or adding a small pocket to one side for extra functionality.

Common Mistakes & How to Fix Them

โœ— Not maintaining consistent tension throughout can cause the bag to warp or become uneven in width and appearance โœ— Forgetting to crochet through both the back loop of the current row and previous row will lose the signature ribbed texture โœ— Skipping the steaming and blocking step can result in a bag that doesn't have clean rectangular lines and proper shape โœ— Attaching hardware before weaving in ends can make it difficult to properly secure yarn tails and create a neat finish

Mini Crossbody Bag Crochet Pattern

Create your own stylish mini crossbody bag with this detailed crochet pattern! This elegant accessory features a unique textured stitch technique that creates a beautiful ribbed fabric perfect for everyday use. The pattern includes complete instructions for the main bag body, side panels, adjustable handle, and professional finishing with metal hardware. Whether you're heading out for errands or a night out, this compact bag is the perfect size to hold your essentials while adding a handmade touch to any outfit.

Intermediate 6-8 Hours

Materials Needed for Mini Crossbody Bag Crochet Pattern

โ€” Main Fabric

  • 01
    Sensy 2mm macrame cord (100% polypropylene, 230m/251 yards per 200g skein) approximately 251 yards total
  • 02
    Alternative: Any 2mm macrame cord or similar weight cord

โ€” Tools Required

  • 01
    Crochet hook 3.50mm (E/4)
  • 02
    Measuring tape
  • 03
    Scissors
  • 04
    Stitch markers
  • 05
    Tapestry needle
  • 06
    16mm (5/8 inch) inner metal D-rings (2 pieces)
  • 07
    46mm ร— 44mm bag lock clasp
  • 08
    25mm (1 inch) inner metal swivel clasp or carabiner
  • 09
    Steaming iron or steamer

Progress Tracker

0% Complete

โ€” STEP 1: MAIN PART

Setup :

Leave a long tail of yarn approximately 25cm (10 inches) and make 31 chain stitches

Row 1 :

30 sc, 1 ch, turn

Row 2 :

Lay the long tail on top and crochet it into the row. Work 30 sc inserting hook into back loop of current row and loop of foundation chain, 1 ch, turn. Straighten fabric and adjust with long tail so first rows aren't overstretched

Row 3 :

Work 30 sc inserting hook into back loop of current row and back loop of previous row, 1 ch, turn

Rows 4-90 :

Repeat Row 3 until piece measures 35-36cm (13.8-14 inches) in length. Straighten, steam, and shape into clear rectangle. Mark bottom and sides with stitch markers: 11cm from each end and 3cm from edges

โ€” STEP 2: BAG SIDES (MAKE 2)

Setup :

Make 5 chain stitches

Row 1 :

4 sc, 1 ch, turn

Row 2 :

Continue with main pattern: 4 sc, 1 ch, turn

Rows 3-25 :

4 sc, 1 ch, turn

Row 26 :

4 sl-sts. Cut working yarn. Straighten and steam the side piece. Final size: 3cm ร— 10cm

โ€” STEP 3: ASSEMBLY

Attach Left Side :

Place left side piece onto main part and connect corners. Insert hook into back loop of main part and front loop of side piece (3 loops on hook), pull yarn through all 3 loops. Work slip stitches along three sides of bag side piece

Continue Edging :

Don't cut yarn. Continue slip stitches along main part to corner, then to middle of closing flap. Cut yarn

Attach Right Side :

Attach right bag side in same way. Weave in yarn ends. Mark center of flap

Add Hardware :

Attach lock to upper flap, then corresponding part to main bag body. Sew D-rings to bag sides for handle attachment

โ€” STEP 4: HANDLE

Setup :

Leave long tail approximately 15cm (6 inches). Make 4 chain stitches

Row 1 :

3 sc, 1 ch, turn

Row 2 :

Continue with main pattern: 3 sc, 1 ch, turn

Row 3 :

3 sc, 1 ch, turn

Rows 4-146 :

Continue pattern until desired length reached (67cm/26 inches recommended, or approximately 146 rows). Attach handle to carabiners. Weave in yarn ends

Final Step :

Attach handle to bag and it's ready to use

Assembly Instructions

  • Steam and block the main rectangular piece to ensure clean edges and proper measurements before assembly begins
  • Attach the left side panel first by aligning corners and working slip stitches through back loop of main part and front loop of side piece
  • Continue slip stitching along the main part edge up to the center of the flap for a clean finish
  • Repeat the same process for the right side panel, ensuring symmetrical placement on both sides
  • Attach the bag lock clasp to the flap center, securing the top portion to the flap and bottom portion to the bag body
  • Sew D-rings securely to both side panels at the desired height for handle attachment
  • Attach the completed handle to the D-rings using the metal swivel clasps or carabiners for easy removal

Important Notes

  • ๐Ÿ’กGauge is critical for this pattern - make sure to achieve 17 sc ร— 13 rows = 4 inches to ensure proper bag sizing
  • ๐Ÿ’กThe special stitch technique requires crocheting through back loops of both current and previous rows for the ribbed texture
  • ๐Ÿ’กSteam blocking is essential to achieve the professional structured look and rectangular shape of the finished bag
  • ๐Ÿ’กUse stitch markers to track the fold lines on the main piece before assembly to ensure accurate bag proportions
  • ๐Ÿ’กWhen working with macrame cord, maintain consistent tension as this material doesn't have as much give as traditional yarn
  • ๐Ÿ’กWeave in all ends securely before attaching hardware to prevent them from working loose over time
  • ๐Ÿ’กA video tutorial is referenced in the pattern for the joining technique if you need visual guidance

This sophisticated mini crossbody bag pattern combines function and fashion in one stunning accessory! The unique ribbed stitch technique creates a textured fabric that's both beautiful and durable, while the professional hardware finishing gives it that boutique-quality look. Perfect for carrying your essentials with handmade style, this bag proves that crochet accessories can be modern, chic, and incredibly practical. ๐Ÿงถ Happy crocheting and enjoy your new favorite accessory! โœจ๐Ÿ‘œ

You ask,

we answer.

FAQs

Can I use regular yarn instead of macrame cord for this bag?

While you can use yarn, macrame cord is recommended because it provides structure and durability that regular yarn doesn't offer. If using yarn, choose a tightly twisted cotton or acrylic in a similar weight and be aware your bag may not hold its shape as well over time.

What does it mean to crochet through the back loop of the previous row?

This special technique creates the ribbed texture. You insert your hook through both the back loop of the stitch you're currently working in AND the back loop of the stitch from the row below it. The pattern includes video references to help visualize this technique.

How do I adjust the size of the bag if I want it larger or smaller?

To adjust width, add or subtract chains in the foundation chain (each stitch adds approximately 0.5cm). To adjust height, work more or fewer rows before folding. Remember to adjust the side panel length proportionally to match your new dimensions.

Where can I find the metal hardware mentioned in the pattern?

Bag hardware including D-rings, clasps, and locks can be found at craft stores, online retailers like Etsy or Amazon, or specialty bag-making supply websites. Make sure to get the sizes specified: 16mm D-rings and 46mm ร— 44mm bag lock.

Is steaming and blocking really necessary for this project?

Yes, steaming is crucial for this pattern! It helps set the shape, creates clean rectangular lines, and gives the bag that professional structured appearance. Without blocking, the edges may curl or appear uneven.