๐Ÿงถ Beautiful โœจ Detailed ๐Ÿ’ Adorable

Bobby the Pencil Amigurumi Pattern

Bobby the Pencil Amigurumi Pattern
4.2โ˜… Rating
5-6 Hours Time Needed
3.0K Made This
โœ‚๏ธ

Advanced Level

Designed for experienced knitters, these patterns involve intricate designs and complex techniques to challenge and inspire.

โฑ๏ธ

Weekend Treat

Takes 5-7 hours, making it an enjoyable project to finish over a couple of days.

๐Ÿฐ

Whimsical Buddy

Playful characters full of personality, designed to spark imagination and become cherished playtime favorites.

About This Bobby the Pencil Amigurumi Pattern

Bobby the Pencil showcases exceptional technical skill with intricate color changes throughout the body that replicate the iconic yellow and ivory stripe pattern found on classic wooden pencils. The pattern begins with the black pencil tip and smoothly transitions through multiple color sections using strategic changes that create clean lines. What makes this pattern truly unique is the dimensional mouth construction - you'll create an opening using chain stitches and slip stitches worked in back loops only, then sew in a separate black inner mouth piece and pink tongue for incredible three-dimensional detail. The gray metal band is created using back post single crochet for authentic texture, and the pink eraser top is shaped with careful increases and decreases.

Bobby the Pencil Amigurumi Pattern crochet pattern - detailed view of completed project

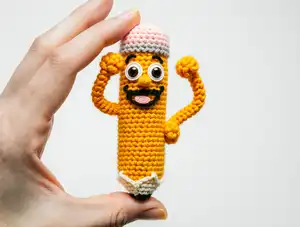
The pattern features wire-reinforced poseable arms with adorable little thumbs, allowing you to position Bobby in various creative poses. Detailed embroidery adds personality with white eye highlights, expressive eyebrows, and a sweet nose that brings this stationary character to life.

Why You'll Love This Bobby the Pencil Amigurumi Pattern

I'm absolutely head over heels for this Bobby the Pencil pattern because it transforms such an ordinary everyday object into the most charming character with so much personality. There's something incredibly satisfying about working through those precise color changes that create the yellow stripes against the ivory background - when you see that authentic pencil pattern emerging, you'll feel like a true amigurumi artist. The mouth construction is pure genius and unlike anything I've worked before - creating that open mouth with the dimensional interior and little pink tongue sticking out adds such character and charm. I especially love the challenge of the back post single crochet sections that create the realistic metal band texture. Working with wire to make the arms poseable means Bobby can wave, point, or be positioned holding things, which opens up endless display possibilities. The tiny thumbs on the hands are such a sweet detail that shows real craftsmanship. Embroidering Bobby's expressive face is where the magic really happens - those eyebrows and eye highlights give him such personality that he practically comes alive. This isn't just a pencil; it's a little friend with attitude who'll inspire creativity on any desk or shelf. Every writer, artist, teacher, or student in your life needs a Bobby!

Bobby the Pencil Amigurumi Pattern step 1 - construction progress Bobby the Pencil Amigurumi Pattern step 2 - assembly progress Bobby the Pencil Amigurumi Pattern step 3 - details and accessories Bobby the Pencil Amigurumi Pattern step 4 - final assembly and finishing

Switch Things Up

I absolutely love personalizing Bobby for different occasions and recipients by changing his color scheme and accessories. For a more artistic vibe, I make Bobby look like colored pencils by using the entire body in a single vibrant color - deep purple, bright red, electric blue, or grass green - while keeping the black tip, gray band, and pink eraser. This creates a whole set of rainbow pencil friends that look amazing displayed together. For mechanical pencil versions, I work the entire body in gray or silver tones, skip the wood-striped section entirely, and add small black lines with embroidery to mimic the grip texture.

Seasonal variations bring Bobby to different celebrations throughout the year. A Christmas pencil uses red and green stripes instead of yellow and ivory, with the eraser worked in white like a snow cap. For Halloween, orange and black stripes with a purple eraser create a spooky stationary friend. Valentine's Day Bobbys work beautifully in pink and white stripes with a red eraser - I even embroider little hearts onto the body. Back-to-school versions can feature school colors, making them perfect personalized gifts for teachers or students.

Size variations are fun to experiment with too. Using thread weight yarn and a 1mm hook creates tiny 8cm pencils perfect as keychains, zipper pulls, or bag charms - just skip the wire armature for these mini versions. Going larger with bulky yarn and a 4mm hook produces a 25cm Bobby that works as a decorative pillow or doorstop. I've even made giant 40cm versions using super bulky yarn that kids love as quirky floor cushions.

The facial expressions can be customized endlessly through embroidery changes. Sleepy Bobby gets closed curved lines for eyes and a small yawning mouth. Surprised Bobby has wide round eyes with raised eyebrows. Grumpy Bobby gets angled eyebrows and a frowning expression. You can even add accessories like tiny crocheted glasses, a miniature hat, or a little bowtie. For teacher gifts, I sometimes embroider "World's Best Teacher" or grade levels onto the pink eraser section using backstitch with contrasting thread. The possibilities are as endless as your imagination!

Common Mistakes & How to Fix Them

โœ— Not maintaining consistent color change technique when creating the yellow stripe pattern, resulting in uneven or messy color transitions throughout the pencil body โœ— Incorrectly working the slip stitch round for the mouth opening by missing the back loops only instruction, creating improper texture โœ— Forgetting to sew the inner mouth piece before completing too many body rounds, making it difficult to access and attach securely โœ— Not trimming and properly isolating wire ends with band-aids before inserting into body, which can poke through fabric and cause injury โœ— Placing plastic eyes at wrong position relative to mouth upper line, throwing off the entire facial expression and proportion โœ— Overstuffing the arms which should remain unstuffed to allow wire movement and proper posing flexibility throughout use

Bobby the Pencil Amigurumi Pattern

Bring school supplies to life with this charming Bobby the Pencil amigurumi pattern! Standing at 15cm (5.9 inches) tall, this playful character features authentic pencil details including a black tip, ivory wood section with yellow stripe pattern, gray metal band, and pink eraser top. Bobby comes with an adorable personality complete with embroidered facial features, a dimensional mouth with black interior and pink tongue, plastic safety eyes, and poseable wire-reinforced arms with tiny thumbs. The pattern uses multiple color changes to recreate realistic pencil markings and includes detailed instructions for creating the open mouth using slip stitches and chain work. Perfect as a back-to-school gift, teacher appreciation present, or desk buddy for writers and artists, this whimsical pencil character adds fun and creativity to any space!

Advanced 5-6 Hours

Materials Needed for Bobby the Pencil Amigurumi Pattern

โ€” Main Fabric

  • 01
    YarnArt Jeans or Alize Cotton Gold cotton/semi-cotton yarn (~160m/50g or 174yds/1.75oz) in yellow
  • 02
    YarnArt Jeans or Alize Cotton Gold in black
  • 03
    YarnArt Jeans or Alize Cotton Gold in ivory
  • 04
    YarnArt Jeans or Alize Cotton Gold in gray
  • 05
    YarnArt Jeans or Alize Cotton Gold in pink
  • 06
    YarnArt Jeans or Alize Cotton Gold in white (for embroidery)
  • 07
    Less than one ball of each color required

โ€” Tools Required

  • 01
    1.75-2mm crochet hook
  • 02
    10mm plastic safety eyes (1 pair)
  • 03
    1-1.5mm aluminum or copper wire for poseable arms
  • 04
    Band-aids to wrap wire ends for safety
  • 05
    Yarn sewing needles
  • 06
    Stitch markers
  • 07
    Pins with large heads
  • 08
    Scissors
  • 09
    Polyester fiberfill stuffing

Progress Tracker

0% Complete

โ€” Inner Part of the Mouth :

Info :

Black yarn, 1.75 mm hook

Round 1 :

6 SC in MR (6)

Round 2 :

6 INC (12)

Round 3 :

(SC, INC)*6 (18)

Round 4 :

(2 SC, INC)*6 (24)

Round 5 :

(3 SC, INC)*6 (30)

Finishing :

Fix the thread and leave a long ending for sewing

โ€” Tongue :

Info :

Pink yarn, 1.75 mm hook

Round 1 :

6 SC in MR (6)

Round 2 :

6 INC (12)

Round 3 :

3 SC, CH, turn the detail (3)

Round 4 :

3 SC in the other direction

Finishing :

Fix the thread and leave a long ending for sewing, withdraw the initial thread from the MR to the last row

โ€” Body :

Info :

Start with black yarn, 1.75 mm hook. Stuff in process

Round 1 :

3 SC IN MR (3)

Round 2 :

3 INC (6)

Round 3 :

(SC, INC)*3 (9)

Round 4 :

(2 SC, INC)*3 (12)

Info :

Change the color to ivory

Round 5 :

(3 SC, INC)*3 (15)

Round 6 :

(4 SC, INC)*3 (18)

Round 7 :

(5 SC, INC)*3 (21)

Round 8 :

(6 SC, INC)*3 (24)

Info :

In Round 9 begin to change the thread color in turn

Round 9 :

(3 SC, change the color to yellow, SC, change the color to ivory)*6 (24)

Round 10 :

2 SC, (change the color to yellow, 3 SC, change the color to ivory, SC)*5, change the color to yellow, 2 SC (24)

Info :

Further, there are repeated rounds; if you want a longer pencil, just work extra repeated rounds

Round 11-24 :

14 rounds 24 SC

Round 25 :

5 SC, INC, 12 SC, INC, 5 SC (26)

Round 26 :

6 SC, INC, 12 SC, INC, 6 SC (28)

Round 27 :

7 SC, INC, 12 SC, INC, 7 SC (30)

Round 28 :

7 SC, 16 SS back loops only, 7 SC (30)

Round 29 :

6 SC, chain 18, skip 18 St, 6 SC (12)

Round 30 :

6 SC, 18 SC on the chain, 6 SC (30)

Info :

Further, there are repeated rounds (Rounds 31-38); after you would crochet 3 rounds, fix the mouth inner part โ€“ sew it, as shown in the photo: on the top โ€“ hooking up black front loops and yellow loops of the chain, from below hooking up black and yellow front loops; fix with a stitch the middle part of the mouth and the body from the other side, so that the fiber filling does not push the black part out

Round 31-38 :

7 rounds 30 SC

Round 39 :

(4 SC, INC)*6 (36)

Info :

Insert plastic eyes 4 rounds higher than mouth upper line at the distance of 6 SC. Fix with the thread the middle of the mouth from the other side

Info :

Change the color to gray

Round 40 :

36 SC front loops only (36)

Round 41 :

36 BPSC (36)

Round 42-43 :

2 rounds 36 SC

Round 44 :

36 BPSC (36)

Info :

Change the color to pink

Round 45 :

(5 SC, INC)*6 (42)

Round 46 :

(6 SC, INC)*6 (48)

Round 47-49 :

3 rounds 48 SC

Round 50 :

(6 SC, DEC)*6 back loops only (42)

Round 51 :

(5 SC, DEC)*6 (36)

Round 52 :

(4 SC, DEC)*6 (30)

Round 53 :

(3 SC, DEC)*6 (24)

Round 54 :

12 DEC (12)

Round 55 :

6 DEC (6)

Finishing :

Tighten the hole, fix the thread and hide the ending inside. Embroider the white of the eye on the sides, eyebrows and nose. Sew the tongue

โ€” Arms (2 Details) :

Info :

Yellow yarn, 1.75 mm hook. Don't stuff

Round 1 :

3 SC IN MR (3)

Round 2 :

3 INC (6)

Round 3 :

(SC, INC)*3 (9)

Round 4 :

9 SC (9)

Round 5 :

Chain 3, (start in the 2nd chain from the hook) 2 SC on the chain, 9 SC (9+2 on thumb)

Round 6 :

9 SC (9)

Round 7 :

(SC, DEC)*3 (6)

Round 8-17 :

10 rounds 6 SC

Finishing :

Fix the thread and leave a long ending for sewing

Assembly Instructions

  • After crocheting 3 rounds past the mouth opening (rounds 31-33), sew the black inner mouth piece to the body by hooking up black front loops with yellow chain loops on top, and black with yellow front loops below.
  • Secure the middle part of the mouth to the opposite side of the body interior with stitches to prevent fiber filling from pushing the black mouth piece outward.
  • Insert plastic safety eyes 4 rounds higher than the mouth upper line with 6 SC distance between them, and secure the mouth middle from the other side with thread.
  • After completing the body, embroider white highlights on the sides of the eyes, add expressive eyebrows above the eyes, and embroider a nose below the eyes using appropriate yarn colors.
  • Sew the pink tongue piece to the inside of the mouth opening for dimensional detail.
  • Insert aluminum or copper wire into the completed body, trim ends, bend tips, and isolate with band-aids ensuring wire length on each side equals arm length.
  • Place the unstuffed arms onto the wire extensions protruding from the body and sew them securely in place for poseable movement.

Important Notes

  • ๐Ÿ’กMaintain consistent crocheting density and tension throughout, adjusting hook size based on your personal crocheting method and style
  • ๐Ÿ’กPattern uses U.S. crochet terminology throughout all instructions
  • ๐Ÿ’กIf you want a longer pencil body, simply work additional repeated rounds in the rounds 11-24 section before continuing
  • ๐Ÿ’กAlways use stitch markers to track your position in continuous spiral rounds, especially during complex color changes
  • ๐Ÿ’กArms must remain completely unstuffed to allow wire movement and proper posing flexibility
  • ๐Ÿ’กWhen working back post single crochet for the metal band, insert hook from wrong side into gap then around post from front to back
  • ๐Ÿ’กTrim wire ends and wrap them securely with band-aids before inserting into body to prevent injury and fabric damage

This delightfully naughty Bobby the Pencil pattern was designed to bring joy, personality, and creative inspiration to writers, artists, students, and teachers everywhere! With his cheeky expression, adorable dimensional mouth with peeking tongue, and poseable wire-reinforced arms that let you create endless fun poses, Bobby is so much more than just a desk decoration. The intricate color work recreates an authentic wooden pencil appearance while the advanced techniques challenge your skills and result in a truly impressive finished piece. Whether perched on a desk, displayed on a shelf, or given as a heartfelt handmade gift, Bobby will inspire creativity and bring smiles wherever he goes! โœ๏ธ๐Ÿงถ Happy crocheting! ๐Ÿ“โœจ

You ask,

we answer.

FAQs

How do I create the yellow stripe pattern on the pencil body?

The stripe pattern is created through strategic color changes within rounds 9-10 and continued through round 24. You'll alternate between ivory and yellow yarn mid-round, changing colors at specific stitch counts to create the diagonal stripes characteristic of wooden pencils. The pattern gives exact instructions for when to change: in round 9, you work 3 SC ivory, change to yellow for 1 SC, then back to ivory, repeating this sequence. Each subsequent round shifts the color change position slightly to create the diagonal effect.

What's the technique for creating Bobby's dimensional mouth opening?

The mouth is created using a clever multi-step process. First, you work slip stitches in back loops only to create texture in round 28. Then in round 29, you chain 18 and skip 18 stitches, creating an opening. Round 30 works single crochet back across that chain, forming the mouth structure. After working 3 more rounds, you sew a separately crocheted black circle into this opening, attaching it to both the chain loops and front loops. This creates a realistic three-dimensional open mouth that the pink tongue piece is then sewn into.

Why are the arms left unstuffed and how do I make them poseable?

The arms must remain unstuffed to allow the internal wire to move freely, creating poseable limbs. After completing the body, you insert aluminum or copper wire (1-1.5mm) into the body, with equal lengths extending from each side. Trim the wire to match your arm length, bend the sharp ends, and wrap them with band-aids for safety. Slide the unstuffed arms onto these wire extensions and sew them in place. The wire allows you to pose Bobby waving, pointing, or holding small objects.

How do I work back post single crochet for the metal band section?

Back post single crochet (BPSC) creates the textured appearance of a metal pencil ferrule. The pattern includes a two-step photo tutorial: Step 1 - Insert your hook from the wrong side of the fabric into the gap on the hook-side of the next stitch. Step 2 - Insert the hook from front to back around the post into the far side. Then complete the single crochet as normal. This technique makes the stitches recede, creating dimensional texture that mimics real metal banding.

Can I make Bobby longer or shorter than 15cm?

Absolutely! The pattern specifically notes that rounds 11-24 are repeated rounds that create the main pencil body length. To make Bobby longer, simply work additional rounds in this section while maintaining the striped color pattern. To make him shorter, work fewer rounds. You can also adjust the overall size by using thicker or thinner yarn with an appropriately sized hook - just maintain the same stitch counts for proper proportions. The wire length for arms should always be adjusted to match your finished body width.