๐Ÿงถ Beautiful โœจ Detailed ๐Ÿ’ Adorable

Baby Security Blanket with Puppy Amigurumi Pattern

Baby Security Blanket with Puppy Amigurumi Pattern
4.3โ˜… Rating
8-10 Hours Time Needed
2.4K Made This
โœ‚๏ธ

Intermediate Level

Ideal for those with basic knitting experience, featuring slightly more advanced stitches and techniques to expand your skills.

โฑ๏ธ

All-Day Adventure

Requires 8-10 hours, ideal for a full day of immersive knitting.

๐Ÿงธ

Cute Companion

An adorable friend to cherish, handcrafted with love to bring comfort and joy for years to come.

About This Baby Security Blanket with Puppy Amigurumi Pattern

This enchanting security blanket pattern brings together two beloved characters in one comforting creation. The sleeping baby features a sweet pacifier, cozy hood hat, and soft blanket body that's perfect for tiny hands to hold. The accompanying puppy adds extra charm with floppy ears, a cute white belly patch, and a tiny scarf. Both pieces are designed with the perfect balance of detail and simplicity, creating loveys that will become a child's constant companion through naps, bedtime, and beyond.

Baby Security Blanket with Puppy Amigurumi Pattern crochet pattern - detailed view of completed project

The pattern includes a crucial technique note about hook changes to ensure the blanket body remains soft and cuddly while keeping the stuffed portions firm and well-shaped. Complete with finishing touches like embroidered closed eyes for the baby and careful color changes for the puppy's markings, every detail has been thoughtfully designed.

Why You'll Love This Baby Security Blanket with Puppy Amigurumi Pattern

I absolutely love this pattern because it creates something truly meaningful that will be treasured for years. There's something incredibly special about crafting a comfort item that will soothe a baby through countless naps and nighttime cuddles. I love how the pattern includes both the baby and puppy, giving you two adorable pieces that complement each other perfectly. The technique of changing hook sizes for different sections was a game-changer for me, ensuring the blanket body stays soft and floppy while the head and limbs maintain their shape. The tiny details like the pacifier, closed embroidered eyes, and the puppy's little scarf make these pieces feel extra special and personal. Plus, watching these characters come to life as you work through each round is incredibly satisfying and rewarding.

Baby Security Blanket with Puppy Amigurumi Pattern step 1 - construction progress Baby Security Blanket with Puppy Amigurumi Pattern step 2 - assembly progress Baby Security Blanket with Puppy Amigurumi Pattern step 3 - details and accessories Baby Security Blanket with Puppy Amigurumi Pattern step 4 - final assembly and finishing

Switch Things Up

I absolutely love customizing this pattern to make each security blanket truly unique! For the baby, I've experimented with different hair colors and styles - instead of yellow curly hair, try brown straight chains for a different look, or even skip the hair entirely for a sweet bald baby. You could also change the outfit color from light blue to soft pink, mint green, or lavender to match a nursery theme.

The pacifier offers fun opportunities too - I've made some with patterned designs by alternating colors in the rounds, or you could skip it entirely and embroider a sweet smile instead. For the hood hat, try adding little bear ears on top by making two small semi-circles and sewing them on, or create a bunny version with long floppy ears.

With the puppy companion, the customization options are endless! I've created different breeds by changing colors - try all white for a polar bear look, orange and white for a fox, or gray with white for a husky. You could also adjust the ear shape and size - make them shorter and pointy for a cat, or longer and more droopy for a basset hound.

For a really special touch, I love adding personalized details like embroidering the baby's initials on the blanket body or creating a small heart patch on the puppy's chest. You could also make seasonal versions - add a tiny Santa hat for Christmas, or little flowers for spring. The scarf on the puppy can be any color to coordinate with the baby's outfit, or you could replace it with a bow tie for a dapper look.

Common Mistakes & How to Fix Them

โœ— Using the same hook size throughout the entire blanket body, which makes it too stiff and loses the soft, cuddly quality essential for a security blanket comfort item โœ— Forgetting to change to skin color yarn at the specified rounds for the baby's face, which disrupts the natural transition between the clothing and facial features โœ— Not leaving long enough yarn tails when finishing the puppy's ears for sewing, making it difficult to securely attach them to the head later in assembly โœ— Stuffing the blanket body portions instead of only stuffing the head, arms, and feet, which defeats the purpose of having a soft, floppy security blanket for baby โœ— Skipping the back loop only (BLO) and front loop only (FLO) instructions, which create important texture changes and definition between different sections of the pattern โœ— Not properly flattening and closing edges with the specified number of stitches, resulting in lumpy or uneven joins between body parts and blanket sections

Baby Security Blanket with Puppy Amigurumi Pattern

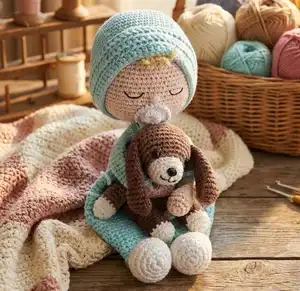
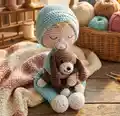
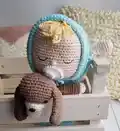
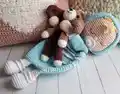
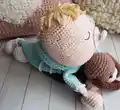
Create the sweetest companion for a little one with this adorable baby security blanket pattern featuring a precious sleeping baby and their loyal puppy friend. This heartwarming design combines comfort and cuteness, perfect for naptime cuddles and soothing little ones. The pattern includes detailed instructions for both characters, complete with soft blanket bodies, tiny details like a pacifier and hood hat for baby, and a charming scarf for the puppy. Whether you're crafting for your own child or creating a thoughtful handmade gift, this security blanket will become a treasured keepsake that brings comfort and joy for years to come.

Intermediate 8-10 Hours

Materials Needed for Baby Security Blanket with Puppy Amigurumi Pattern

โ€” Main Fabric

  • 01
    100g of medium cotton yarn in light blue color
  • 02
    100g of medium cotton yarn in skin/beige color
  • 03
    100g of medium cotton yarn in white color
  • 04
    50g of extra light cotton yarn in yellow color
  • 05
    50g of extra light cotton yarn in white color
  • 06
    Small amount of light cotton yarn in black color
  • 07
    100g of medium cotton yarn in brown color (for puppy)

โ€” Tools Required

  • 01
    Crochet hook size 2.5mm
  • 02
    Crochet hook size 3.5mm
  • 03
    Crochet hook size 2mm (for hair)
  • 04
    Tapestry needle
  • 05
    Scissors
  • 06
    Stitch markers
  • 07
    Polyester fiberfill stuffing
  • 08
    Pins (for positioning parts)

Progress Tracker

0% Complete

โ€” Baby Security Blanket:

โ€” Arms:

Round 1:

6 sc in a magic ring (6)

Round 2:

6 inc (12)

Round 3:

1 sc, 1 inc (18)

Round 4-6:

18 sc (3 rounds) (18)

Round 7:

1 sc, 1 dec (12)

Round 8-9:

12 sc (2 rounds) (12)

Info:

Start stuffing

Round 10:

Hold the edge flat and close with 6 sc

Round 11:

Sc around the 6 front loops and sc around the 6 back loops (you'll have 12 sc again), move the marker

Round 12:

Change to light blue yarn and make 12 sc (12)

Round 13:

12 sc (12)

Round 14:

BLO 3 sc, 1 inc (15)

Round 15-28:

15 sc (14 rounds) (15)

โ€” Body Blanket:

Info:

Starts on the feet with hook size 2.5mm

Round 1:

6 sc in a magic ring (6)

Round 2:

6 inc (12)

Round 3:

1 sc, 1 inc (18)

Round 4:

2 sc, 1 inc (24)

Round 5-7:

24 sc (4 rounds) (24)

Round 8:

6 sc, 6 dec, 6 sc (18)

Round 9:

6 sc, 3 dec, 6 sc (15)

Round 10:

15 sc BLO (15)

Round 11:

15 sc (15)

Info:

Stuff the tip of the feet

Round 12:

15 sc (15)

Round 13:

Change to skin color, BLO 15 sc (15)

Round 14:

15 sc (15)

Round 15:

Change to light blue color, 15 sc (15)

Round 16:

15 sc (15)

Round 17:

15 sc + 3 sc after the marker

Round 18:

Hold the edge flat and close with 7 sc (7)

Round 19:

7 sc on the front loops and 8 sc on the back loops, and another 15 sc around

Info:

Cut the yarn and make another piece

Round 20:

When the second foot is done, without cutting the yarn, make 5 ch, 1 sc on the first piece, 14 sc, 5 sc on the chain, 15 sc, 5 sc on the chain, place the marker (40)

Info:

Change to hook size 3.5mm

Round 21:

40 sc (40)

Round 22:

19 sc, 1 inc, 19 sc, 1 inc (42)

Round 23:

6 sc, 1 inc (48)

Round 24-25:

48 sc (2 rounds) (48)

Round 26:

7 sc, 1 inc (54)

Round 27:

54 sc (54)

Round 28:

8 sc, 1 inc (60)

Round 29-32:

60 sc (5 rounds)

Round 33:

60 sc BLO (60)

Round 34:

60 sc (60)

Round 35:

8 sc, 1 dec (54)

Round 36:

54 sc (54)

Round 37:

54 sc BLO (54)

Round 38:

7 sc, 1 dec (48)

Round 39:

48 sc (48)

Round 40:

48 sc BLO (48)

Round 41:

6 sc, 1 dec (42)

Round 42:

42 sc BLO (42)

Round 43:

Change to hook size 2.5mm, 42 sc (42)

Round 44:

5 sc, 1 dec (36)

Round 45:

36 sc (36)

Round 46:

Pin the arms: 3 sc, with the arm placed on the body, join the edges with 7 sc, 11 sc, join the other arm with 7 sc, 8 sc (36)

Round 47:

3 sc, 8 sc with the upper edge of arm, 11 sc and 8 sc on the other arm (38)

Round 48:

17 sc, 1 dec, 17 sc, 1 dec (36)

Round 49:

4 sc, 1 dec (30)

Round 50:

30 sc BLO (30)

Round 51:

Change to skin color, 30 sc (30)

Round 52:

3 sc, 1 dec (24)

Round 53:

2 sc, 1 dec (18)

Info:

Don't cut the yarn. The next rounds will be counted as head's rounds

โ€” Head:

Round 1:

2 dec, flat the edge, close it with 8 sc. Sc around the edge, 8 sc FLO and 8 sc BLO. Place the marker

Round 2:

16 inc (32)

Round 3:

3 sc, 1 inc (40)

Round 4:

4 sc, 1 inc (48)

Round 5:

5 sc, 1 inc (56)

Round 6-7:

56 sc (2 rounds) (56)

Round 8:

6 sc, 1 inc (64)

Round 9-16:

64 sc (8 rounds) (64)

Round 17:

23 sc, (1 sc, 1 dec) x 2, 26 sc, (1 sc, 1 dec) x 2, 3 sc (60)

Round 18:

60 sc (60)

Round 19:

8 sc, 1 dec (54)

Round 20-21:

54 sc (2 rounds) (54)

Round 22:

7 sc, 1 dec (48)

Round 23:

6 sc, 1 dec (42)

Round 24:

5 sc, 1 dec (36)

Round 25:

4 sc, 1 dec (30)

Round 26:

3 sc, 1 dec (24)

Round 27:

2 sc, 1 dec (18)

Round 28:

1 sc, 1 dec (12)

โ€” Pacifier:

Round 1:

6 sc in a magic ring (6)

Round 2:

6 inc (12)

Round 3:

1 sc, 1 inc (18)

Round 4:

2 sc, 1 inc (24)

Round 5:

24 crab stitch

Pacifier ring:

6 ch, 1 sl st, 12 sc, 18 sc on the 12 sc made

โ€” Hood Hat:

Info:

With hook size 3.5mm

Round 1:

6 sc in a magic ring (6)

Round 2:

6 inc (12)

Round 3:

1 sc, 1 inc (18)

Round 4:

2 sc, 1 inc (24)

Round 5:

3 sc, 1 inc (30)

Round 6:

4 sc, 1 inc (36)

Round 7:

5 sc, 1 inc (42)

Round 8:

6 sc, 1 inc (48)

Round 9:

7 sc, 1 inc (54)

Round 10:

8 sc, 1 inc (60)

Round 11-17:

60 sc (7 rounds) (60)

Round 18:

52 sc, 1 ch and turn (52)

Round 19-24:

FLO on the even rounds and BLO on the odd rounds: 52 sc (6 rounds) (52)

Round 25:

52 sl st (52)

Info:

Finish with a chain of 20 st, cut the yarn. Make another chain of 20 st on the other side

โ€” Hair:

Info:

With extra light cotton yarn and hook size 2mm

Instructions:

Start with a chain of 21 stitches and 20 sc on the chain. On each sc: 20 ch and 1 sl st in the next sc

Info:

Sew the hair to the top center of the head

โ€” Collar:

Info:

On the round 50, mark the half of front and back sides with pins, the 7th st from the 15 stitches of each side

Instructions:

Start crocheting from the back: (3 ch, 1 dc) in 1 st, 2 dc in each st until the 13th st. In the 14th st, make (1 dc, 1 hdc). In the 15th st, 1 sl st. In the 16th st (1 hdc, 1 dc). Continue with 2 dc in each st, close with sl st

โ€” Puppy Security Blanket:

โ€” Puppy Head:

Info:

With white yarn and hook size 2.5mm

Round 1:

6 sc in a magic ring (6)

Round 2:

6 inc (12)

Round 3:

1 sc, 1 inc (18)

Round 4-6:

18 sc (3 rounds) (18)

Info:

Change to brown yarn

Round 7:

6 sc, 6 inc, 6 sc (24)

Round 8:

24 sc (24)

Round 9:

3 sc, 1 inc (30)

Round 10:

4 sc, 1 inc (36)

Round 11-13:

36 sc (3 rounds) (36)

Round 14:

4 sc, 1 dec (30)

Round 15:

3 sc, 1 dec (24)

Round 16:

2 sc, 1 dec (18)

Round 17:

1 sc, 1 dec (12)

Round 18:

6 dec (6)

Round 19:

2 dec (close with tapestry needle)

โ€” Puppy Arms:

Info:

With white yarn

Round 1:

6 sc in a magic ring (6)

Round 2:

6 inc (12)

Info:

Change to brown yarn

Round 3-4:

12 sc (2 rounds) (12)

Round 5-8:

12 sc (4 rounds) (12)

Round 9:

2 sc, 1 dec (8)

Round 10-12:

8 sc (3 rounds) (8)

Round 13:

Hold the edge flat and close with 4 sc

โ€” Puppy Ears:

Round 1:

6 sc in a magic ring (6)

Round 2:

6 inc (12)

Round 3:

1 sc, 1 inc (18)

Round 4-7:

18 sc (4 rounds) (18)

Round 8:

1 sc, 1 dec (12)

Round 9-11:

12 sc (3 rounds) (12)

Round 12:

4 sc, 1 dec (10)

Round 13-14:

10 sc (2 rounds) (10)

Round 15:

Hold the edge flat and close with 5 sc

Info:

Leave a long yarn tail for sewing

โ€” Puppy Body:

Info:

With white yarn, starts on the feet

Round 1:

6 sc in a magic ring (6)

Round 2:

6 inc (12)

Round 3-5:

12 sc (3 rounds) (12)

Info:

Change to brown yarn

Round 6-11:

12 sc (6 rounds)

Info:

Cut the yarn and make another piece. When you finish the second foot, don't cut the yarn and make 4 ch and 1 sc on the other foot

Round 12:

11 sc, 4 sc on the chain, 12 sc, 4 sc on the chain and place marker (32)

Round 13-14:

32 sc (2 rounds) (32)

Round 15:

7 sc, 1 inc (36)

Info:

Change to hook size 3.5mm

Round 16:

36 sc (36)

Round 17:

13 sc with brown, 2 sc with white, 21 sc with brown (36)

Round 18:

12 sc in brown, 4 sc in white, 20 sc in brown (36)

Round 19-20:

11 sc in brown, 6 sc in white, 19 sc in brown (36)

Round 21:

12 sc in brown, 4 sc in white, 20 sc in brown (36)

Round 22:

13 sc in brown, 2 sc in white, 21 sc in brown (36)

Round 23:

In brown, 4 sc, 1 dec (30)

Round 24:

4 sc, with the arm placed on the edge of the body make 4 sc by taking both edges, 12 sc, 4 sc with the other arm, 6 sc (30)

Info:

Change to hook size 2.5mm

Round 25:

3 sc, 1 dec (24)

Round 26:

2 sc, 1 dec (18)

Round 27:

1 sc, 1 dec (12)

Info:

Hold the edge flat and close with 6 sc

โ€” Puppy Tail:

Round 1:

6 sc in a magic ring (6)

Round 2-6:

6 sc (5 rounds) (6)

โ€” Puppy Scarf:

Instructions:

46 ch and go back on the ch with 45 sl st

Assembly Instructions

  • Sew the pacifier on the middle of the baby's face, between rounds 7 and 12 of the head.
  • Embroider a small loop in skin color in the center of round 13 for the nose, by taking 2 sc and passing the needle 5-6 times.
  • Embroider the baby's closed eyes between rounds 14 and 15, making them 5 stitches wide with 6 sc of separation between both eyes.
  • On the loops that remain from the back loop only rounds, make 1 sl st, 1 ch to create texture details.
  • Sew the puppy's head to the body on round 12 of the head.
  • Sew the puppy's ears placed on round 12 of the head with 13 stitches between both ears.
  • Attach the scarf around the puppy's neck by wrapping and securing with a few stitches.

Important Notes

  • ๐Ÿ’กThe most important thing in this security blanket is the hook change when you crochet the body - use 3.5mm for the blanket body to keep it soft and open, then change to 2.5mm for parts that need stuffing
  • ๐Ÿ’กMake sure that the crocheting is tense when working on stuffed parts (head, arms, feet) so that the filling is not visible through the stitches
  • ๐Ÿ’กDo not stuff the blanket body portions - only stuff the head, arms, and feet tips to maintain the soft, floppy security blanket quality
  • ๐Ÿ’กUse stitch markers throughout to keep track of your rounds, especially during color changes and when joining body parts
  • ๐Ÿ’กPin all parts in place before sewing to ensure correct positioning and symmetry, particularly for the arms and ears
  • ๐Ÿ’กLeave long yarn tails when finishing pieces like ears and arms to make sewing easier and more secure

This heartwarming Baby Security Blanket with Puppy pattern creates the ultimate comfort companion for little ones. Designed with thoughtful details like a sleeping baby with a pacifier and cozy hood, paired with an adorable puppy friend complete with floppy ears and a tiny scarf, this pattern will become a treasured keepsake. The clever hook size changes ensure the perfect balance between cuddly softness and lasting durability. Whether you're crafting for your own child or creating a meaningful handmade gift, these loveys will bring comfort through countless naps and bedtime snuggles. ๐Ÿงถ Happy crocheting! ๐Ÿ’™๐Ÿถ

You ask,

we answer.

FAQs

Why do I need to change hook sizes during this pattern?

Changing hook sizes is crucial for this security blanket. The larger 3.5mm hook creates a looser, softer stitch for the blanket body that babies can easily grip and snuggle, while the smaller 2.5mm hook creates tighter stitches for stuffed parts like the head and arms to prevent filling from showing through.

Can I make this pattern without the puppy companion?

Absolutely! The baby security blanket is a complete project on its own. However, the puppy makes a wonderful matching companion piece. You could also make multiple puppies in different colors or create just the puppy as a standalone lovey.

What parts should I stuff and what parts should remain flat?

Only stuff the baby's head, arms, and the tips of the feet. The entire blanket body should remain completely unstuffed to stay soft and floppy. For the puppy, stuff the head lightly and keep the body, arms, and tail unstuffed for the same soft security blanket feel.

Is this pattern safe for newborns and young babies?

Yes, when made correctly with securely embroidered features rather than buttons or beads, this security blanket is safe for babies. The closed embroidered eyes and sewn-on pacifier eliminate choking hazards. Always supervise babies with any lovey and follow safe sleep guidelines.

What yarn weight works best for this pattern?

The pattern calls for medium weight cotton yarn (worsted weight/category 4). Cotton is ideal because it's breathable, washable, and durable for baby items. You can substitute acrylic if preferred, but cotton tends to soften beautifully with washing and is hypoallergenic.

How do I care for this security blanket once completed?

Hand wash in cool water with gentle detergent and lay flat to dry, or machine wash on a delicate cycle in a mesh laundry bag. The cotton yarn will soften with each wash, making it even more cuddly. Avoid high heat which can cause shrinkage or damage to the stuffing.