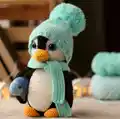
Create your own adorable Penguin Lilo with this comprehensive amigurumi pattern! This charming penguin comes complete with a cozy knitted hat, matching scarf, and even holds a sweet little fish friend. Standing at 9 inches tall, this cuddly companion features intricate details like a distinctive black hood marking, a perfectly shaped yellow beak, and tiny webbed feet. The pattern includes both crochet and knitting techniques, offering you the choice between crocheted or knitted accessories to suit your crafting preference.
Progress Tracker
0% Complete
— Head :
Round 3 :
(sc, inc) x 6 (18)
Round 4 :
(2 sc, inc) x 6 (24)
Round 5 :
(3 sc, inc) x 6 (30)
Round 6 :
(4 sc, inc) x 6 (36)
Round 7 :
(5 sc, inc) x 6 (42)
Round 8 :
(6 sc, inc) x 6 (48)
Round 9 :
(7 sc, inc) x 6 (54)
Round 10-17 :
54 sc (8 rounds)
Info :
Insert the eyes between rounds 16 and 17, at a distance of 7-8 loops
Round 18 :
9 sc, (sc, inc) x 6, 12 sc, (inc, sc) x 6, 9 sc (66)
Round 19-24 :
66 sc (5 rounds)
Round 25 :
9 sc, (sc, dec) x 6, 12 sc, (dec, sc) x 6, 9 sc (54)
Round 26 :
(7 sc, dec) x 6 (48)
Info :
Start filling the part
Round 27 :
(6 sc, dec) x 6 (42)
Round 28 :
(5 sc, dec) x 6 (36)
Round 29 :
(4 sc, dec) x 6 (30)
Round 30 :
(3 sc, dec) x 6 (24)
Round 31 :
(2 sc, dec) x 6 (18)
Info :
Secure and trim the thread
— Beak :
Info :
Crochet with yellow color. It consists of two identical parts, crochet in turning rows
Row 1 :
3 ch, turn. Begin to crochet in the 2nd st from the hook
Row 4 :
inc, 2 sc, inc, ch, turn
Row 5 :
inc, 4 sc, inc, ch, turn
Row 6 :
inc, 6 sc, inc, ch
Info :
Tie the part with sc, trim the thread. Don't cut the thread on the second part. When two parts are connected, put them together and crochet sc. Do not crochet the part where the beak will be sewn to the head
— Hood :
Info :
Crochet with Alize Softy, black color
Round 3 :
(sc, inc) x 6 (18)
Round 4 :
(2 sc, inc) x 6 (24)
Round 5 :
(3 sc, inc) x 6 (30)
Round 6 :
(4 sc, inc) x 6 (36)
Round 7 :
(5 sc, inc) x 6 (42)
Round 8 :
(6 sc, inc) x 6 (48)
Round 9 :
(7 sc, inc) x 6 (54)
Round 10 :
(8 sc, inc) x 6 (60)
Round 11 :
(9 sc, inc) x 6 (66)
Round 12-19 :
66 sc (8 rounds)
Info :
Next, crochet in turning rows
Row 20-22 :
8 sc, ch, turn
Row 23 :
sc, dec, 2 sc, dec, sc, ch, turn
Row 24 :
sc, 2 dec, sc, ch, turn
Info :
Secure and trim the thread
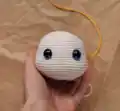
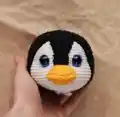
— Assembly and Design of the Head :
Step 1 :
Wear the hood and sew it to head (photos 1, 2)
Step 2 :
Fill the beak and sew it to the head as shown in the photo (photos 8, 9)
Step 3 :
Make a tightening following photos 3-7
— Body :
Info :
Crochet with Alize Softy, black color
Round 3 :
(sc, inc) x 6 (18)
Round 4 :
(2 sc, inc) x 6 (24)
Round 5 :
(3 sc, inc) x 6 (30)
Round 6 :
(4 sc, inc) x 6 (36)
Round 7 :
(5 sc, inc) x 6 (42)
Round 8 :
(6 sc, inc) x 6 (48)
Round 9 :
(7 sc, inc) x 6 (54)
Round 10 :
(8 sc, inc) x 6 (60)
Round 11-18 :
60 sc (8 rounds)
Round 19 :
(8 sc, dec) x 6 (54)
Round 20-22 :
54 sc (3 rounds)
Round 23 :
(7 sc, dec) x 6 (48)
Info :
Start filling the part
Round 26 :
(6 sc, dec) x 6 (42)
Round 29 :
(5 sc, dec) x 6 (36)
Round 32 :
(4 sc, dec) x 6 (30)
Info :
Secure and trim the thread
— Tail :
Info :
Crochet with Alize Softy, black color. Do not fill the part
Round 2 :
(sc, inc) x 3 (9)
Round 3 :
(2 sc, inc) x 3 (12)
Round 4 :
(3 sc, inc) x 3 (15)
Round 5 :
(4 sc, inc) x 3 (18)
Round 6 :
(5 sc, inc) x 3 (21)
Info :
Fold the part in half and crochet both sides 10 sc. Fasten the thread and cut it off, leave the end for sewing
— Belly :
Info :
Crochet with milky color in turning rows. Begin to crochet with the 2nd st from the hook
Row 4 :
sc, inc, 6 sc, inc, sc, ch, turn
Row 6 :
sc, inc, 8 sc, inc, sc, ch, turn
Row 8 :
sc, inc, 10 sc, inc, sc, ch, turn
Row 10 :
sc, inc, 12 sc, inc, sc, ch, turn
Row 12 :
sc, inc, 14 sc, inc, sc, ch, turn
Row 13-19 :
20 sc, ch, turn (7 rows)
Row 20 :
sc, dec, 14 sc, dec, sc, ch, turn
Row 22 :
sc, dec, 12 sc, dec, sc, ch, turn
Row 24 :
sc, dec, 10 sc, dec, sc, ch, turn
Row 25 :
sc, dec, 8 sc, dec, sc, ch, turn
Row 26 :
sc, dec, 6 sc, dec, sc, ch, turn
Row 27 :
sc, dec, 4 sc, dec, sc, ch, turn
Row 28-29 :
8 sc, ch, turn
Info :
Crochet from all sides using sc. Secure and trim the thread, leaving the end for sewing
— Wings :
Info :
Crochet 4 parts: 2 in milky color and 2 in black color. First crochet light details then the black ones. Crochet in turning rows. Begin to crochet with the 2nd st from the hook
Row 4 :
2 sc, inc, sc, ch, turn
Row 6 :
3 sc, inc, sc, ch, turn
Row 8 :
4 sc, inc, sc, ch, turn
Row 10 :
5 sc, inc, sc, ch, turn
Row 12 :
6 sc, inc, sc, ch, turn
Row 14 :
7 sc, inc, sc, ch, turn
Row 16 :
8 sc, inc, sc, ch, turn
Row 18 :
9 sc, inc, sc, ch, turn
Row 19-23 :
12 sc, ch, turn (5 rows)
Row 24 :
9 sc, dec, sc, ch, turn
Row 26 :
8 sc, dec, sc, ch, turn
Row 28 :
7 sc, dec, sc, ch, turn
Row 29 :
sc, dec, 6 sc, ch, turn
Row 30 :
5 sc, dec, sc, ch
Info :
Crochet from all sides using sc. Clip and trim the thread. Don't cut the thread on the black part. Fold the light and dark parts and crochet them together using sc. For one wing, the light part should be in front, for the second behind
— Paws :
Info :
Crochet with yellow color
Round 3 :
(sc, inc) x 6 (18)
Round 4 :
(5 sc, inc) x 3 (21)
Round 7 :
(5 sc, dec) x 3 (18)
Info :
Fill the part slightly. Fold the part in half and crochet both sides 9 sc. Secure and trim the thread, leaving the end for sewing
— Assembling the Toy :
Step 1 :
Sew the belly to the body
Step 3 :
Sew on the wings, tail and paws
— Fish :
Info :
Crochet from acrylic yarn. Fill it in the process of crocheting, not tightly
Round 2 :
(sc, inc) x 3 (9)
Round 3 :
(2 sc, inc) x 3 (12)
Round 4 :
(3 sc, inc) x 3 (15)
Round 6 :
(4 sc, inc) x 3 (18)
Info :
Change the yarn color
Round 7 :
(8 sc, inc) x 2 (20)
Round 8 :
(9 sc, inc) x 2 (22)
Round 9 :
(10 sc, inc) x 2 (24)
Round 10-14 :
24 sc (5 rounds)
Round 15 :
(10 sc, dec) x 2 (22)
Round 16-17 :
22 sc (2 rounds)
Round 18 :
(9 sc, dec) x 2 (20)
Round 20 :
(8 sc, dec) x 2 (18)
Round 22 :
(7 sc, dec) x 2 (16)
Round 23 :
(6 sc, dec) x 2 (14)
Round 24 :
(5 sc, dec) x 2 (12)
Round 25 :
(4 sc, dec) x 2 (10)
Round 26 :
(3 sc, dec) x 2 (8)
Info :
Fold in half and crochet on both sides 4 sc. Change the yarn color
Row 27 :
inc, 2 sc, inc, ch, turn
Row 28 :
inc, 4 sc, inc, ch, turn
Row 29 :
inc, 6 sc, inc, ch, turn
Row 30 :
inc, 8 sc, inc, ch
Info :
Fasten and trim the thread. Glue the half-bead eyes
— Hat and Scarf Knitted with Knitting Needles :
Info :
Knit from acrylic yarn with knitting needles number 2. The cap is knitted without a seam, in a circle. Dial 72 loops, close in a circle
Rows 7-36 :
Knit another 30 rows, unchanged, all loops knit stitch
Info :
Then in each row make subtractions
Decrease Row 1 :
(10K, K2tog) x 6
Decrease Row 2 :
(9K, K2tog) x 6
Decrease Row 3 :
(8K, K2tog) x 6
Decrease Row 4 :
(7K, K2tog) x 6
Decrease Row 5 :
(6K, K2tog) x 6
Decrease Row 6 :
(5K, K2tog) x 6
Decrease Row 7 :
(4K, K2tog) x 6
Decrease Row 8 :
(3K, K2tog) x 6
Decrease Row 9 :
(2K, K2tog) x 6
Info :
Pull the hole. Make a pompom and sew it to the hat
Scarf :
Knit the front stitch. Dial 10 loops and knit to the desired length
— Hat and Scarf Crocheted :
Info :
Crochet from Alize Lana Cotton. Crocheted in turning rows. Start with the 2nd st from the hook
Row 1 :
26 ch, 25 sc, ch, turn
Row 2-51 :
BLO 25 sc, ch, turn (50 rows)
Info :
Fasten the thread and cut it off, leaving the end for sewing. Sew the first and last rows of the cap. Pull the hole off on one side. Attach a pompom
Scarf :
Row 1: 111 ch, start with the 2nd st from the hook, crochet 110 slst, ch, turn
Row 2-7 :
110 slst, ch, turn
Row 8 :
110 slst. Fasten and trim the thread
This enchanting Penguin Lilo pattern brings together everything you love about amigurumi with a touch of winter magic. The combination of plush textures, classic black-and-white coloring, and those irresistible accessories creates a character that's perfect for display or cuddling. Whether you choose the knitted or crocheted version of the hat and scarf, your penguin will have that cozy, bundled-up charm. The little fish companion adds an extra layer of personality, making this not just a toy, but a complete character with its own story. Perfect for gifts or your personal collection! 🐧🧶✨