🧢 Beautiful ✨ Detailed πŸ’ Adorable

Dragonfruiteratops Dinosaur Amigurumi Pattern

Dragonfruiteratops Dinosaur Amigurumi Pattern
4.0β˜… Rating
3-4 Hours Time Needed
4.1K Made This
βœ‚οΈ

Intermediate Level

Ideal for those with basic knitting experience, featuring slightly more advanced stitches and techniques to expand your skills.

⏱️

Bite-Sized Project

Complete in under 2 hoursβ€”quick, fun, and perfect for a little creative escape.

🐰

Whimsical Buddy

Playful characters full of personality, designed to spark imagination and become cherished playtime favorites.

About This Dragonfruiteratops Dinosaur Amigurumi Pattern

Dragonfruiteratops Dinosaur Amigurumi Pattern crochet pattern - detailed view of completed project

Perfect for amigurumi enthusiasts looking to expand their skills, this pattern includes techniques like invisible decreases, color changes, and working in back loops only. The finished piece captures the essence of dragonfruit with its distinctive coloring and playful prehistoric design.

Why You'll Love This Dragonfruiteratops Dinosaur Amigurumi Pattern

I absolutely love this pattern because it combines two of my favorite things: adorable dinosaurs and creative fruit-themed designs! The Dragonfruiteratops is such a unique concept that stands out from typical amigurumi patterns. I find the color combination of bright pink and white with green accents incredibly eye-catching and fun to work with. The construction technique of attaching the legs while building the body creates a sturdy little creature that can actually stand on its own, which I always appreciate in amigurumi. The picot edge on the ruff adds such a lovely textured detail that makes this little dino extra special and polished.

Dragonfruiteratops Dinosaur Amigurumi Pattern step 1 - construction progress Dragonfruiteratops Dinosaur Amigurumi Pattern step 2 - assembly progress Dragonfruiteratops Dinosaur Amigurumi Pattern step 3 - details and accessories Dragonfruiteratops Dinosaur Amigurumi Pattern step 4 - final assembly and finishing

Switch Things Up

I love experimenting with this pattern to create entirely new fruit-dinosaur combinations! Instead of dragonfruit colors, I've tried making a kiwi version using bright green for the body and brown for the skin section, with tiny black embroidered seeds. It turned out absolutely adorable and gave me a whole new character to add to my collection.

Another fun variation I enjoy is adjusting the size of the horns and ruff to create different dinosaur species. By making the ruff smaller and adding more horns, you can transform the Dragonfruiteratops into a completely different creature. I once made five horns instead of three and created a fruit-themed styracosaurus that looked amazing on my shelf.

You could also experiment with the tail shape by adding extra increase rounds to make it thicker and more dramatic. I've tried making the tail twice as long for a more whimsical look, and it really changes the personality of the finished piece. The pattern is so flexible that these modifications are easy to implement without disrupting the overall structure.

For those who want to add extra details, consider creating tiny dragonfruit flowers using green and yellow yarn to attach near the horns or tail. These small embellishments really bring the fruit theme to life and make each creation unique and special.

Common Mistakes & How to Fix Them

βœ— Forgetting to stuff the legs firmly before attaching them to the body can result in a floppy dinosaur that won't stand properly βœ— Missing the color change from white to bright pink at round 11 disrupts the dragonfruit design aesthetic entirely βœ— Not using stitch markers when attaching legs to the body in round 4 can cause misalignment and uneven leg placement βœ— Closing the body too loosely without proper invisible closure technique leaves an unsightly gap at the top of the body βœ— Embroidering seeds on the white section before assembly makes it harder to position the head and tail correctly

Dragonfruiteratops Dinosaur Amigurumi Pattern

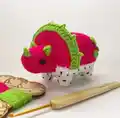
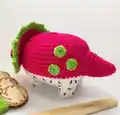
Create your own adorable Dragonfruiteratops with this charming amigurumi pattern! This delightful dinosaur combines the sweetness of dragonfruit with the fun of prehistoric creatures, featuring a bright pink body, white dragonfruit base with embroidered seeds, and cute green spots and spikes. Standing at 9cm tall, this little companion makes a perfect gift or decorative piece. The pattern includes detailed instructions for creating the body, head, tail, ruff, horns, and spots, with helpful photo guides throughout to ensure success.

Intermediate 3-4 Hours

Materials Needed for Dragonfruiteratops Dinosaur Amigurumi Pattern

β€” Main Fabric

  • 01
    Stylecraft Special DK yarn in Bright Pink
  • 02
    Stylecraft Special DK yarn in Grass Green
  • 03
    Stylecraft Special DK yarn in White

β€” Tools Required

  • 01
    2.5mm crochet hook
  • 02
    Two 6mm safety eyes
  • 03
    Stitch markers
  • 04
    Black embroidery floss
  • 05
    Yarn needle
  • 06
    Fibrefill stuffing
  • 07
    Scissors

Progress Tracker

0% Complete

β€” Legs (make four) :

Rnd 1 :

Using White, 6 sc in MR (6)

Rnd 2 :

inc each st around (12)

Rnd 3 :

in BLO sc each st around (12)

Rnd 4 :

sc each st around (12)

Info :

Cut yarn and weave in ends

β€” Body :

Rnd 1 :

Using White, ch 9, sc in second ch from hook, 6 sc, 3 sc in next st, working down the other side of the ch, 6 sc, inc (18)

Rnd 2 :

inc, 6 sc, 3 inc, 6 sc, 2 inc (24)

Rnd 3 :

sc, inc, 6 sc, (sc, inc) rep 3 times, 6 sc, (sc, inc) rep 2 times (30)

Info :

In the next round we will join the legs to the body

Rnd 4 :

With the body still on your hook, insert hook through any st in leg 1 and through the next st of rnd 3, complete sc, complete a further 2 sc in this way, 6 sc, 3 sc through leg 2 and rnd 3, 3 sc, 3 sc through leg 3 and rnd 3, 6 sc, 3 sc through leg 4 and rnd 3, 3 sc (30)

Rnd 5 :

9 sc around the remaining sts of leg 1, 6 sc, 9 sc round leg 2, 3 sc, 9 sc round leg 3, 6 sc, 9 sc round leg 4, 3 sc (54)

Rnd 6 :

(8 sc, inc) rep 6 times (60)

Rnd 7 :

(8 sc, dec) rep 6 times (54)

Rnds 8-10 :

sc each st around (54) (3 rnds)

Info :

Change to Bright Pink

Rnds 11-17 :

sc each st around (54) (7 rnds)

Rnd 18 :

(7 sc, dec) rep 6 times (48)

Rnd 19 :

(6 sc, dec) rep 6 times (42)

Rnd 20 :

(5 sc, dec) rep 6 times (36)

Info :

Start to add stuffing, ensuring each leg is stuffed firmly. Continue stuffing as we go

Rnd 21 :

(4 sc, dec) rep 6 times (30)

Rnd 22 :

(3 sc, dec) rep 6 times (24)

Rnd 23 :

(2 sc, dec) rep 6 times (18)

Rnd 24 :

(1 sc, dec) rep 6 times (12)

Rnd 25 :

dec 6 times (6)

Info :

Cut yarn leaving a long tail. Close invisibly and weave in any ends

β€” Head :

Rnd 1 :

Using Bright Pink, 6 sc in MR (6)

Rnd 2 :

inc each st around (12)

Rnd 3 :

(3 sc in next st, sc, 3 sc in next st, 3 sc) rep 2 times (20)

Rnds 4-6 :

sc each st around (20) (3 rnds)

Rnd 7 :

(4 sc, inc) rep 4 times (24)

Rnds 8-10 :

sc each st around (24) (3 rnds)

Infos :

Finish the final rnd with a slst to join. Cut yarn leaving a long tail. Insert safety eyes either side of the head between rnds 6-7 and add stuffing

β€” Tail :

Rnd 1 :

Using Bright Pink, 6 sc in MR (6)

Rnd 2 :

(sc, inc) rep 3 times (9)

Rnd 3 :

sc each st around (9)

Rnd 4 :

(2 sc, inc) rep 3 times (12)

Rnd 5 :

sc each st around (12)

Rnd 6 :

5 sc, 2 inc, 5 sc (14)

Rnd 7 :

sc each st around (14)

Rnd 8 :

6 sc, 2 inc, 6 sc (16)

Rnd 9 :

sc each st around (16)

Infos :

Finish the final rnd with a slst to join. Cut yarn leaving a long tail and add stuffing

β€” Ruff :

Row 1 :

Using Bright Pink, leave a long starting tail, ch 19, sc in 2nd ch from hook, 17 sc, ch 1 turn (18)

Row 2 :

sc, (inc, 2 sc) rep 5 times, inc, sc, ch 1 turn (24)

Row 3 :

sc each st in the row, ch 1 turn (24)

Row 4 :

sc, (inc, 3 sc) rep 5 times, inc, 2 sc (30)

Info :

Fasten off and cut yarn. Using Grass Green, turn work and join yarn to last sc worked in row 4

Row 5 :

sc each st in row, ch 1 turn (30)

Row 6 :

3 sc, (picot, 4 sc) rep 6 times, picot, 3 sc (30 sc, 7 picots)

Info :

Cut yarn and weave in all ends except for the beginning long tail

β€” Horns (make 3) :

Row 1 :

Using Grass Green, ch 3, sc in 2nd ch from hook, hdc

Info :

Cut yarn leaving a long tail

β€” Spots (make 6) :

Rnd 1 :

Using Grass Green, 6 sc in MR close with a slst (6)

Info :

Cut yarn leaving a long tail

Assembly Instructions

  • Using the black embroidery floss, stitch seeds on the white section of the body to create the dragonfruit effect
  • Attach the head to the front of the body over rounds 9-15, using the long tail left from the head
  • Attach the tail to the back of the body over rounds 11-16, ensuring it's centered and secure
  • Stitch the ruff around the head at the point where the head meets the body, starting and ending at round 11 on either side of the head
  • Sew one horn at the front of the head between rounds 3-4 for the nose horn
  • Sew the other two horns between rounds 7-8, spacing them roughly three stitches apart
  • Finally, sew three spots onto the body on either side of the tail for the complete dragonfruit look

Important Notes

  • πŸ’‘Use stitch markers when attaching the legs in round 4 to ensure even spacing and proper alignment
  • πŸ’‘Stuff the legs firmly before continuing with the body to create a stable base that can stand upright
  • πŸ’‘Leave long tails when finishing each piece as these will be used for assembly instead of new yarn
  • πŸ’‘The picot edge on the ruff requires working ch 2 and sc in 2nd chain from hook for the decorative texture
  • πŸ’‘Insert safety eyes between rounds 6-7 before stuffing the head completely for easier placement
  • πŸ’‘The invisible closing technique is essential for a professional finish at the top of the body

This delightful Dragonfruiteratops pattern brings a whimsical twist to amigurumi with its charming fruit-dinosaur fusion! Designed by Candy Downs, this 9cm creation combines bright pink and white yarn with green accents to capture the essence of dragonfruit in dinosaur form. The pattern features intermediate techniques including leg attachment during construction, color changes, and decorative details like the picot-edged ruff and embroidered seeds. Perfect for creating a unique gift or adding to your collection of fruit-themed creatures! πŸ‰πŸ‰πŸ§Ά

You ask,

we answer.

FAQs

Can I use a different yarn weight for this pattern?

While the pattern is designed for DK weight yarn with a 2.5mm hook, you can use different weights. Just remember that your finished Dragonfruiteratops will be larger or smaller depending on your yarn choice. Adjust your hook size accordingly and keep your tension consistent.

How do I attach the legs securely to the body?

The pattern uses a unique technique where you crochet through both the leg stitches and body stitches simultaneously in round 4. Make sure to stuff the legs firmly first, use stitch markers to mark where each leg should attach, and work slowly through this round to ensure even spacing.

What's the best way to embroider the dragonfruit seeds?

Use black embroidery floss and make small straight stitches scattered randomly across the white section of the body. Work these stitches at slight angles to mimic the natural appearance of dragonfruit seeds. It's easier to do this before attaching the head and tail.

Can I make the Dragonfruiteratops in different colors?

Absolutely! While the pattern uses dragonfruit colors, you could create different fruit dinosaurs by changing the color scheme. Try yellow and green for kiwi, orange and white for papaya, or purple and green for a fantasy fruit version.

Why won't my Dragonfruiteratops stand up properly?

The most common issue is insufficient stuffing in the legs. Make sure each leg is stuffed very firmly before you attach them to the body. Also check that the legs are evenly spaced and attached securely in round 4 of the body construction.