🧶 Beautiful ✨ Detailed 💝 Adorable

Bluebell Fairy Amigurumi Pattern

Bluebell Fairy Amigurumi Pattern
4.1★ Rating
8-10 Hours Time Needed
4.1K Made This
✂️

Advanced Level

Designed for experienced knitters, these patterns involve intricate designs and complex techniques to challenge and inspire.

⏱️

All-Day Adventure

Requires 8-10 hours, ideal for a full day of immersive knitting.

🧸

Whimsical Buddy

Playful characters full of personality, designed to spark imagination and become cherished playtime favorites.

About This Bluebell Fairy Amigurumi Pattern

This Bluebell Fairy pattern is a masterpiece of miniature crochet artistry that combines delicate threadwork with precise assembly techniques. Working with fine cotton crochet thread and a tiny hook, you'll create a fairy that captures the essence of woodland magic in just 6cm of height. The pattern features advanced techniques including working with wire for poseable arms, creating dimensional bell-shaped flowers with triangular peaks, and mastering the art of wrapping threads for realistic sleeves and flower stems.

Bluebell Fairy Amigurumi Pattern crochet pattern - detailed view of completed project

Each component of this fairy requires careful attention to detail, from stuffing the tiny head firmly to sewing imperceptible stitches during assembly. The pattern includes detailed instructions for creating both the fairy's bluebell hat and a small coordinating flower accessory.

Why You'll Love This Bluebell Fairy Amigurumi Pattern

I absolutely love this pattern because it's like sculpting pure magic with thread and hook! The satisfaction of seeing this tiny fairy come to life, with her delicate bluebell hat cascading in perfect petals and those carefully wrapped lilac sleeves, is simply unmatched. I adore how the pattern challenges my precision skills while rewarding me with an heirloom-quality piece that captures woodland enchantment in miniature form. The combination of crochet, embroidery, and wire-work techniques keeps the project engaging from start to finish, and watching those tiny arms take shape through the wrapping technique never gets old. Most of all, I love that this fairy becomes a treasured keepsake—a testament to the beauty that patience and skill can create in something so wonderfully small.

Bluebell Fairy Amigurumi Pattern step 1 - construction progress Bluebell Fairy Amigurumi Pattern step 2 - assembly progress Bluebell Fairy Amigurumi Pattern step 3 - details and accessories Bluebell Fairy Amigurumi Pattern step 4 - final assembly and finishing

Switch Things Up

I absolutely love experimenting with different color combinations for this Bluebell Fairy pattern! While the classic lilac and purple create that traditional bluebell look, I've had so much fun creating entire fairy families in different flower themes. Try using soft pink and rose threads to transform her into a Cherry Blossom Fairy, or go with sunny yellows and oranges for a Marigold Fairy version.

I also like to add tiny embellishments that give each fairy her own personality—a few seed beads sewn onto the hat for sparkle, or a tiny ribbon bow at the waist. Some of my favorite variations include adding metallic thread to the wrapping on the arms for a shimmery effect, or using variegated thread for the hat to create beautiful color transitions in the petals.

For the small flower accessory, I sometimes make two or three in coordinating colors so the fairy has a whole bouquet to hold. You could even create a tiny basket from the same thread and fill it with multiple miniature flowers. I've also experimented with needle felting tiny details onto the face for a softer, more dimensional look, though the embroidered features are equally charming.

The body color can be changed too—try using a pale green for the dress portion to create more of a forest sprite effect, or add stripes by changing colors every few rounds for a whimsical garden fairy costume. The possibilities are truly endless once you master the basic construction!

Common Mistakes & How to Fix Them

✗ Overstuffing the tiny head making it misshapen—stuff firmly but leave room for the fabric to maintain its rounded shape naturally ✗ Not pulling the wire tight enough at the wrist when making arms—this causes the hand to be floppy and the sleeve wrapping to slip off later ✗ Cutting the thread bundle straight instead of diagonally for arms—diagonal cutting creates a more natural tapered shape for realistic tiny hands ✗ Sewing arms too high on the body—they should be placed exactly three rounds down from the neckline for proper proportions and balance ✗ Forgetting to place the cardboard circle inside the body before closing—this base is essential for the fairy to stand properly and maintain shape ✗ Not wetting the bottom of the cone to flatten it—the body won't stand straight without this crucial drying step on an even surface

Bluebell Fairy Amigurumi Pattern

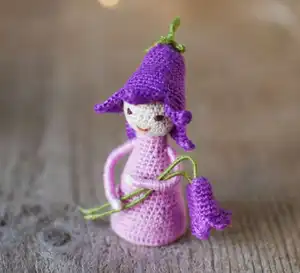
Create an enchanting miniature Bluebell Fairy with this delightful crochet pattern! This tiny 6cm fairy companion features intricate details including a beautiful bluebell hat with five delicate petals, carefully wrapped lilac sleeves, and an adorable embroidered face. Perfect for fairy garden enthusiasts or as a precious handmade gift, this pattern guides you through creating a whimsical character complete with a small bluebell flower accessory. The finished fairy stands elegantly with detailed construction techniques that bring this magical woodland sprite to life in your hands.

Advanced 8-10 Hours

Materials Needed for Bluebell Fairy Amigurumi Pattern

— Main Fabric

  • 01
    Cotton crochet thread in Beige (10 gr/87m ~ 1 oz/267 yd)
  • 02
    Cotton crochet thread in Light lilac (10 gr/87m ~ 1 oz/267 yd)
  • 03
    Cotton crochet thread in Dark lilac (10 gr/87m ~ 1 oz/267 yd)
  • 04
    Cotton crochet thread in Green (10 gr/87m ~ 1 oz/267 yd)
  • 05
    Cotton crochet thread in Light yellow - small amount (10 gr/87m ~ 1 oz/267 yd)
  • 06
    Embroidery floss in Dark brown for eyes
  • 07
    Embroidery floss in Reddish brown for mouth
  • 08
    Embroidery floss in Beige for stitching
  • 09
    Embroidery floss in Light lilac for stitching
  • 10
    Embroidery floss in Green for stitching

— Tools Required

  • 01
    Crochet hook 0.9mm or 1mm (US 12 – UK 6)
  • 02
    Sewing needle
  • 03
    Tapestry needle
  • 04
    Pins
  • 05
    Scissors
  • 06
    Thin wire 0.2-0.3mm (~0.01 in)
  • 07
    Glue stick
  • 08
    Old bank card or cardboard
  • 09
    Synthetic or organic stuffing filler

Progress Tracker

0% Complete

— Head :

Round 1 :

2 ch and 6 sc into first ch (6 sts)

Round 2 :

(inc) X 6 (12 sts)

Round 3 :

(1sc,inc) X 6 (18 sts)

Round 4 :

(2sc,inc) X 6 (24 sts)

Round 5-11 :

sc around (24 sts)

Round 12 :

(2sc, dec) X 6 (18 sts)

Round 13 :

(1sc, dec) X 6 (12 sts)

Info :

Stuff the head tightly with filler after round 13. Use the ends of scissors to push it inside.

Round 14 :

(dec) X 6 (6 sts)

Round 15 :

decrease and close the hole with a slip stitch
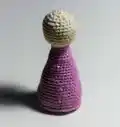
— Body :

Round 1 :

2 ch and 6 sc into first ch (6 sts)

Round 2 :

(inc) X 6 (12 sts)

Round 3 :

(1sc,inc) X 6 (18 sts)

Round 4 :

(2sc,inc) X 6 (24 sts)

Round 5 :

(3sc,inc) X 6 (30 sts)

Round 6 :

(4sc,inc) X 6 (36 sts)

Round 7 :

(5sc,inc) X 6 (42 sts)

Info :

Make a circular bottom from an old plastic card – outline the hexagon with a pencil and cut it out with a little less diameter.

Round 8 :

Make single crochets perpendicular to the previous round – work not in the top of the stitch but around the post of the single crochet; insert the hook perpendicular to the surface (42 sts)

Round 9-10 :

sc around (42 sts)

Round 11 :

(5sc,dec) X 6 (36 sts)

Round 12-14 :

sc around (36 sts)

Round 15 :

(4sc,dec) X 6 (30 sts)

Round 16-18 :

sc around (30 sts)

Round 19 :

(3sc,dec) X 6 (24 sts)

Info :

After round 19 place the circle inside!

Round 20-22 :

sc around (24 sts)

Round 23 :

(2sc,dec) X 6 (18 sts)

Round 24-26 :

sc around (18 sts)

Round 27 :

(1sc,dec) X 6 (12 sts)

Round 28-29 :

sc around (12 sts)

Info :

Stuff the finished cone with filler rather tightly with the ends of the scissors. Wet the bottom a little and stand it to dry on an even surface.
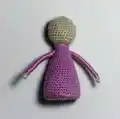
— Arms (make 2) :

Infos :

Prepare 2 pieces of wire 10cm (4 in) long. Wrap beige thread around 2 fingers 10 times and tie it tightly in the middle. Cut at other side. Fold in half so that the knot is at the place of fold, then put the wire around the bunch of threads at a 3-4mm distance from the knot, twist the ends of the wire together very tightly at the wrist. Cut the bunch of threads diagonally at a 3cm distance from the wired wrist.

Step 1 :

Take lilac thread, leave a long tail, place it along the bunch up to the wrist, and start to wrap the thread around the arm very tightly and neatly above the wire

Step 2 :

When you reach the end of beige threads, tie the lilac thread very tightly in knot, leave long tails

Step 3 :

Repeat wrapping with lilac thread again – the sleeve would be wrapped twice. Tie the ends very tightly

Step 4 :

Cut off the wire, leaving 1 cm (0.4 in) long tails. The length of arms should be ~3.5cm (1.4 in)

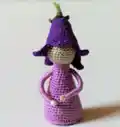
— Bluebell Hat Corolla :

Round 1 :

2 ch and 5 sc into first ch (5 sts)

Round 2 :

(inc) X 5 (10 sts)

Round 3 :

(1sc,inc) X 5 (15 sts)

Round 4 :

sc around (15 sts)

Round 5 :

(2sc,inc) X 5 (20 sts)

Round 6-7 :

sc around (20 sts)

Round 8 :

(3sc,inc) X 5 (25 sts)

Round 9-10 :

sc around (25 sts)

Round 11 :

(4sc,inc) X 5 (30 sts)

Round 12-13 :

sc around (30 sts)

Round 14 :

(5sc,inc) X 5 (35 sts)

Round 15-16 :

sc around (35 sts)

Round 17 :

(6sc,inc) X 5 (40 sts)

Round 18 :

sc around (40 sts), finish with sl st

Triangular Peak :

R1: 8 sc, 1 ch | R2: 5 sc, dec (6 sts), 1 ch | R3: 3 sc, dec (4 sts), 1 ch | R4: 1 sc, dec (2 sts), 1 ch | R5: 1 sc, 1 ch. Move down with 4 sl st along the side and start next peak (total 5 peaks)

Info :

When all 5 peaks are finished, crochet around by stitches in sc, dc and sl st. The lowest sl st is made in the previous 18th row.

— Bluebell Hat Calyx :

Instructions :

8 ch, make sc in 7th ch, then make 6 sc around (not in) the long chain; then 1 sl st in 3rd ch from the beginning; (make 4 ch, 3 sc, sl st in 3rd previous ch) X 4. Then make again 4 ch, 3 sc, then get around the pedicle that sticks out, and make last st sl in 3rd previous ch

— Eyes and Mouth :

Eyes :

Embroider with dark brown 3 strands of embroidery floss between rounds 8 and 9. Distance between eyes is 4 crochet stitches. Length of eyes is 1 (or 1.5) single crochet. Height of eyes is 4 sew stitches.

Mouth :

Embroider with reddish brown embroidery floss between round 5 and 6, in 3 stitches

— Small Bluebell Flower Corolla :

Round 1 :

2 ch and 5 sc into first ch (5 sts)

Round 2 :

(inc) X 5 (10 sts)

Round 3-5 :

sc around (10 sts)

Round 6 :

(1sc,inc) X 5 (15 sts)

Round 7-8 :

sc around (15 sts), finish with sl st

Round 9 :

Make 5 triangular peaks: 4ch, 1sl st, 1sc, 1 dc, sl st in 4th sc (from the beginning peak) previous round

— Small Bluebell Flower Stem :

Filament :

Make filament from light yellow thread – tie a long piece of thread around 2 short pieces to get 5 filaments. Pull the long tail through the central hole of the flower.

Stem :

Prepare 12 cm (4.7 in) piece of wire, pass it through some loops of the flower's center, fold in half and twist together to form the stem. Yellow thread tail hangs down along the wire.

Wrapping :

Take green thread and start to wrap it around the stem tightly, placing the wraps side by side. When you wrap around 1 cm of stem, cut yellow thread off. When you wrap around 5 cm of stem in total, tie the ends of the threads tightly in knot.

Finishing :

Cut the wire off at a distance of 2-3mm from the knot, bend the wire upward and press it hard to the stem. Cut the threads at a 5mm distance from the knot and apply glue stick to the ends.

Assembly Instructions

  • Sew the head to the body neatly with imperceptible stitches between 2nd and 3rd rounds of the head using beige embroidery floss
  • Find spots for the arms 3 rounds down from the neckline on both sides of the body and mark with pins
  • Widen the chosen spot with the crochet hook, insert the end of arm's wire into the hole, thread the long lilac threads through with a tapestry needle and pull to deepen the arm in the body
  • Sew the arm to the body around the shoulder very carefully with a sewing needle and embroidery floss in very small imperceptible stitches, then pull the tail of threads and cut it off
  • Pull the tail of calyx inside the flower hat through the central hole, then sew the sepals to the flower in small imperceptible stitches
  • Put a little bit of filler inside the finished flower hat, place the hat on the doll's head, fix with pins and sew it thoroughly to the head by imperceptible stitches
  • Give the finished small bluebell flower to the fairy's hand to complete your Bluebell Fairy

Important Notes

  • 💡This project requires excellent sewing skills and thorough, neat assembly work—take your time with each piece
  • 💡Pull the initial thread end out between rounds 2 and 3 to serve as a marker and help count rounds on all pieces
  • 💡When pieces become voluminous, fold them in half while working to make crocheting easier and more manageable
  • 💡Make both arms at the same time, alternating steps between them to ensure they end up similar in size and shape
  • 💡Use thin embroidery floss for sewing as it slides well and doesn't get stuck in the tight crochet stitches
  • 💡The bottom of the body cone must be wetted and dried on an even surface to stand properly—don't skip this step
  • 💡Work with very tight tension when wrapping thread around arms and flower stems to prevent unraveling during use

This enchanting Bluebell Fairy pattern brings woodland magic to life in the most delicate miniature form imaginable! Designed for advanced crocheters who love a challenge, this pattern combines fine threadwork, wire manipulation, and precise embroidery to create a 6cm fairy with incredible detail. From her cascading bluebell hat with five perfect petals to her carefully wrapped lilac sleeves and tiny embroidered face, every element of this fairy showcases your mastery of the craft. The addition of a matching small bluebell flower makes her a complete woodland sprite ready to enchant any fairy garden or become a treasured keepsake gift. 🧚✨

You ask,

we answer.

FAQs

What size will my finished Bluebell Fairy be?

If you use the materials mentioned in the pattern (cotton crochet thread with 0.9-1mm hook), your finished fairy will be approximately 6cm (2.4 inches) tall. The head will be about 2cm high and the body cone about 4cm high. Using thicker yarn will result in a larger fairy that would need proportionally longer arms and hair.

Why won't my fairy's body stand straight?

The body needs to be properly shaped to stand. After stuffing, wet the bottom of the cone slightly and place it on an even surface to dry while you work on other pieces. This flattens the base and allows the fairy to stand properly. Also make sure you've inserted the cardboard circle base after round 19 as instructed.

How do I prevent the arm wrapping from unraveling?

The key is to wrap the lilac thread extremely tightly and tie it securely with multiple knots. The pattern instructs you to wrap the sleeve twice for extra security. Make sure to twist the wire very tightly at the wrist before beginning to wrap, and always leave long tails when tying off to ensure the knots won't come loose.

Can I make this fairy without the wire in the arms?

The wire is essential for the arm construction method used in this pattern—it provides the structure around which the thread bundle is wrapped and helps secure the arms to the body. Without it, the arms wouldn't have the proper shape or stability. If you're uncomfortable with wire, you might need to completely redesign the arm construction method.

What's the best way to create imperceptible stitches when assembling?

Use embroidery floss that matches your crochet thread color exactly, and work with very small stitches that catch only a few threads of the crochet fabric. Take your time and ensure each stitch goes through the same row on both pieces you're joining. The pattern recommends using beige embroidery floss as it slides well through the tight stitches.

How do I make the triangular peaks on the bluebell hat uniform?

Work slowly and count your stitches carefully for each peak. The pattern shows you decrease gradually from 8 stitches down to 1. After completing each peak, use exactly 4 slip stitches to move down the side before starting the next peak. Pin the peaks in place before doing the final round of edging to ensure they're evenly spaced.