🧶 Beautiful ✨ Detailed 💝 Adorable

Amigurumi Cactus Collection Amigurumi Pattern

Amigurumi Cactus Collection Amigurumi Pattern
4.8★ Rating
1.5-2 Hours Time Needed
3.9K Made This
✂️

Beginner Friendly Level

Perfect for those just starting their sewing journey, with clear instructions and simple techniques

⏱️

Bite-Sized Project

Complete in under 2 hours—quick, fun, and perfect for a little creative escape.

🏡

Cozy Accent

A warm touch for your space that transforms ordinary corners into inviting nooks filled with handmade charm.

About This Amigurumi Cactus Collection Amigurumi Pattern

Amigurumi Cactus Collection Amigurumi Pattern crochet pattern - detailed view of completed project

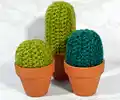
These no-fuss cacti require only basic crochet knowledge and simple materials. They're perfect as gifts, home decor accents, or as your first amigurumi project that guarantees success and smiles!

Why You'll Love This Amigurumi Cactus Collection Amigurumi Pattern

I absolutely love this pattern because it's incredibly beginner-friendly yet produces such charming results! There's something magical about creating a plant that never wilts or needs watering. I find the repetitive rounds meditative and relaxing, perfect for unwinding after a busy day. The three size options mean you can create an entire cactus family, and they work up so quickly that you'll want to make multiples. Plus, they make the most thoughtful handmade gifts for plant lovers who might not have the greenest thumb!

Amigurumi Cactus Collection Amigurumi Pattern step 1 - construction progress Amigurumi Cactus Collection Amigurumi Pattern step 2 - assembly progress Amigurumi Cactus Collection Amigurumi Pattern step 3 - details and accessories Amigurumi Cactus Collection Amigurumi Pattern step 4 - final assembly and finishing

Switch Things Up

I love experimenting with different yarn textures to create unique cactus variations! Try using a fuzzy or boucle yarn to mimic certain succulent varieties, or add small French knots with embroidery thread to create the appearance of tiny spines. You could also work with variegated yarn in shades of green to create natural-looking color variations throughout your cactus.

For a more whimsical approach, consider adding tiny crocheted flowers in bright colors like pink, yellow, or orange to the top of your cacti. You can also create a whole desert scene by making multiple sizes and arranging them together in a long planter or wooden box filled with sand or small pebbles.

I've experimented with different pot styles too—painting terracotta pots in pastel colors or adding geometric patterns can completely change the aesthetic from rustic to modern. Some crafters even add googly eyes or embroidered faces to create adorable cactus characters that bring personality to any room!

Common Mistakes & How to Fix Them

✗ Not working through back loops only can cause the cactus to lose its ribbed texture and authentic appearance ✗ Stuffing too loosely results in a floppy cactus that won't stand upright properly in the pot ✗ Skipping the stitch count at the end of each round leads to uneven shaping and sizing problems ✗ Pulling chain stitches too tight at the beginning makes it difficult to work into them properly

Amigurumi Cactus Collection Amigurumi Pattern

Bring the desert home without the prickles! This charming amigurumi cactus pattern features three adorable sizes—small, medium, and large—perfect for creating your own little succulent garden. Each cactus is crafted with simple stitches and soft yarn, making them ideal for brightening up any space. Whether you're a beginner looking for a quick project or simply love low-maintenance plants, these sweet cacti are the perfect blend of cute and easy. Add them to terracotta pots for a realistic touch that will never need watering!

Beginner Friendly 1.5-2 Hours

Materials Needed for Amigurumi Cactus Collection Amigurumi Pattern

— Main Fabric

  • 01
    Worsted Weight Yarn in Green shades (Tube Caron Simply Soft in Heather recommended)
  • 02
    Additional green yarn in teal or dark green for variety

— Tools Required

  • 01
    Crochet Hook D3 (3.25mm) or size to match gauge
  • 02
    Polyester Fiberfill for stuffing
  • 03
    Darning Needle for weaving in ends
  • 04
    Scissors
  • 05
    Small terracotta pots for display (optional but recommended)

Progress Tracker

0% Complete

— Small Cactus :

Chain 11

Skip first chain, SC into next 10 chains. (10)

R1-2 :

Working through back loop only, SC across.

Repeat :

Repeat 8 more times (18 rows total)

Info :

Continue to finishing instructions

— Medium Cactus :

Chain 16

Skip first chain, SC into next 15 chains. (15)

R1-2 :

Working through back loop only, SC across.

Repeat :

Repeat 8 more times (18 rows total)

Info :

Continue to finishing instructions

— Large Cactus :

Chain 21

Skip first chain, SC into next 20 chains. (20)

R1-2 :

Working through back loop only, SC across.

Repeat :

Repeat 8 more times (18 rows total)

Info :

Continue to finishing instructions

— Finishing :

Step 1 :

Sew up the chain row and the 20th row, through back loops only on 18th row.

Step 2 :

Place darning needle through the top stitch of every other row and pull tail through these stitches 2-3 times.

Step 3 :

Stuff

Step 4 :

Repeat assembly step 2.

Step 5 :

Place flower on top of cactus, and place bottom into a small pot.

Assembly Instructions

  • Sew up the chain row and the 20th row together, working through back loops only on the 18th row to create the seam.
  • Thread your darning needle through the top stitch of every other row to create gathering points.
  • Pull the tail through these gathered stitches 2-3 times to cinch the top closed.
  • Stuff the cactus firmly with polyester fiberfill before closing completely to ensure it stands upright.
  • Repeat the gathering technique at the bottom to close and shape the cactus properly.
  • Optional: Add a small crocheted flower to the top of your cactus for extra charm.
  • Place the finished cactus into a small terracotta pot for the most authentic and adorable display.

Important Notes

  • 💡Hook size is not critical as long as your stitches are tight enough to prevent stuffing from showing through.
  • 💡Working through back loops only is essential for creating the ribbed cactus texture throughout the pattern.
  • 💡Don't let your stuffing escape by ensuring you pull the gathering stitches tight before final assembly.
  • 💡Keep track of your row count to ensure all cacti in a set are uniform in height.
  • 💡Use stitch markers if needed to help keep your place, especially when counting rows.
  • 💡The pattern works up quickly, so consider making multiple cacti in different colors for variety.
  • 💡Adjust your yarn size and embroidery accordingly if you change your yarn weight from the recommended worsted weight.

This adorable amigurumi cactus collection brings desert charm to your home without any of the prickles! Perfect for beginners, this quick and satisfying project creates the cutest low-maintenance plants that never need watering. Make all three sizes to create your own mini succulent garden, or gift them to plant-loving friends who appreciate handmade treasures. With simple stitches and minimal shaping, you'll be amazed at how quickly these little beauties come together. Happy crocheting, and enjoy your prickle-free garden! 🌵✨

You ask,

we answer.

FAQs

Can I use different yarn weights for this pattern?

Yes! You can use any yarn weight, but adjust your hook size accordingly. Just ensure your stitches are tight enough to prevent stuffing from showing through. Lighter weights will create smaller cacti, while bulkier yarns will make larger versions.

What does 'working through back loop only' mean?

When you work through the back loop only (BLO), you insert your hook through only the loop farthest from you instead of under both loops of the stitch. This creates the distinctive ribbed texture that makes the cactus look realistic.

Do I need to use terracotta pots?

No, the pots are optional! You can display your cacti in any small container, use them as standalone decorations, or even add a flat base by crocheting a circle to help them stand independently.

How can I make my cactus stand upright better?

Stuff firmly (but not too tightly) and make sure to pull the gathering stitches very tight at both the top and bottom. You can also add a small amount of weighted pellets to the bottom before stuffing for extra stability.

Can I make these cacti in different colors?

Absolutely! While traditional green shades look most realistic, feel free to experiment with any colors you like. Pastels, variegated yarns, or even rainbow colors can create fun, whimsical versions.