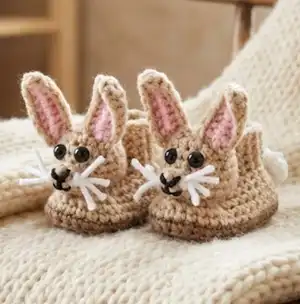
Welcome to one of the sweetest little projects you'll ever work on — a pair of handmade bunny baby booties that are as fun to make as they are adorable to look at. This pattern walks you through every single step, from crocheting the base bootie and the bunny head down to the tiny little ears, nose, tail, and whiskers. Whether you're making these as a gift for a newborn or just treating yourself to a cozy weekend project, these booties are guaranteed to steal every heart in the room. Available in multiple sizes to fit babies from newborn all the way up to 24 months, so you can grow right along with the little one.
Progress Tracker
0% Complete
— Bunny Ears (Inner Section – Make 4) :
Info :
Using pink yarn and F hook, CH 8, SC in 2nd CH from hook and in remaining 6 CHs, fasten off. (7 SC)
— Bunny Ears (Outer Section – Make 4) :
Row 1 :
With Buff and F hook, CH 9, HDC in 2nd CH from hook and in remaining CHs, CH 1, turn. (8 HDC)
Row 2 :
Place pink inner ear right side up on top of the buff outer section. Working through both pieces, working up the first side, SC in next 7 STs, SL ST in the next two STs of the brown piece only, working through both pieces again, SC in next 7 STs, 2 SC along the bottom, SL ST to join and fasten off leaving a tail for sewing. Will have a slight bend. (11 SC)
Info :
Tuck in any loose ends minus the tail for sewing.
— Bunny Nose (Make 2) :
Round 1 :
With Buff and F hook, CH 2, 6 SC in 2nd CH from hook, do not join. (6 SC)
Round 2 :
SC in each SC around, SL ST to join, fasten off leaving a tail for sewing. (6 SC)
— Bunny Tail (Make 2) :
Round 1 :
With White and F hook, CH 2, 6 SC in 2nd CH from hook, do not join. (6 SC)
Round 2 :
In back loops only, 2 SC in each SC around. (12 SC)
Round 3 :
SC DEC together 2 SC around, fasten off leaving a long tail for sewing. Weave tail through SC stitches, pull tight to form a ball. Use remaining tail to sew with. (6 SC)
— Head (Make 2 – All Sizes) :
Info :
This head works for all bootie sizes and uses an F hook. This piece is made in continuous rounds. Use a stitch marker if needed.
Round 1 :
Using Cafe color and F hook, CH 2, 6 SC in 2nd CH from hook. Do not join. Use stitch marker if needed. (6 SC)
Round 2 :
2 SC in each SC around. (12 SC)
Round 3 :
*SC in next SC, 2 SC in next SC*, repeat from * to * around. (18 SC)
Round 4-7 :
SC in each SC around. (18 SC)
Round 8 :
*SC DEC in next 2 SC, SC in next SC*, repeat from * to * around. (12 SC)
Round 9 :
*SC DEC next 2 SC*, repeat from * to * around, fasten off leaving approximately a 12" tail to sew. (6 SC)
Info :
Do not stuff yet. Continue to bunny assembly.
— Base Bootie Sole – 0-3 Month / 3-6 Month (Make 2) :
Info :
0-3 Month: 3.5" use G hook. 3-6 Month: 4" use H hook. Remember to measure baby's foot to ensure the correct size is being made.
Round 1 :
Using Sole Color, CH 10, SC in 2nd CH from hook, SC in next 5 CH, HDC in next CH, 2 HDC in next CH, 5 HDC in next CH, working down opposite side of starting CH, 2 HDC in next CH, HDC in next CH, SC in next 5 CH, 2 SC in next CH. (24 Stitches)
Info :
This piece is worked in continuous rounds so do not SL ST to join. Just continue on to next round. Use a stitch marker to mark the beginning stitch.
Round 2 :
2 SC in first SC, SC in next 8 stitches, *2 SC in next stitch, SC in next stitch*, repeat from * to * 2 more times, SC in next 8 stitches, 2 SC in next stitch. (29 SC)
Round 3 :
2 SC in next stitch, SC in next 9 stitches, 2 SC in next stitch, *SC in next stitch, 2 SC in next stitch*, repeat from * to * 2 more times, SC in next 9 stitches, 2 SC in next stitch, SC in next stitch, SL ST in next stitch. (35 SC)
Info :
Check gauge here. Sole should measure 3.5" with G hook or 4" with H hook. If gauge is off, adjust as needed.
— Base Bootie Main – 0-3 Month / 3-6 Month :
Row 1 :
CH 1, working in back loops only, SC in same stitch as joining and in each SC around, SL ST in first SC to join. (35 SC)
Info :
At this point you can change colors if desired to have the sole one color and the bootie a contrasting color. If the decision is to change colors, fasten off, and attach new color in same stitch.
Row 2 :
CH 1, working in both loops, SC in each SC around, SL ST in first SC to join. (35 SC)
Row 3 :
CH 1, SC in same stitch as joining and in each SC around, SL ST in first SC to join. (35 SC)
Info :
We will now begin shaping the toe.
Row 4 :
CH 1, SC in same stitch as joining and in next 11 stitches, skip next stitch, HDC in next stitch, skip next stitch, DC in next stitch, DC DEC next 2 stitches together, DC in next stitch, skip next stitch, HDC in next stitch, skip next stitch, SC in next 13 stitches, SL ST in first SC to join. (30 stitches)
Info :
Use a stitch marker to mark the first stitch so there is no confusion what stitch to join at the end of the row.
Row 5 :
CH 1, skip joining stitch, SC in next 10 stitches, skip next stitch, SC in next stitch, skip next stitch, SC in next 2 stitches, skip next stitch, SC in next stitch, skip next stitch, SC in next 10 stitches, skip last stitch, SL ST in first SC to join. (24 SC)
Row 6 :
CH 1, SC in same stitch as joining and in next 7 SC, *skip next SC, SC in next SC*, repeat from * to * 2 more times, skip next SC, SC in next 8 SC, skip last SC, SL ST in first SC to join. (19 SC)
Row 7 :
CH 1, using front loops only, SC in same stitch as joining and in next 7 SC, skip next SC, SC in each of the next 2 SC, skip next SC, SC in next 7 SC, SL ST in first SC to join. (17 SC)
Info :
The last 3 rows form the ankle cuff.
Row 8-10 :
CH 1, using front loops only, SC in same stitch as joining and in each SC around, SL ST in first SC to join. At end of row 10, fasten off and weave in ends. (17 SC)
— Base Bootie Sole – 6-12 Month / 12-18 Month (Make 2) :
Info :
6-12 Month: 4.5" use G hook. 12-18 Month: 5" use H hook.
Round 1 :
Using Sole Color, CH 14, SC in 2nd CH from hook, SC in next 9 CH, HDC in next CH, 2 HDC in next CH, 5 HDC in next CH, working down opposite side of starting CH, 2 HDC in next CH, HDC in next CH, SC in next 9 CH, 2 SC in next CH. (32 Stitches)
Info :
This piece is worked in continuous rounds so do not SL ST to join. Just continue on to next round. Use a stitch marker to mark the beginning stitch.
Round 2 :
2 SC in first SC, SC in next 12 stitches, *2 SC in next stitch, SC in next stitch*, repeat from * to * 2 more times, SC in next 12 stitches, 2 SC in next stitch. (37 SC)
Round 3 :
2 SC in next stitch, SC in next 13 stitches, 2 SC in next stitch, *SC in next stitch, 2 SC in next stitch*, repeat from * to * 2 more times, SC in next 13 stitches, 2 SC in next stitch, SC in next stitch, SL ST in next stitch. (43 SC)
Info :
Check gauge here. Sole should measure 4.5" with G hook or 5" with H hook. If gauge is off, adjust as needed.
— Base Bootie Main – 6-12 Month / 12-18 Month :
Row 1 :
CH 1, working in back loops only, SC in same stitch as joining and in each SC around, SL ST in first SC to join. (43 SC)
Info :
At this point you can change colors if desired. If the decision is to change colors, fasten off, and attach new color in same stitch.
Row 2 :
CH 1, working in both loops, SC in each SC around, SL ST in first SC to join. (43 SC)
Row 3 :
CH 1, SC in same stitch as joining and in each SC around, SL ST in first SC to join. (43 SC)
Info :
We will now begin shaping the toe.
Row 4 :
CH 1, SC in same stitch as joining and in next 15 stitches, skip next stitch, HDC in next stitch, skip next stitch, DC in next stitch, DC DEC next 2 stitches together, DC in next stitch, skip next stitch, HDC in next stitch, skip next stitch, SC in next 17 stitches, SL ST in first SC to join. (38 stitches)
Info :
Use a stitch marker to mark the first stitch so there is no confusion what stitch to join at the end of the row.
Row 5 :
CH 1, skip joining stitch, SC in next 14 stitches, skip next stitch, SC in next stitch, skip next stitch, SC in next 2 stitches, skip next stitch, SC in next stitch, skip next stitch, SC in next 14 stitches, skip last stitch, SL ST in first SC to join. (32 SC)
Row 6 :
CH 1, SC in same stitch as joining and in next 11 SC, *skip next SC, SC in next SC*, repeat from * to * 2 more times, skip next SC, SC in next 12 SC, skip last SC, SL ST in first SC to join. (27 SC)
Row 7 :
CH 1, using front loops only, SC in same stitch as joining and in next 11 SC, skip next SC, SC in each of the next 2 SC, skip next SC, SC in next 11 SC, SL ST in first SC to join. (25 SC)
Info :
The last 4 rows form the ankle cuff.
Row 8-11 :
CH 1, using front loops only, SC in same stitch as joining and in each SC around, SL ST in first SC to join. At end of row 11, fasten off and weave in ends. (25 SC)
— Base Bootie Sole – 18-24 Month (Make 2) :
Info :
18-24 Month: 5.5" use H hook.
Round 1 :
Using Sole Color, CH 15, SC in 2nd CH from hook, SC in next 10 CH, HDC in next CH, 2 HDC in next CH, 5 HDC in next CH, working down opposite side of starting CH, 2 HDC in next CH, HDC in next CH, SC in next 10 CH, 2 SC in next CH. (34 Stitches)
Info :
This piece is worked in continuous rounds so do not SL ST to join. Just continue on to next round. Use a stitch marker to mark the beginning stitch.
Round 2 :
2 SC in first SC, SC in next 13 stitches, *2 SC in next stitch, SC in next stitch*, repeat from * to * 2 more times, SC in next 13 stitches, 2 SC in next stitch. (39 SC)
Round 3 :
2 SC in next stitch, SC in next 14 stitches, 2 SC in next stitch, *SC in next stitch, 2 SC in next stitch*, repeat from * to * 2 more times, SC in next 14 stitches, 2 SC in next stitch, SC in next stitch, 2 SC in next stitch. (46 SC)
Round 4 :
1 SC in next stitch, 2 SC in next stitch, 1 SC in next 42 stitches, 2 SC in next stitch, SL ST in last stitch. (48 SC)
Info :
Check gauge here. Sole should measure 5.5" with H hook. If gauge is off, adjust as needed.
— Base Bootie Main – 18-24 Month :
Row 1 :
CH 1, working in back loops only, SC in same stitch as joining and in each SC around, SL ST in first SC to join. (48 SC)
Info :
At this point you can change colors if desired. If the decision is to change colors, fasten off, and attach new color in same stitch.
Row 2 :
CH 1, working in both loops, SC in each SC around, SL ST in first SC to join. (48 SC)
Row 3 :
CH 1, SC in same stitch as joining and in each SC around, SL ST in first SC to join. (48 SC)
Info :
We will now begin shaping the toe.
Row 4 :
CH 1, SC in same stitch as joining and in next 18 stitches, skip next stitch, HDC in next stitch, skip next stitch, DC in next stitch, DC DEC next 2 stitches together, DC in next stitch, skip next stitch, HDC in next stitch, skip next stitch, SC in next 19 stitches, SL ST in first SC to join. (43 stitches)
Row 5 :
CH 1, skip joining stitch, SC in next 17 stitches, skip next stitch, SC in next stitch, skip next stitch, SC in next 2 stitches, skip next stitch, SC in next stitch, skip next stitch, SC in next 17 stitches, SL ST in first SC to join. (38 SC)
Row 6 :
CH 1, SC DEC next 2 SC, SC in next 12 SC, SC DEC next 2 SC, *skip next SC, SC in next SC*, repeat from * to * 2 more times, skip next SC, SC DEC next 2 SC, SC in next 11 SC, SC DEC last 2 SC, SL ST in first SC to join. (30 SC)
Row 7 :
CH 1, SC DEC next 2 SC, SC in next 11 SC, skip next SC, SC in each of the next 2 SC, skip next SC, SC in next 11 SC, SC DEC last 2 SC, SL ST in first SC to join. (26 SC)
Row 8 :
CH 1, SC in same stitch as joining and in next 10 SC, skip next SC, SC in next 3 SC, skip next SC, SC in next 10 SC, SL ST in first SC to join. (24 SC)
Info :
The last 4 rows form the ankle cuff.
Row 9-12 :
CH 1, using front loops only, SC in same stitch as joining and in each SC around, SL ST in first SC to join. At end of row 12, fasten off and weave in ends. (24 SC)
There's honestly nothing quite like finishing a tiny pair of handmade bunny booties and seeing them come to life with their floppy ears, little button nose, and fluffy tail. This pattern is one of those projects that feels like a genuine act of love — whether you're gifting it to a new parent or just making something sweet for yourself. Every stitch is a little moment of creativity, and the end result is something truly magical. 🐰🧶 Happy crocheting, and enjoy every bit of the journey! ✨