🧶 Beautiful ✨ Detailed 💝 Adorable

11 Adorable Animal Dolls Collection Amigurumi Pattern

11 Adorable Animal Dolls Collection Amigurumi Pattern
4.5★ Rating
4-5 Hours Time Needed
2.2K Made This
✂️

Beginner Friendly Level

Perfect for those just starting their sewing journey, with clear instructions and simple techniques

⏱️

Weekend Treat

Takes 5-7 hours, making it an enjoyable project to finish over a couple of days.

🧸

Cute Companion

An adorable friend to cherish, handcrafted with love to bring comfort and joy for years to come.

About This 11 Adorable Animal Dolls Collection Amigurumi Pattern

11 Adorable Animal Dolls Collection Amigurumi Pattern crochet pattern - detailed view of completed project

The beauty of this pattern lies in its versatility—once you've mastered one doll, you can easily create all eleven with confidence. Each character has its own personality through unique ear shapes, facial features, and charming outfits that bring them to life.

Why You'll Love This 11 Adorable Animal Dolls Collection Amigurumi Pattern

I absolutely love this pattern collection because it gives you so much creative freedom! Once you understand the basic construction, you can create an entire family of adorable animal friends in different colors and styles. The fact that all dolls share the same fundamental body pattern means you'll build confidence quickly as you work through the collection. I especially appreciate how the pattern includes multiple clothing options—from sweet dresses with shoulder straps to practical pants—so each character can have their own unique wardrobe. The small size makes these perfect for quick projects that still feel incredibly rewarding when completed!

11 Adorable Animal Dolls Collection Amigurumi Pattern step 1 - construction progress 11 Adorable Animal Dolls Collection Amigurumi Pattern step 2 - assembly progress 11 Adorable Animal Dolls Collection Amigurumi Pattern step 3 - details and accessories 11 Adorable Animal Dolls Collection Amigurumi Pattern step 4 - final assembly and finishing

Switch Things Up

I love experimenting with these adorable doll patterns because there are so many ways to make them uniquely yours! One of my favorite tweaks is changing up the color combinations—instead of traditional colors, try pastel shades for a softer look or bold, vibrant colors for a more playful vibe. You could even create seasonal versions: imagine a white bunny with red and green accessories for Christmas, or an orange bear for autumn!

I also enjoy mixing and matching the clothing between different animals. Why not put the pants on the rabbit or the dress on the bear? You can create your own unique character combinations that aren't in the original pattern. Another fun variation is adding embroidered details like spots on the giraffe, stripes on a cat version, or even little flowers on the dresses using simple embroidery stitches.

For a more advanced twist, I sometimes modify the ear shapes to create entirely new animals—pointed ears could turn a bear into a fox, or rounded ears could transform any character into a mouse. You could also experiment with different facial expressions by changing the eye placement or adding embroidered eyebrows, smiles, or sleeping eyes for different personalities. The possibilities are truly endless with this versatile collection!

Common Mistakes & How to Fix Them

✗ Not crocheting tight enough stitches which can cause stuffing to show through the fabric gaps ✗ Forgetting to place safety eyes before closing the head completely making it difficult to secure them properly ✗ Overstuffing the body parts which distorts the shape and makes sewing pieces together challenging ✗ Not using stitch markers to track round endings leading to misaligned stitches and uneven shapes ✗ Skipping the slip stitch and fasten off steps which causes the pieces to unravel during assembly ✗ Not leaving long enough tails for sewing which makes attaching pieces to the body frustrating

11 Adorable Animal Dolls Collection Amigurumi Pattern

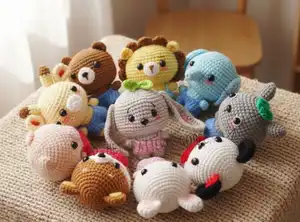
Create your own charming collection of 11 unique amigurumi animal dolls with this comprehensive crochet pattern! This delightful set includes patterns for rabbits, elephants, bears, giraffes, dogs, pandas, lions, Totoro, and a pig—each with their own adorable outfits and accessories. Perfect for gifting or building your own handmade toy collection, these small stuffed friends are crafted using simple stitches and basic techniques. Each doll features safety eyes, cute details, and customizable clothing options including dresses and pants with shoulder straps.

Beginner Friendly 4-5 Hours

Materials Needed for 11 Adorable Animal Dolls Collection Amigurumi Pattern

— Main Fabric

  • 01
    Yarn in white color for white rabbit
  • 02
    Yarn in grey color for grey rabbit and Totoro
  • 03
    Yarn in blue color for elephant
  • 04
    Yarn in brown color for bear
  • 05
    Yarn in light brown color for giraffe and light brown dog
  • 06
    Yarn in light grey color for light grey dog
  • 07
    Yarn in yellow color for lion
  • 08
    Yarn in skin color for pig
  • 09
    Yarn in pink color for dresses
  • 10
    Yarn in dark blue color for pants
  • 11
    Yarn in light blue color for dress
  • 12
    Yarn in red color for panda dress and bow
  • 13
    Yarn in dark pink color for pig dress
  • 14
    Yarn in green color for leaves
  • 15
    Yarn in dark brown color for giraffe horns and lion mane
  • 16
    Yarn in light pink color for pig nose
  • 17
    Yarn in black color for details

— Tools Required

  • 01
    Crochet hook suitable for your yarn weight
  • 02
    Safety eyes (various sizes: 8mm recommended)
  • 03
    Stuffing (polyester fiberfill)
  • 04
    Yarn needle or tapestry needle for sewing
  • 05
    Scissors
  • 06
    Stitch markers or piece of contrasting yarn
  • 07
    Tweezers for stuffing hands
  • 08
    Hot glue gun (optional, for attaching hands)
  • 09
    Pink blush makeup powder or pink acrylic paint for cheeks

Progress Tracker

0% Complete

— 1. White Rabbit:

Head (white):

R1:

Magic Ring 6X

R2:

6V

R3:

(X, V) * 6

R4:

(X, V, X) * 6

R5:

(3X, V) * 6

R6:

(2X, V, 2X) * 6

R7:

(5X, V) * 6

R8:

(3X, V, 3X) * 6

R9-16:

48X

R17:

(3X, A, 3X) * 6

R18:

(5X, A) * 6

R19:

(2X, A, 2X) * 6

R20:

(3X, A) * 6

R21:

(X, A, X) * 6

Info:

Slst and fasten off. Leave long tail for sewing to body. Just follow the pattern and finish the head. You may refer photo 1.

Legs (white) * 2:

R1-3:

Magic Ring 9X

R4:

Join both two legs: 18X

Info:

You may refer photo 2: How to join legs + body.

Body (white):

R5-9:

Magic Ring 18X

Info:

Slst and fasten off.

Hand (white) * 2:

R1:

Magic Ring 6X

R2-3:

6X

Info:

Slst and fasten off. You may refer photo 3: For tips on hands.

Ears (white) * 2:

R1:

Magic Ring 6X

R2:

6V

R3-7:

12X

Info:

Sew the ears between R3-5 on the head.

Face Details:

Info:

Place safety eyes between R12 and R13. The distance between both safety eyes is 6 stitches.

Dress (pink):

R1:

22CH, slip stitch heads with tail into a circle. Do 22F in circle.

R2:

4X, 5CH, skip 3 stitches, 8X, 5CH, skip 3 stitches, 4X5CH to make 2 shoulder straps.

Info:

You may refer Photo 4: The dress and Photo: 5 How to dress straps.

— 2. Grey Rabbit:

Head (grey):

R1:

Magic Ring 6X

R2:

6V

R3:

(X, V) * 6

R4:

(X, V, X) * 6

R5:

(3X, V) * 6

R6:

(2X, V, 2X) * 6

R7:

(5X, V) * 6

R8:

(3X, V, 3X) * 6

R9-16:

48X

R17:

(3X, A, 3X) * 6

R18:

(5X, A) * 6

R19:

(2X, A, 2X) * 6

R20:

(3X, A) * 6

R21:

(X, A, X) * 6

Info:

Slst and fasten off. Leave long tail for sewing to body. Just follow the pattern and finish the head. You may refer photo 1.

Legs (grey) * 2:

R1-3:

Magic Ring 9X

R4:

Join both two legs: 18X

Info:

You may refer photo 2: How to join legs + body.

Body (grey):

R5-9:

Magic Ring 18X

Info:

Slst and fasten off.

Hand (grey) * 2:

R1:

Magic Ring 6X

R2-3:

6X

Info:

Slst and fasten off. You may refer photo 3: For tips on hands.

Ears * 2:

R1:

16CH, 6X, 8T, Into 1 stitch: 5T, 8T, 6X, 1CH, Turn over

R2:

6X, 8T, 5TV, 8T, 6X

Infos:

Sew the ears on R8. Sew the eyebrow above the eyes.

Face Details:

Info:

Place safety eyes between R12 and R13. The space between two holes that you put safety eyes is 7 stitches.

Leaf (green):

R1:

10CH, reverse 1 stitch: 2T, X, SL, X, 2T, W, 2T, X, SL, X, 2T, V

Dress 2 (pink):

R1:

22CH, 22F in circle

R2:

4X, 5CH, skip 3 stitches, 8X, 5CH, skip 3 stitches, 4X5CH to make 2 shoulder straps.

Info:

You may refer Photo 4: The dress and Photo: 5 How to dress straps.

— 3. Elephant (blue):

Head (blue):

R1:

Magic Ring 6X

R2:

6V

R3:

(X, V) * 6

R4:

(X, V, X) * 6

R5:

(3X, V) * 6

R6:

(2X, V, 2X) * 6

R7:

(5X, V) * 6

R8:

(3X, V, 3X) * 6

R9-16:

48X

R17:

(3X, A, 3X) * 6

R18:

(5X, A) * 6

R19:

(2X, A, 2X) * 6

R20:

(3X, A) * 6

R21:

(X, A, X) * 6

Info:

Slst and fasten off. Leave long tail for sewing to body. Just follow the pattern and finish the head. You may refer photo 1.

Legs (blue) * 2:

R1-3:

Magic Ring 9X

R4:

Join both two legs: 18X

Info:

You may refer photo 2: How to join legs + body.

Body (blue):

R5-9:

Magic Ring 18X

Info:

Slst and fasten off.

Hand (blue) * 2:

R1:

Magic Ring 6X

R2-3:

6X

Info:

Slst and fasten off. You may refer photo 3: For tips on hands.

Ears * 2:

Info:

Note: You have to Chain3, turn over every end of the working piece. (Chain 3= also count as 1 Double Crochet in next R)

R1:

Magic Ring 8F

R2:

2F, 4FV, 2F

R3:

4F, 4FV, 4F

Info:

Sew the ears on R6-18.

Face Details:

Info:

Place safety eyes between R12 and R13. The space between two holes that you put safety eyes is 6 stitches.

Nose:

R1:

Magic Ring 8X

R2-5:

8X

Info:

Sew it on R13-14.

Pants (dark blue):

R1:

11CH, 11X in circle

R2:

11X

Info:

R1 & R2 make 2, then join both pieces into 1: 22X

R4:

22X

R5:

4X, 5CH, skip 3 stitches, 8X, 5CH, skip 3 stitches, 4X5CH to make 2 shoulder straps.

Info:

You may refer photo 6: The pants and Photo 7: How to strap the pants.

— 4. Bear (brown):

Head (brown):

R1:

Magic Ring 6X

R2:

6V

R3:

(X, V) * 6

R4:

(X, V, X) * 6

R5:

(3X, V) * 6

R6:

(2X, V, 2X) * 6

R7:

(5X, V) * 6

R8:

(3X, V, 3X) * 6

R9-16:

48X

R17:

(3X, A, 3X) * 6

R18:

(5X, A) * 6

R19:

(2X, A, 2X) * 6

R20:

(3X, A) * 6

R21:

(X, A, X) * 6

Info:

Slst and fasten off. Leave long tail for sewing to body. Just follow the pattern and finish the head. You may refer photo 1.

Legs (brown) * 2:

R1-3:

Magic Ring 9X

R4:

Join both two legs: 18X

Info:

You may refer photo 2: How to join legs + body.

Body (brown):

R5-9:

Magic Ring 18X

Info:

Slst and fasten off.

Hand (brown) * 2:

R1:

Magic Ring 6X

R2-3:

6X

Info:

Slst and fasten off. You may refer photo 3: For tips on hands.

Ears (brown) * 2:

R1:

Magic Ring 6X

R2:

6V

Info:

Sew the ears on R4-7.

Face Details:

Info:

Place safety eyes between R12 and R13. The space between two holes that you put safety eyes is 6 stitches

Mouth (white):

R1:

Magic Ring 8X

R2:

8V

Info:

Leave long yarn sew to head. Use black yarn sew out the nose.

Pants (dark blue):

R1:

11CH, 11X in circle

R2:

11X

Info:

R1 & R2 make 2, then join both pieces into 1: 22X

R4:

22X

R5:

4X, 5CH, skip 3 stitches, 8X, 5CH, skip 3 stitches, 4X5CH to make 2 shoulder straps.

Info:

You may refer photo 6: The pants and Photo 7: How to strap the pants.

— 5. Giraffe (light brown):

Head (light brown):

R1:

Magic Ring 6X

R2:

6V

R3:

(X, V) * 6

R4:

(X, V, X) * 6

R5:

(3X, V) * 6

R6:

(2X, V, 2X) * 6

R7:

(5X, V) * 6

R8:

(3X, V, 3X) * 6

R9-16:

48X

R17:

(3X, A, 3X) * 6

R18:

(5X, A) * 6

R19:

(2X, A, 2X) * 6

R20:

(3X, A) * 6

R21:

(X, A, X) * 6

Info:

Slst and fasten off. Leave long tail for sewing to body. Just follow the pattern and finish the head. You may refer photo 1.

Legs (light brown) * 2:

R1-3:

Magic Ring 9X

R4:

Join both two legs: 18X

Info:

You may refer photo 2: How to join legs + body.

Body (light brown):

R5-9:

Magic Ring 18X

Info:

Slst and fasten off.

Hand (light brown) * 2:

R1:

Magic Ring 6X

R2-3:

6X

Info:

Slst and fasten off. You may refer photo 3: For tips on hands.

Ears (light brown) * 2:

R1:

6X

R2:

6V

R3:

(X, V) * 6

R4-7:

18X

Info:

Sew the ears on R6-8.

Face Details:

Info:

Place safety eyes between R10 and R11. The space between two holes that you put safety eyes is 6 stitches.

Horn * 2:

Info:

Begin with dark brown.

R1-3:

Magic Ring 8X

R4-7:

Change to yellow, 8X

Info:

Sew the horns on R3-5

Mouth (white):

R1:

4CH, working on 2nd stitch: 2X, W, X, V (Slip stitch, Chain 1)

R2:

V, X, 3V, X, 2V

Info:

Sew it on R12-16 to head.

Pants (dark blue):

R1:

11CH, 11X in circle

R2:

11X

Info:

R1 & R2 make 2, then join both pieces into 1: 22X

R4:

22X

R5:

4X, 5CH, skip 3 stitches, 8X, 5CH, skip 3 stitches, 4X5CH to make 2 shoulder straps.

Info:

You may refer photo 6: The pants and Photo 7: How to strap the pants.

— 6. Dog (light grey):

Head (light grey):

R1:

Magic Ring 6X

R2:

6V

R3:

(X, V) * 6

R4:

(2X, V) * 6

R5:

(3X, V) * 6

R6:

(4X, V) * 6

R7:

(5X, V) * 6

R8:

(6X, V) * 6

R9:

16X, 6X (white), 3X, 6X (white), 17X

R10:

15X, 7X (white), 3X, 7X (white), 16X

R11:

14X, 8X (white), 3X, 8X (white), 15X

R12:

13X, 21X (white), 14X

R13-16:

12X, 23X (white), 13X

R17:

3X, A, 6X, [white: A, 6X, A, 6X, A, 5X], X, A, 6X, A, 3X

R18:

5X, A, 4X, [white: X, A, 5X, A, 5X, A, X], 4X, A, 5X, A

R19:

2X, A, 4X, A, [white: 4X, A, 4X, A, 2X], 2X, A, 4X, A, 2X

R20:

3X, A, 3X, A, [white: 3X, A, 3X, A], 3X, A, 3X, A

R21:

X, A, 2X, A, 2X, [white: A, 2X, A], 2X, A, 2X, A, X

Info:

Slst and fasten off. Leave long tail for sewing to body. Just follow the pattern and finish the head.

Body & Legs (light grey) * 2:

R1:

Magic Ring 9X

R2-3:

9X

Info:

R1-R3 Make 2, fasten off 1 leg.

R4-8:

Join both legs into 1: 18X

Info:

You may refer photo 2: How to join legs + body.

Hand (light grey) * 2:

R1:

Magic Ring 6X

R2-3:

6X

Info:

Slst and fasten off. You may refer photo 3: For tips on hands.

Ears * 2:

R1:

5X in circle

R2:

2V, white: V, 2X

R3:

4X, white: 2V, 4X

R4:

3X, V, [white: 4X], V, 3X

R5:

X, V, X, V, X, [white: V, 2X, V], X, V, X, V, X

R6:

7X, white: 6X, 7X

Face Details:

Info:

Place safety eyes between R12 and R13. The space between two holes that you put safety eyes is 8 stitches.

Mouth (white):

R1:

6CH, reverse 4 stitches: W, 3X, V

R2:

V, 3X, W, 3X, 2V

R3:

18X

Pants (light blue):

R1:

11CH, 11X in circle

R2:

11X

Info:

R1 & R2 make 2, then join both pieces into 1: 22X

R4:

22X

R5:

4X, 5CH, skip 3 stitches, 8X, 5CH, skip 3 stitches, 4X5CH to make 2 shoulder straps.

Info:

You may refer photo 6: The pants and Photo 7: How to strap the pants.

— 7. Dog (light brown):

Head (light brown):

Info:

NOTE: R1-11: light brown, R12-21: white.

R1:

Magic Ring 6X

R2:

6V

R3:

(X, V) * 6

R4:

(X, V, X) * 6

R5:

(3X, V) * 6

R6:

(2X, V, 2X) * 6

R7:

(5X, V) * 6

R8:

(3X, V, 3X) * 6

R9-16:

48X

R17:

(3X, A, 3X) * 6

R18:

(5X, A) * 6

R19:

(2X, A, 2X) * 6

R20:

(3X, A) * 6

R21:

(X, A, X) * 6

Info:

Slst and fasten off. Hide the yarn.

Legs (light brown) * 2:

R1-3:

Magic Ring 9X

R4:

Join both two legs: 18X

Info:

You may refer photo 2: How to join legs + body.

Body (light brown):

R5-9:

Magic Ring 18X

Info:

Slst and fasten off.

Hand (light brown) * 2:

R1:

6X in Magic circle

R2-3:

6X

Info:

Slst and fasten off. You may refer photo 3: For tips on hands.

Ears * 2:

R1:

6X

R2:

(X, V) * 3

R3:

9X

R4:

(X, V, X) * 3

R5:

(3X, V) * 3

Inner (yellow):

R1:

4CH, reverse 1 stitch, T, F

Face Details:

Info:

Place safety eyes between R12 and R13. The space between two holes that you put safety eyes is 8 stitches.

Mouth (white):

R1:

6X

R2:

6V

R3:

12X

Dress 2 (pink):

R1:

22CH, 22X in circle

R2:

3X, 4V, 7X, 4V, 4X

Info:

5CH to make 2 shoulder straps.

Info:

You may refer Photo 8 : Dress 2 and Photo 9: how to Dress 2 straps.

— 8. Panda (white):

Head (white):

R1:

Magic Ring 6X

R2:

6V

R3:

(X, V) * 6

R4:

(X, V, X) * 6

R5:

(3X, V) * 6

R6:

(2X, V, 2X) * 6

R7:

(5X, V) * 6

R8:

(3X, V, 3X) * 6

R9-16:

48X

R17:

(3X, A, 3X) * 6

R18:

(5X, A) * 6

R19:

(2X, A, 2X) * 6

R20:

(3X, A) * 6

R21:

(X, A, X) * 6

Info:

Slst and fasten off. Leave long tail for sewing to body. Just follow the pattern and finish the head. You may refer photo 1.

Legs (white) * 2:

R1-3:

Magic Ring 9X

R4:

Join both two legs: 18X

Info:

You may refer photo 2: How to join legs + body.

Body (white):

R5-9:

Magic Ring 18X

Info:

Slst and fasten off.

Hand (white) * 2:

R1:

Magic Ring 6X

R2-3:

6X

Info:

Slst and fasten off. You may refer photo 3: For tips on hands.

Ears * 2:

R1:

Magic Ring 6X

R2:

6V

R3:

(X, V) * 6

R4-6:

18X

R7:

(X, V) * 6

Infos:

Sew the ears on R4-9. Sew the nose on R12-13.

Face Details:

Info:

Place safety eyes between R10 and R12. The space between two holes that you put safety eyes is 7 stitches.

Bow (red):

R1:

(2CH, 2F, 2CH, SL) * 2

Dress (red):

R1:

22CH, 22X in circle

R2:

3X, 4V, 7X, 4V, 4X

Info:

5CH to make 2 shoulder straps.

Info:

You may refer Photo 8 : Dress 2 and Photo 9: how to Dress 2 straps.

— 9. Lion (yellow):

Head (yellow):

R1:

Magic Ring 6X

R2:

6V

R3:

(X, V) * 6

R4:

(X, V, X) * 6

R5:

(3X, V) * 6

R6:

(2X, V, 2X) * 6

R7:

(5X, V) * 6

R8:

(3X, V, 3X) * 6

R9-16:

48X

R17:

(3X, A, 3X) * 6

R18:

(5X, A) * 6

R19:

(2X, A, 2X) * 6

R20:

(3X, A) * 6

R21:

(X, A, X) * 6

Info:

Slst and fasten off. Leave long tail for sewing to body. Just follow the pattern and finish the head. You may refer photo 1.

Legs (yellow) * 2:

R1-3:

Magic Ring 9X

R4:

Join both two legs: 18X

Info:

You may refer photo 2: How to join legs + body.

Body (yellow):

R5-9:

Magic Ring 18X

Info:

Slst and fasten off.

Hand (yellow) * 2:

R1:

Magic Ring 6X

R2-3:

6X

Info:

Slst and fasten off. You may refer photo 3: For tips on hands.

Ears * 2:

R1:

Magic Ring 6X

R2:

6V

Face Details:

Info:

Place safety eyes between R12 and R13. The space between two holes that you put safety eyes is 5 stitches.

Mane (dark brown):

R1:

48CH in circle, reverse: [2SL, 2FV] * 12

Info:

Sew to R7-8.

Mouth (white):

R1:

Magic Ring 6X

R2:

6V

Dress (light blue):

R1:

22CH, 22X in circle

R2:

3X, 4V, 7X, 4V, 4X

Info:

5CH to make 2 shoulder straps.

Info:

You may refer Photo 8 : Dress 2 and Photo 9: how to Dress 2 straps.

— 10. Totoro (grey):

Head (grey):

R1:

Magic Ring 6X

R2:

6V

R3:

(X, V) * 6

R4:

(X, V, X) * 6

R5:

(3X, V) * 6

R6:

(2X, V, 2X) * 6

R7:

(5X, V) * 6

R8:

(3X, V, 3X) * 6

R9-16:

48X

R17:

(3X, A, 3X) * 6

R18:

(5X, A) * 6

R19:

(2X, A, 2X) * 6

R20:

(3X, A) * 6

R21:

(X, A, X) * 6

Info:

Slst and fasten off. Leave long tail for sewing to body. Just follow the pattern and finish the head. You may refer photo 1.

Legs (grey) * 2:

R1-3:

Magic Ring 9X

R4:

Join both two legs: 18X

Info:

You may refer photo 2: How to join legs + body.

Body (grey):

R5-9:

Magic Ring 18X

Info:

Slst and fasten off.

Hand (grey) * 2:

R1:

Magic Ring 6X

R2-3:

6X

Info:

Slst and fasten off. You may refer photo 3: For tips on hands.

Ears * 2:

R1:

Magic Ring 6X

R2:

6X

R3:

6V

R4-6:

12X

R7:

6V

Info:

Sew the ears on R4-5.

Face Details:

Info:

Place safety eyes between R11 and R12.

Leaf (green):

R1:

7CH, reverse 1 stitch: T, 2F, T, W, T, 2F, T, V

Pants (dark blue):

R1:

11CH, 11X in circle

R2:

11X

Info:

R1 & R2 make 2, then join both pieces into 1: 22X

R4:

22X

R5:

4X, 5CH, skip 3 stitches, 8X, 5CH, skip 3 stitches, 4X5CH to make 2 shoulder straps.

Info:

You may refer photo 6: The pants and Photo 7: How to strap the pants.

— 11. Pig (skin color):

Head (skin color):

R1:

Magic Ring 6X

R2:

6V

R3:

(X, V) * 6

R4:

(X, V, X) * 6

R5:

(3X, V) * 6

R6:

(2X, V, 2X) * 6

R7:

(5X, V) * 6

R8:

(3X, V, 3X) * 6

R9-16:

48X

R17:

(3X, A, 3X) * 6

R18:

(5X, A) * 6

R19:

(2X, A, 2X) * 6

R20:

(3X, A) * 6

R21:

(X, A, X) * 6

Info:

Slst and fasten off. Leave long tail for sewing to body. Just follow the pattern and finish the head. You may refer photo 1.

Legs (skin colour) * 2:

R1-3:

Magic Ring 9X

R4:

Join both two legs: 18X

Info:

You may refer photo 2: How to join legs + body.

Body (skin colour):

R5-9:

Magic Ring 18X

Info:

Slst and fasten off.

Hand (skin colour) * 2:

R1:

6X in Magic circle

R2-3:

6X

Info:

Slst and fasten off. You may refer photo 3: For tips on hands.

Ears * 2:

R1:

Magic Ring 7X, Chain1, turn over

R2:

3X, W, 3X

Info:

Sew the ears on R4-6.

Face Details:

Info:

Place safety eyes between R12 and R13. The space between two holes that you put safety eyes is 7 stitches.

Nose (light pink):

R1:

4CH, working on 2nd stitch: 2X, W, X, V (Slip stitch, Chain 1)

R2:

V, X, 3V, X, 2V

Info:

With white colour yarn sew the nose, then sew it on R12-16 to head.

Dress 2 (dark pink):

R1:

22CH, 22X in circle

R2:

3X, 4V, 7X, 4V, 4X

Info:

5CH to make 2 shoulder straps.

Info:

You may refer Photo 8 : Dress 2 and Photo 9: how to Dress 2 straps.

Assembly Instructions

  • Use the excess yarn tail from the head to sew it securely to the body opening
  • Attach hands to the body using either sewing method with matching yarn or hot glue for a quicker assembly
  • Sew ears to the head at the specified round positions for each animal character ensuring they are symmetrical
  • Attach clothing pieces like dresses or pants by sliding them onto the body before attaching the head
  • For accessories like leaves, bows, or manes, position and sew them to the specified rounds on the head
  • Stuff the head firmly before closing but avoid overstuffing to maintain the proper rounded shape
  • Use tweezers to insert small amounts of stuffing into the hands for a neater finish before closing them

Important Notes

  • 💡Crochet all pieces with tight stitches to prevent stuffing from showing through the fabric
  • 💡Use stitch markers or contrasting yarn pieces to mark the end of each round for accuracy
  • 💡Place safety eyes at the specified positions before closing the head as they cannot be added later
  • 💡Read through the complete pattern for your chosen animal before starting to understand color changes and special techniques
  • 💡The head pattern is identical for most dolls making it easy to create multiple characters once mastered
  • 💡Join rounds with slip stitch or turning method based on your preference for a neater finish
  • 💡Apply pink blush makeup powder or diluted acrylic paint to create adorable rosy cheeks on your finished dolls

This charming 11 Dolls Collection pattern is your gateway to creating an entire family of adorable amigurumi friends! With eleven unique animal characters including rabbits, bears, elephants, and more, you'll never run out of creative possibilities. Each doll is crafted using the same fundamental body construction, making it incredibly beginner-friendly while still offering enough variety to keep things exciting. The included clothing patterns add personality and charm to each character, making them perfect gifts or collectibles. Happy crocheting, and enjoy building your own amigurumi family! 🧶✨

You ask,

we answer.

FAQs

Can I use different yarn weights for this pattern?

Yes! The pattern works with any yarn weight, but using a different weight will change the final size of your dolls. If you use bulkier yarn with a larger hook, your dolls will be bigger, and finer yarn with a smaller hook will create miniature versions. Just ensure your hook size matches your yarn weight and that your stitches are tight enough to prevent stuffing from showing through.

Are all eleven dolls made the same way?

The basic body structure (head, body, legs, and hands) is identical for most dolls, which makes the pattern very beginner-friendly. The differences come in the ear shapes, facial features, accessories, and clothing. The light grey dog has unique color changes in the head pattern, but otherwise, once you've mastered one doll, you can easily create all eleven with confidence.

What size are the finished dolls?

The pattern doesn't specify exact measurements as the final size depends on your yarn weight, hook size, and tension. Using standard worsted weight yarn with a suitable hook (typically 2.5-3.5mm), these dolls will be approximately 4-6 inches (10-15cm) tall, making them perfect pocket-sized companions or decorative pieces.

Do I need to know how to read crochet abbreviations?

Yes, basic knowledge of crochet abbreviations is helpful. The pattern includes a complete abbreviations guide at the beginning explaining X (single crochet), V (increase), A (decrease), CH (chain), and other stitches used. If you're new to reading patterns, familiarize yourself with these abbreviations before starting, and you'll find the pattern easy to follow.

Can I sell dolls made from this pattern?

This depends on the original designer's copyright terms, which aren't specified in the pattern itself. Generally, handmade items created from patterns can be sold in small quantities with proper credit given to the pattern designer. For large-scale production or commercial use, you should contact the original pattern creator for permission.

How do I join the legs to the body?

The pattern instructs you to create two separate legs, then fasten off one leg. When you complete the second leg, insert your hook into the first leg and continue working in single crochet to join both legs together into one continuous round. Photo 2 referenced in the pattern provides visual guidance for this technique.