About This Zesty Lemon Gnome Amigurumi Pattern
This cheerful gnome makes a wonderful addition to a tiered tray display or a thoughtful handmade gift that brings a pop of color and personality to any room in the house.
Ideal for those with basic crocheting experience, featuring slightly more advanced stitches and techniques to expand your skills.
Takes 5-7 hours, making it an enjoyable project to finish over a couple of days.
Playful characters full of personality, designed to spark imagination and become cherished playtime favorites.
This cheerful gnome makes a wonderful addition to a tiered tray display or a thoughtful handmade gift that brings a pop of color and personality to any room in the house.
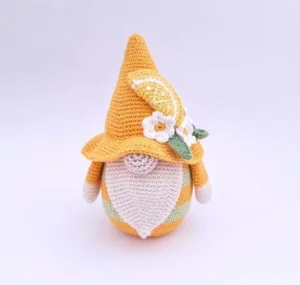
I'm obsessed with how the tiny lemon slice on the hat pulls the whole theme together. It's one of those projects where the assembly is just as fun as the stitching because you get to see his little personality emerge with every flower and leaf you attach!


When I first sat down to design this little guy, I wanted something that felt like a burst of sunshine on a rainy afternoon. There is just something about the combination of bright yellow and that fresh leaf green that instantly lifts my mood! I spent quite a bit of time playing with the shape of the hat — I wanted it to be tall and whimsical without being too floppy, which is why those gradual increases are so important.
One thing I discovered while making my first version is that you can really play with the placement of the decorations. While the pattern suggests grouping them on one side, you could also scatter the flowers all around the brim for a crown-like effect. If you find the hat is leaning more than you'd like, you can even insert a pipe cleaner or a bit of wire into the tip to make it poseable. It’s those little personal tweaks that make a pattern your own, and I encourage you to follow your creative instincts! I can't wait to see how yours turns out.
Brighten up your home with this adorable citrus-inspired gnome! He's the perfect little companion for a sunny kitchen shelf or a cheerful gift for your favorite gardener. You'll love working through the vibrant yellow stripes and adding the delicate floral touches that make this little guy truly stand out. It's a joyful project that brings a bit of summer into your craft room no matter the season.
Using yellow yarn, 6 x 1sc into a MR (6)
6 x inc (12)
(1 sc, inc) x 6 (18)
(2 sc, inc) x 6 (24)
(3 sc, inc) x 6 (30)
(4 sc, inc) x 6 (36)
(5 sc, inc) x 6 (42)
(6 sc, inc) x 6 (48)
(7 sc, inc) x 6 (54)
54 x BLO sc (54)
54 x 1sc (54)
(8 sc, inc) x 6 (60)
60 x 1sc (60)
(9 sc, inc) x 6 (66)
Switch to green yarn
66 x 1sc (66)
Switch back to yellow yarn
66 x 1sc (66)
Switch to green yarn
66 x 1sc (66)
(20 sc, dec) x 3 (63)
63 x 1sc (63)
Switch back to yellow yarn
(19 sc, dec) x 3 (60)
60 x 1sc (60)
(18 sc, dec) x 3 (57)
57 x 1sc (57)
(17 sc, dec) x 3 (54)
54 x 1sc (54)
(7 sc, dec) x 6 (48)
48 x 1sc (48)
(6 sc, dec) x 6 (42)
42 x 1sc (42)
(5 sc, dec) x 6 (36)
36 x 1sc (36)
(7 sc, dec) x 4 (32)
(6 sc, dec) x 4 (28)
(5 sc, dec) x 4 (24)
24 x 1sc (24)
(4 sc, dec) x 4 (20)
20 x 1sc (20)
(3 sc, dec) x 4 (16)
(2 sc, dec) x 4 (12)
(1 sc, dec) x 4 (8)
4 x dec (4)
Before you finish, insert a plastic or paper circle into the base to keep it flat. Stuff the body firmly with fiberfill before closing.
Using beige yarn, 7 x 1sc into a MR (7)
7 x inc (14)
(1 sc, inc) x 7 (21)
21 x 1sc (21)
(1 sc, dec) x 7 (14)
7 x dec (7)
Fill the nose with stuffing, fasten off, and leave a long tail for sewing.
Using light beige yarn, 6 x 1sc into a MR (6)
6 x 1sc (6)
(1 sc, inc) x 3 (9)
(2 sc, inc) x 3 (12)
(2 sc, inc) x 4 (16)
(3 sc, inc) x 4 (20)
(4 sc, inc) x 4 (24)
24 x 1sc (24)
(5 sc, inc) x 4 (28)
(6 sc, inc) x 4 (32)
(7 sc, inc) x 4 (36)
(8 sc, inc) x 4 (40)
40 x 1sc (40)
(8 sc, dec) x 4 (36)
(7 sc, dec) x 4 (32)
32 x 1sc (32)
Do not stuff. Flatten the piece, crochet through both layers with a row of sc to close, then fasten off with a long sewing tail.
Using light beige yarn, 6 x 1sc into a MR (6)
6 x inc (12)
(2 sc, inc) x 4 (16)
16 x 1sc (16)
Switch to yellow yarn
16 x 1sc (16)
(6 sc, dec) x 2 (14)
14 x 1sc (14)
Make two hands. Do not stuff. Flatten the piece and close with a row of sc through both layers. Leave a long tail for sewing.
Using yellow yarn, 8 x 1sc into a MR (8)
8 x 1sc (8)
(1 sc, inc) x 4 (12)
12 x 1sc (12)
(2 sc, inc) x 4 (16)
16 x 1sc (16)
(3 sc, inc) x 4 (20)
20 x 1sc (20)
(4 sc, inc) x 4 (24)
24 x 1sc (24)
(5 sc, inc) x 4 (28)
28 x 1sc (28)
(6 sc, inc) x 4 (32)
32 x 1sc (32)
(7 sc, inc) x 4 (36)
36 x 1sc (36)
(5 sc, inc) x 6 (42)
42 x 1sc (42)
(6 sc, inc) x 6 (48)
48 x 1sc (48)
(7 sc, inc) x 6 (54)
54 x 1sc (54)
(8 sc, inc) x 6 (60)
60 x 1sc (60)
(9 sc, inc) x 6 (66)
66 x 1sc (66)
(10 sc, inc) x 6 (72)
72 x 1sc (72)
(8 sc, inc) x 8 (80)
80 x 1sc (80)
(9 sc, inc) x 8 (88)
(10 sc, inc) x 8 (96)
96 x 1sc (96)
(11 sc, inc) x 8 (104)
104 x 1sc (104)
Fasten off and leave a long tail for sewing.
Using yellow yarn, 6 x 1sc into a MR (6)
6 x inc (12)
(1 sc, inc) x 6 (18)
(2 sc, inc) x 6 (24)
(3 sc, inc) x 6 (30)
Switch to white yarn
(4 sc, inc) x 6 (36)
Switch back to yellow yarn
(5 sc, inc) x 6 (42)
Do not stuff. Fold the circle in half and close by crocheting 1 row through both layers. Fasten off with a long tail.
Using yellow yarn, 6 x 1sc into a MR (6). Fasten off.
Join white yarn to any loop of Round 1.
In each of the 6 loops, work: (1 sl st, 2 ch, 2 dc, 2 ch, 1 sl st). Repeat for all 6 stitches to create 6 petals.
Make three flowers in total.
Using green yarn, ch 12. Starting in the 2nd ch from the hook, work: 1 sl st, 1 sc, 1 HDC, 2 dc, 2 tr, 2 dc, 1 HDC, 1 sl st.
Using green yarn, ch 12. Starting in the 2nd ch from the hook, work: 1 sl st, 1 sc, 1 HDC, 2 dc, 2 tr, 2 dc, 1 HDC, then 3 sc into the final loop. Continue down the other side of the chain: 1 HDC, 2 dc, 2 tr, 2 dc, 1 HDC, 1 sc, 1 sl st.
I hope you had as much fun making this little lemon gnome as I did! There's something so satisfying about those bright citrus colors and the way all the small details come together to create such a big personality. He looks absolutely darling on a windowsill where the light can catch those vibrant yellow tones. Don't forget to share your finished photos with the community — I love seeing how everyone adds their own unique touch to the floral arrangements on the hat. Happy crocheting, and I'll see you for the next project! 🧶🍋✨
A clean yogurt lid or a piece of flexible plastic from a milk jug works perfectly! Just trace the bottom of your gnome and cut it slightly smaller than the diameter.
Yes, but keep in mind that using a heavier yarn like worsted weight will result in a much larger gnome, and you'll need to increase your hook size accordingly.
To get cleaner stripes, try the 'jogless join' method by pulling through the new color on the very last loop of the final stitch in the previous round.
Since you're working many stitches into one small loop, keep your tension slightly loose on the chains to make it easier to fit the double crochets into the same space.
