🧢 Beautiful ✨ Detailed πŸ’ Adorable

Yumi the Baby Panda Amigurumi Pattern

Yumi the Baby Panda Amigurumi Pattern
4.1β˜…Rating
3-5 HoursTime Needed
2.3KMade This
βœ‚οΈ

Intermediate Level

Ideal for those with basic crocheting experience, featuring slightly more advanced stitches and techniques to expand your skills.

⏱️

Quick Craft

Fits nicely into a free afternoon β€” 2 to 5 hours of focused, enjoyable crocheting.

🧸

Cute Companion

An adorable friend to cherish, handcrafted with love to bring comfort and joy for years to come.

About This Yumi the Baby Panda Amigurumi Pattern

Yumi the Baby Panda Amigurumi Pattern crochet pattern - detailed view

This little panda makes an incredible nursery decoration or a heartfelt gift for a baby shower. The mix of textures is sensory-friendly and the finished look is professional yet full of handmade charm.

Why You'll Love This Yumi the Baby Panda Amigurumi Pattern

I honestly think my favorite part of this project is seeing the personality come through when you add the eye patches. It's like she suddenly wakes up! Plus, attaching the arms and legs as you go is such a game-changerβ€”it makes the final assembly feel so much faster and more secure.

Yumi the Baby Panda Amigurumi Pattern step 1 Yumi the Baby Panda Amigurumi Pattern step 2 Yumi the Baby Panda Amigurumi Pattern step 3 Yumi the Baby Panda Amigurumi Pattern step 4

Switch Things Up

I remember the first time I tried working with plush yarn; it was a total disaster! I couldn't see my stitches, and I ended up with a lopsided bunny that looked more like a potato. But once I realized that I had to 'feel' for the stitches rather than just looking for them, everything changed. That's why I love Yumi so muchβ€”she's the perfect project to practice that intuitive crocheting feel because her shapes are so chunky and satisfying.

There's something so therapeutic about the rhythm of this pattern. When you get to the body and start attaching the paws as you go, it feels like magic. No more fumbling with a dozen pins trying to get the arms level! I usually put on a good audiobook and just let the stitches flow. I hope you find as much peace in making her as I do. If you're making this for a little one, just imagine the look on their face when they get to hug this squishy friend for the first time. It makes every single stitch worth it.

Common Mistakes & How to Fix Them

βœ— When you're working Round 12 of the head, it's really easy for the increases to shift if your tension is tight; make sure they're centered so the muzzle doesn't look lopsided.βœ— If you don't stuff the bottom paws firmly enough before closing Round 39, the panda might have trouble sitting upright on its own.βœ— For the eye patches, using a hook that's too large can make the stitches look gappy; try to keep your tension very consistent so the black yarn looks solid.βœ— When joining the upper paws in Round 22, double-check that the 'elbow' bend is facing the body rather than pointing outward.

Yumi the Baby Panda Amigurumi Pattern

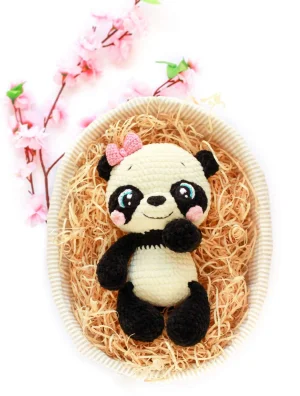
You're going to love making this little panda! Yumi is such a sweet soul with those big, expressive eyes and soft plush texture. I've designed this pattern to be a relaxing project where the limbs are crocheted right into the body, so there's less sewing at the end. It's a great way to play with different yarn textures while creating a cuddly friend that's perfect for gifting or keeping on your own shelf.

Intermediate 3-5 Hours

Materials Needed for Yumi the Baby Panda Amigurumi Pattern

β€” Main Fabric

  • 01
    Plush yarn (approx. 120m per 100g) in white or ivory for the main body parts.
  • 02
    Black plush yarn for the limbs, ears, tail, and eye patches.
  • 03
    A small amount of pink plush yarn for the cheek blushes.
  • 04
    Semi-cotton yarn (approx. 330m per 100g) in black, white, and pink for the facial features and bow.
  • 05
    A bit of blue or green semi-cotton yarn for the iris detail in the eyes.
  • 06
    Thin cotton thread matching the plush colors for sewing the pieces together.

β€” Tools Required

  • 01
    3.5mm to 4.0mm crochet hook for the main body (3.75mm recommended).
  • 02
    2.0mm to 2.5mm crochet hook for the cotton details (2.25mm recommended).
  • 03
    Long needle for sculpting the muzzle features.
  • 04
    Large tapestry needle for assembling the body parts.
  • 05
    Strong synthetic thread or dental floss for tightening the muzzle shape.
  • 06
    Polyester fiberfill stuffing.
  • 07
    Stitch markers and pins with large heads.
  • 08
    Sharp scissors.

Progress Tracker

0% Complete

β€” 1. Upper Paws (Make 2) :

Round 1 :

Start with black plush yarn and create 6 sc in a MR (6)

Round 2 :

Work 6 inc around the circle (12)

Round 3 :

Repeat (1 sc, 1 inc) 6 times (18)

Round 4 :

sc in every stitch around (18)

Round 5 :

4 sc, repeat (1 sc, 1 dec) 3 times, then 5 sc (15)

Round 6 :

sc in every stitch around (15)

Round 7 :

4 sc, 3 dec, 5 sc (12)

Round 8-13 :

sc in every stitch around for 6 rounds (12)

Info :

Stuff only the bottom section of the paw. Work an extra 10 or 11 sc so that when folded, the decreases are positioned on one side.

Finishing :

ch 1, fold the top flat and sc through both layers with 6 sc to close. Fasten off.

β€” 2. Bottom Paws (Make 2) :

Round 1 :

Using black plush yarn, make 6 sc into a MR (6)

Round 2 :

Work 6 inc around (12)

Round 3 :

Repeat (1 sc, 1 inc) 6 times (18)

Round 4 :

Repeat (2 sc, 1 inc) 6 times (24)

Round 5 :

sc in every stitch around (24)

Round 6 :

6 sc, repeat (2 sc, 1 dec) 3 times, then 6 sc (21)

Round 7 :

sc in every stitch around (21)

Round 8 :

6 sc, repeat (1 sc, 1 dec) 3 times, then 6 sc (18)

Round 9 :

sc in every stitch around (18)

Round 10 :

6 sc, 3 dec, 6 sc (15)

Round 11-13 :

sc in every stitch around for 3 rounds (15)

Info :

Stuff only the bottom of the paw. Work 12 or 13 sc to reach the edge so that decreases align on one side when folded.

Finishing :

ch 1, fold the top opening and sc through both sides with 7 sc. Cut the yarn.

β€” 3. Head and Body :

Round 0 :

Using white or ivory plush yarn, ch 9.

Round 1 :

Starting in the 2nd ch from hook: 7 sc, 3 sc in the last ch. Rotate to work on the other side of the chain: 6 sc, 1 inc (18)

Round 2 :

1 inc, 6 sc, 3 inc, 6 sc, 2 inc (24)

Round 3 :

1 sc, 1 inc, 6 sc, repeat (1 sc, 1 inc) 3 times, 6 sc, repeat (1 sc, 1 inc) 2 times (30)

Round 4 :

2 sc, 1 inc, 6 sc, repeat (2 sc, 1 inc) 3 times, 6 sc, repeat (2 sc, 1 inc) 2 times (36)

Round 5 :

3 sc, 1 inc, 6 sc, repeat (3 sc, 1 inc) 3 times, 6 sc, repeat (3 sc, 1 inc) 2 times (42)

Round 6 :

4 sc, 1 inc, 6 sc, repeat (4 sc, 1 inc) 3 times, 6 sc, repeat (4 sc, 1 inc) 2 times (48)

Round 7-8 :

sc in every stitch around (48)

Round 9 :

5 sc, 1 inc, 6 sc, repeat (5 sc, 1 inc) 3 times, 6 sc, repeat (5 sc, 1 inc) 2 times (54)

Round 10-11 :

sc in every stitch around (54)

Info :

Ensure your stitch marker is centered on the side. The next round of increases creates the muzzle.

Round 12 :

11 sc, 6 inc, 37 sc (60)

Round 13-15 :

sc in every stitch around (60)

Round 16 :

11 sc, 6 dec, 37 sc (54)

Round 17 :

5 sc, 1 dec, 6 sc, repeat (5 sc, 1 dec) 3 times, 6 sc, repeat (5 sc, 1 dec) 2 times (48)

Round 18 :

4 sc, 1 dec, 6 sc, repeat (4 sc, 1 dec) 3 times, 6 sc, repeat (4 sc, 1 dec) 2 times (42)

Round 19 :

3 sc, 1 dec, 6 sc, repeat (3 sc, 1 dec) 3 times, 6 sc, repeat (3 sc, 1 dec) 2 times (36)

Round 20 :

2 sc, 1 dec, 6 sc, repeat (2 sc, 1 dec) 3 times, 6 sc, repeat (2 sc, 1 dec) 2 times (30)

Round 21 :

1 sc, 1 dec, 6 sc, repeat (1 sc, 1 dec) 3 times, 6 sc, repeat (1 sc, 1 dec) 2 times (24)

Colour Change :

Switch to black plush yarn for the neck area.

Round 22 :

6 sc through both paw and body, 6 sc, 6 sc through both second paw and body, 6 sc (24)

Round 23 :

Repeat (7 sc, 1 inc) 3 times (27)

Round 24 :

sc in every stitch around (27)

Round 25 :

Repeat (8 sc, 1 inc) 3 times (30)

Colour Change :

Switch back to white or ivory plush yarn.

Round 26 :

sc in every stitch around (30)

Round 27 :

Repeat (9 sc, 1 inc) 3 times (33)

Round 28 :

sc in every stitch around (33)

Round 29 :

Repeat (10 sc, 1 inc) 3 times (36)

Round 30 :

8 sc, repeat (1 sc, 1 inc) 6 times, 16 sc (42)

Round 31-32 :

sc in every stitch around (42)

Round 33 :

2 sc, 7 sc through both bottom paw and body, 14 sc, 7 sc through both second bottom paw and body, 12 sc (42)

Round 34 :

Repeat (5 sc, 1 dec) 6 times (36)

Round 35 :

Repeat (4 sc, 1 dec) 6 times (30)

Round 36 :

Repeat (3 sc, 1 dec) 6 times (24)

Round 37 :

Repeat (2 sc, 1 dec) 6 times (18)

Round 38 :

Repeat (1 sc, 1 dec) 6 times (12)

Round 39 :

Work 6 dec (6)

Finishing :

Close the remaining opening, secure the thread and hide the tail inside.

β€” 4. Ears (Make 2) :

Round 1 :

Using black plush yarn, 6 sc in a MR (6)

Round 2 :

Work 6 inc around (12)

Round 3 :

sc in every stitch around (12)

Finishing :

ch 1, fold in half and sc the sides together with 6 sc. Leave a tail for sewing.

β€” 5. Tail :

Round 1 :

Using black plush yarn, 6 sc in a MR (6)

Round 2 :

Work 6 inc around (12)

Round 3 :

sc in every stitch around (12)

Round 4 :

Work 6 dec (6)

Finishing :

Add a little stuffing and leave a long tail for sewing.

β€” 6. Nose :

Round 0 :

Using black semi-cotton yarn, ch 6.

Round 1 :

Start in 2nd ch: 1 inc, 1 sc, 3 sc in one st, 1 sc, 4 sc in the last ch. Rotate: 3 sc, 1 inc (14)

Finishing :

Secure the yarn and leave a long tail for attaching to the face.

β€” 7. Blushes (Make 2) :

Round 1 :

Using pink plush yarn, work 6 sc in a MR (6)

Finishing :

Fasten off and leave a tail for sewing.

β€” 8. Eye Patches (Make 2) :

Round 0 :

Using black plush yarn, ch 6.

Round 1 :

Start in 2nd ch: 3 sc, 1 hdc, 5 hdc in the last ch. Rotate: 1 hdc, 2 sc, 1 inc (14)

Round 2 :

1 inc, 2 sc, 1 hdc, 5 inc hdc, 1 hdc, 2 sc, 2 inc (22)

Finishing :

Fasten off. It is recommended to sew these on using thin black cotton thread.

β€” 9. Eyes (Make 2) :

Round 1 :

Start with black semi-cotton yarn, 6 sc in a MR (6)

Round 2 :

Work 6 inc around (12)

Round 3 :

Repeat (1 sc, 1 inc) 4 times. Switch to white yarn. In blo: 1 sc, 3 inc (20)

Round 4 :

In blo: 1 inc, 1 sc, 1 ss (4)

Info :

Fasten off leaving white and black tails. Use blue yarn to work surface chain stitches under the white sc section. Embroider white glares.

β€” 10. Bow :

Row 0 :

Using pink semi-cotton yarn, ch 28 plus 2 turning chains (30)

Row 1-4 :

Work 28 hdc in each row, turning with 2 ch at the end of every row.

Finishing :

Fold the rectangle and join the short ends with ss. Wrap yarn around the center to pinch it into a bow shape.

Assembly Instructions

  • Sew the ears to the head positioned between Rounds 5 and 10.
  • Attach the crocheted nose to Round 13, centering it directly beneath the muzzle increases from Round 12.
  • Embroider a smile using black cotton yarn, using pins to mark the curve before stitching.
  • Place the eye patches so the top edge is two rounds above the muzzle increases, then sew the eyes and blushes onto the patches before fixing the whole patch to the head.
  • Add thin eyebrows about two or three rounds higher than the eye patches.
  • Sit the panda up and find the balance point for the tail so it helps support the body, then sew it firmly in place.
  • Attach the pink bow to the top of the head near one of the ears for a sweet finishing touch.

Important Notes

  • πŸ’‘If you struggle to close a magic ring with plush yarn, try the 'chain 2' method and work your first stitches into the second chain from the hook.
  • πŸ’‘Always stuff the head and body firmly as you go, but leave the top parts of the limbs unstuffed so they lay flat against the body.
  • πŸ’‘Use a very strong thread or dental floss for the muzzle sculpting to ensure the yarn doesn't break when you pull it tight.
  • πŸ’‘When attaching the limbs during the body rounds, use stitch markers to keep them perfectly symmetrical.
  • πŸ’‘The eye patches are best sewn on with a thin sewing thread rather than plush yarn to keep the appearance clean and flat.

I'm so excited for you to finish your very own Yumi! There is nothing quite like the feeling of finishing a plushie and seeing that cute face staring back at you. This panda is designed to be a lifelong friend, and I hope you enjoyed every stitch of the process. Don't forget to give her a little squeeze once she's all put together! Happy crocheting, and I can't wait to see your finished panda versions. 🧢🐼✨

You ask,

we answer.

FAQs

Can I use safety eyes instead of crocheting them?

Absolutely! If you prefer safety eyes, I'd recommend 12mm or 14mm sizes, placed right on the eye patches before you sew them to the head.

My panda won't sit up straight, what did I do wrong?

Check the tail placement! It needs to be positioned low enough on the back to act like a tripod leg, supporting the weight of the head.

Why is my plush yarn shedding so much?

Plush yarn is notorious for this! Try to avoid frogging (ripping out) stitches too often, and you can lightly singe the yarn ends with a lighter to stop the shedding.

Do I have to use two different hook sizes?

Yes, it's quite important. The smaller hook for the cotton yarn ensures the eyes and nose are tight and detailed, while the larger hook gives the plush body its soft, squishy texture.