Meet Xander, the most charming little zebra you'll ever get to stitch together! This pattern walks you through every single step of creating a beautifully detailed 32cm amigurumi zebra, complete with bold black and white stripes, a fluffy mane, and the most expressive safety eyes you've ever seen. Whether you're looking for a meaningful handmade gift or simply want a rewarding project to pour your creativity into, Xander is going to steal your heart from the very first round. The pattern includes full instructions for the head, ears, arms, legs, body, and tail — plus detailed guidance on joints, assembly, and those finishing touches that make all the difference. Get your hooks ready, because this little guy is worth every stitch.
Progress Tracker
0% Complete
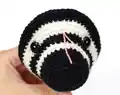
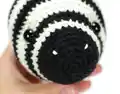
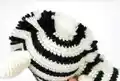
— Head :
Infos :
Begin with black yarn.
Round 3 :
(sc, inc) x 6 (18)
Round 4 :
(inc, sc 2) x 6 (24)
Round 5 :
(sc 7, inc) x 3 (27)
Round 6 :
sc in each st (27)
Round 7 :
sc 3, inc, (sc 8, inc) x 2, sc 5 (30)
Round 8 :
sc in each st (30)
Info :
Switch to white yarn.
Round 9 :
(sc 9, inc) x 3 (33)
Round 10 :
sc in each st (33)
Info :
Switch to black yarn.
Round 11 :
sc 4, inc, (sc 10, inc) x 2, sc 6 (36)
Round 12 :
sc 2, inc, (sc 5, inc) x 5, sc 3 (42)
Info :
On round 13, place a stitch marker in the 24th stitch to mark the center of the face. Use it as a guide when placing the eyes.
Info :
Switch to white yarn.
Round 13 :
(sc 6, inc) x 6 (48)
Round 14 :
sc 18, inc, sc 8, inc, sc 20 (50)
Round 15 :
sc 21, inc, sc 5, inc, sc 22 (52)
Info :
Switch to black yarn.
Round 16 :
(sc 25, inc) x 2 (54)
Round 17 :
sc 23, inc, sc 4, inc, sc 25 (56)
Info :
Attach safety eyes between rounds 13 and 14, leaving 16 stitches (count 15 holes) between them.
Info :
Switch to white yarn.
Rounds 18-20 :
sc in each st (56)
Info :
Switch to black yarn.
Rounds 21-22 :
sc in each st (56)
Info :
Switch to white yarn.
Rounds 23-24 :
sc in each st (56)
Round 25 :
sc 5, dec, (sc 12, dec) x 3, sc 7 (52)
Info :
Switch to black yarn.
Round 26 :
(sc 11, dec) x 4 (48)
Round 27 :
sc 4, dec, (sc 10, dec) x 3, sc 6 (44)
Info :
Sc in next stitch, count it as the end of the round from now on. Start stuffing the head — keep adding fiberfill after every few rounds, stuffing firmly.
Info :
Switch to white yarn.
Round 28 :
(sc 9, dec) x 4 (40)
Round 29 :
sc 3, dec, (sc 8, dec) x 3, sc 5 (36)
Round 30 :
(sc 7, dec) x 4 (32)
Info :
Switch to black yarn.
Round 31 :
sc 2, dec, (sc 6, dec) x 3, sc 4 (28)
Round 32 :
(sc 5, dec) x 4 (24)
Info :
Sc in next stitch, count it as the end of the round from now on. Switch to white yarn.
Round 33 :
(dec, sc 2) x 6 (18)
Round 34 :
(sc, dec) x 6 (12)
Info :
Finish stuffing the head. Cut the yarn leaving a long tail, fasten off. Pick up all remaining stitches and close the opening.
— Ears (make 2) :
Round 2 :
(inc, sc) x 3 (9)
Round 3 :
(sc 2, inc) x 3 (12)
Round 4 :
sc, inc, (sc 3, inc) x 2, sc 2 (15)
Round 5 :
(sc 4, inc) x 3 (18)
Round 6 :
sc 2, inc, (sc 5, inc) x 2, sc 3 (21)
Rounds 7-11 :
sc in each st (21)
Round 12 :
sc 5, dec, sc 14 (20)
Round 13 :
sc in each st (20)
Info :
Sl st in next stitch. Cut yarn leaving a long tail for sewing and fasten off. Do not stuff the ears.
— Left Arm :
Info :
Begin with black yarn.
Round 3 :
(sc, inc) x 7 (21)
Round 4 :
bpsc in each st (21)
Round 5 :
sc 9, dec, sc 4, dec, sc 4 (19)
Round 6 :
sc 11, dec, sc 6 (18)
Round 7 :
sc 6, dec, sc 7, dec, sc (16)
Info :
Start stuffing the arm. Keep adding fiberfill after every few rounds, stuffing firmly. Switch to white yarn.
Round 8 :
sc 8, dec, sc, dec, sc 3 (14)
Round 9 :
sc in each st (14)
Round 10 :
sc 9, dec, sc 3 (13)
Info :
Switch to black yarn.
Round 11 :
sc in each st (13)
Round 12 :
sc 9, dec, sc 2 (12)
Info :
Sc in next stitch, count it as the end of the round from now on. Switch to white yarn.
Rounds 13-15 :
sc in each st (12)
Info :
Switch to black yarn.
Rounds 16-17 :
sc in each st (12)
Info :
Sc in next stitch, count it as the end of the round from now on. Switch to white yarn.
Rounds 18-20 :
sc in each st (13)
Info :
Switch to black yarn.
Rounds 21-22 :
sc in each st (13)
Info :
Sc in next stitch, count it as the end of the round from now on. Switch to white yarn.
Rounds 23-25 :
sc in each st (12)
Info :
Switch to black yarn.
Rounds 26-27 :
sc in each st (12)
Info :
Sc in next stitch, count it as the end of the round from now on. Switch to white yarn.
Rounds 28-30 :
sc in each st (12)
Info :
Attach the joint between rounds 28 and 29, placing it so the stem is facing straight towards the body.
Round 31 :
sc 2, dec x 5 (7)
Info :
Finish stuffing the arm. Cut yarn leaving a long tail and fasten off. Pick up all remaining stitches and close the opening.
— Right Arm :
Info :
Begin with black yarn.
Round 3 :
(sc, inc) x 7 (21)
Round 4 :
bpsc in each st (21)
Round 5 :
sc 3, dec, sc 4, dec, sc 10 (19)
Round 6 :
sc 5, dec, sc 12 (18)
Round 7 :
(dec, sc 7) x 2 (16)
Info :
Start stuffing the arm. Keep adding fiberfill after every few rounds, stuffing firmly. Switch to white yarn.
Round 8 :
sc 2, dec, sc, dec, sc 9 (14)
Round 9 :
sc in each st (14)
Round 10 :
sc 3, dec, sc 9 (13)
Info :
Switch to black yarn.
Round 11 :
sc in each st (13)
Round 12 :
sc 3, dec, sc 8 (12)
Info :
Sc in next stitch, count it as the end of the round from now on. Switch to white yarn.
Rounds 13-15 :
sc in each st (12)
Info :
Switch to black yarn.
Rounds 16-17 :
sc in each st (12)
Info :
Sc in next stitch, count it as the end of the round from now on. Switch to white yarn.
Rounds 18-20 :
sc in each st (12)
Info :
Switch to black yarn.
Rounds 21-22 :
sc in each st (12)
Info :
Sc in next stitch, count it as the end of the round from now on. Switch to white yarn.
Rounds 23-25 :
sc in each st (12)
Info :
Switch to black yarn.
Rounds 26-27 :
sc in each st (12)
Info :
Sc in next stitch, count it as the end of the round from now on. Switch to white yarn.
Rounds 28-30 :
sc in each st (12)
Info :
Attach the joint between rounds 28 and 29, placing it so the stem is facing straight towards the body.
Round 31 :
sc 2, dec x 5 (7)
Info :
Finish stuffing the arm. Cut yarn leaving a long tail and fasten off. Pick up all remaining stitches and close the opening.
— Left Leg :
Info :
Begin with black yarn.
Round 3 :
(sc, inc) x 7 (21)
Round 4 :
(inc, sc 2) x 7 (28)
Round 5 :
bpsc in each st (28)
Round 6 :
sc 15, dec, sc 4, dec, sc 5 (26)
Round 7 :
sc 12, dec, (sc 3, dec) x 2, sc 2 (23)
Round 8 :
dec, sc 6, dec, sc 13 (21)
Round 9 :
sc 11, dec, sc 4, dec, sc 2 (19)
Info :
Start stuffing the leg. Keep adding fiberfill after every few rounds, stuffing firmly. Switch to white yarn.
Round 10 :
sc, (dec, sc 4) x 3 (16)
Round 11 :
sc in each st (16)
Round 12 :
sc 11, dec, sc 3 (15)
Info :
Switch to black yarn.
Round 13 :
sc in each st (15)
Round 14 :
sc 11, dec, sc 2 (14)
Info :
Sc in next stitch, count it as the end of the round from now on. Switch to white yarn.
Rounds 15-17 :
sc in each st (14)
Info :
Switch to black yarn.
Rounds 18-19 :
sc in each st (14)
Info :
Sc in next stitch, count it as the end of the round from now on. Switch to white yarn.
Rounds 20-22 :
sc in each st (14)
Info :
Switch to black yarn.
Rounds 23-24 :
sc in each st (14)
Info :
Sc in next stitch, count it as the end of the round from now on. Switch to white yarn.
Rounds 25-27 :
sc in each st (14)
Info :
Switch to black yarn.
Rounds 28-29 :
sc in each st (14)
Info :
Sc in next stitch, count it as the end of the round from now on. Switch to white yarn.
Rounds 30-32 :
sc in each st (14)
Info :
Attach the joint between rounds 31 and 32, placing it so the stem is facing straight towards the body.
Round 33 :
sc 2, dec, sc 5, dec, sc 3 (12)
Round 34 :
sc 2, dec x 5 (7)
Info :
Finish stuffing the leg. Cut yarn leaving a long tail and fasten off. Pick up all remaining stitches and close the opening.
— Right Leg :
Info :
Begin with black yarn.
Round 3 :
(sc, inc) x 7 (21)
Round 4 :
(inc, sc 2) x 7 (28)
Round 5 :
bpsc in each st (28)
Round 6 :
sc 5, dec, sc 4, dec, sc 15 (26)
Round 7 :
sc 2, dec, (sc 3, dec) x 2, sc 12 (23)
Round 8 :
sc 13, dec, sc 6, dec (21)
Round 9 :
sc 3, dec, sc 4, dec, sc 10 (19)
Info :
Sc in next stitch, count it as the end of the round from now on. Start stuffing the leg. Keep adding fiberfill after every few rounds, stuffing firmly. Switch to white yarn.
Round 10 :
(sc 4, dec) x 3, sc (16)
Round 11 :
sc in each st (16)
Round 12 :
sc 4, dec, sc 10 (15)
Info :
Switch to black yarn.
Round 13 :
sc in each st (15)
Round 14 :
sc 4, dec, sc 9 (14)
Info :
Sc in next stitch, count it as the end of the round from now on. Switch to white yarn.
Rounds 15-17 :
sc in each st (14)
Info :
Switch to black yarn.
Rounds 18-19 :
sc in each st (14)
Info :
Sc in next stitch, count it as the end of the round from now on. Switch to white yarn.
Rounds 20-22 :
sc in each st (14)
Info :
Switch to black yarn.
Rounds 23-24 :
sc in each st (14)
Info :
Sc in next stitch, count it as the end of the round from now on. Switch to white yarn.
Rounds 25-27 :
sc in each st (14)
Info :
Switch to black yarn.
Rounds 28-29 :
sc in each st (14)
Info :
Sc in next stitch, count it as the end of the round from now on. Switch to white yarn.
Rounds 30-32 :
sc in each st (14)
Info :
Attach the joint between rounds 31 and 32, placing it so the stem is facing straight towards the body.
Round 33 :
sc 2, dec, sc 5, dec, sc 3 (12)
Round 34 :
sc 2, dec x 5 (7)
Info :
Finish stuffing the leg. Cut yarn leaving a long tail and fasten off. Pick up all remaining stitches and close the opening.
— Body :
Info :
Begin with white yarn.
Round 3 :
(sc, inc) x 6 (18)
Round 4 :
inc, sc, with black yarn: sc, (inc, sc 2) x 5 (24)
Round 5 :
(sc 3, inc) x 6 (30)
Round 6 :
sc, inc, sc 3, with white yarn: sc, inc, (sc 4, inc) x 4, sc 3 (36)
Round 7 :
sc 3, inc, (sc 8, inc) x 3, sc 5 (40)
Round 8 :
(sc 9, inc) x 4 (44)
Info :
Sc in next 8 stitches. Count the last sc as the end of the round from now on. Switch to black yarn.
Rounds 9-10 :
sc in each st (44)
Info :
Sc in next stitch, count it as the end of the round from now on. Switch to white yarn.
Rounds 11-13 :
sc in each st (44)
Info :
Switch to black yarn.
Rounds 14-15 :
sc in each st (44)
Info :
Sc in next stitch, count it as the end of the round from now on. Turn the body so the end of the round is at your zebra's left hand side. Attach the legs to the sides of the body, between rounds 9 and 10. Switch to white yarn.
Round 16 :
(sc 10, dec) x 2, (sc 8, dec) x 2 (40)
Round 17 :
sc 4, dec, (sc 8, dec) x 3, sc 4 (36)
Round 18 :
(dec, sc 7) x 4 (32)
Info :
Switch to black yarn.
Round 19 :
sc in each st (32)
Round 20 :
sc 8, dec, sc 22 (31)
Info :
Sc in next stitch, count it as the end of the round from now on. Start stuffing the body — keep adding fiberfill after every few rounds, stuffing firmly. Switch to white yarn.
Round 21 :
sc 22, dec, sc 7 (30)
Round 22 :
(sc 4, dec) x 2, sc 18 (28)
Round 23 :
sc 14, dec, sc 10, dec (26)
Info :
Switch to black yarn.
Round 24 :
sc 6, dec, sc 11, dec, sc 5 (24)
Round 25 :
sc in each st (24)
Info :
Sc in next stitch, count it as the end of the round from now on. Switch to white yarn.
Round 26 :
(sc 3, dec) x 2, sc 14 (22)
Round 27 :
sc in each st (22)
Round 28 :
dec, sc 7, dec, sc 11 (20)
Info :
Switch to black yarn.
Rounds 29-30 :
sc in each st (20)
Info :
Sc in next stitch, count it as the end of the round from now on. Switch to white yarn.
Rounds 31-32 :
sc in each st (20)
Info :
Sl st in next stitch. Cut yarn leaving a long tail for sewing and fasten off. Attach the arms to the sides of the body between rounds 28 and 29. Finish stuffing the body.
— Tail :
Info :
Begin with white yarn.
Rounds 2-4 :
sc in each st (5)
Info :
Start stuffing the tail lightly. Switch to black yarn.
Round 5 :
sc 2, inc, sc 2 (6)
Info :
Sc in next stitch, count it as the end of the round from now on. Switch to white yarn.
Rounds 6-7 :
sc in each st (6)
Info :
Switch to black yarn.
Round 8 :
sc in each st (6)
Round 9 :
sc 2, inc, sc 3 (7)
Info :
Sc in next stitch, count it as the end of the round from now on. Switch to white yarn.
Rounds 10-11 :
sc in each st (7)
Info :
Sl st in next stitch. Cut yarn leaving a long tail for sewing and fasten off. Finish stuffing the tail.
— Mane & Tail Finishing :
Mane :
Cut pieces of yarn about 2.5 times longer than the desired mane length. Insert hook under a stitch, fold a piece of yarn in half, draw up a loop through the center, then pull both yarn tails through the loop and draw tight. Attach the mane about three stitches wide along the top of the head following the stripes, going straight around the head and about eight rows down the back.
Tail Fringe :
Attach longer yarn pieces to the tip of the tail using the same fringe technique. Trim to desired length.
— Face Details :
Eye Shaping :
Insert needle from the bottom of the head between rounds 16 and 18, bring up right next to the eye. Go halfway around the eye, insert needle next to the eye and bring to the bottom. Gently tug yarn tails to pull the eye in slightly, then knot. Repeat for the other eye.
Nostrils :
Embroider the nostrils with a few stitches over round 5 using white cotton embroidery floss. Leave about 7–8 stitches between the two nostrils.
Xander the Zebra was a pure joy to design — a project where every single stripe feels like a little reward, and the finished result is this irresistibly chubby, wild-at-heart little creature you just want to squeeze. From the bold two-color body to the tufted yarn mane and those expressive safety eyes, every detail of Xander has been crafted to feel as special as the hands that make him. Whether you're creating him as a heartfelt gift, a keepsake for a little one, or simply a beautiful addition to your handmade collection, Xander is one of those projects you'll be proud to show off for years to come. 🦓🧶 Happy crocheting! ✨