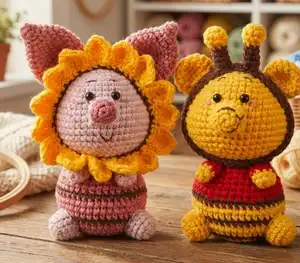
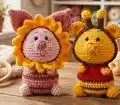
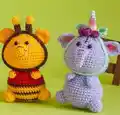
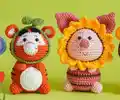
Create your own enchanting Hundred Acre Wood with this delightful collection of five beloved characters! This comprehensive bundle includes detailed patterns for Winnie the Pooh with his adorable bee headband, sweet Piglet with a charming sunflower accessory, melancholic Eeyore complete with carrot headband, bouncy Tigger with a cute bud headband, and whimsical Heffalump sporting a magical unicorn horn. Each character is crafted with love and attention to detail, featuring their signature colors and personalities. Perfect for Disney fans and amigurumi enthusiasts alike, this bundle brings childhood nostalgia to life through the art of crochet.
Progress Tracker
0% Complete
— WINNIE THE POOH —
— Head (yarn A) :
Round 1 :
sc 6 into a magic loop (6)
Round 3 :
[sc 1, inc] 6x (18)
Round 4 :
[sc 1, inc, sc 1] 6x (24)
Round 5 :
[sc 3, inc] 6x (30)
Round 7 :
[sc 2, inc, sc 2] 6x (36)
Round 9 :
sc 8, [sc 1, inc] 3x, sc 8, [sc 1, inc] 3x, sc 8 (42)
Round 11 :
sc 8, [sc 1, inc, sc 1] 3x, sc 8, [sc 1, inc, sc 1] 3x, sc 8 (48)
Round 12-17 :
sc 48 (6 rnds), insert safety eyes between rnd 8&9, 2-3 sts apart (48)
Round 18 :
[sc 6, dec] 6x (42)
Round 19 :
[sc 5, dec] 6x (36)
Round 20 :
[sc 4, dec] 6x (30)
Round 21 :
[sc 3, dec] 6x (24)
Info :
Break the yarn, stuff firmly
— Nose (yarn A) :
Round 1 :
sc 6 into a magic loop (6)
Round 3 :
[sc 3, inc] 3x (15)
Round 4-5 :
sc 15 (2 rnds) (15)
Info :
Break the yarn, stuff slightly. Sew the nose under the eyes
— Ears (yarn A, make 2) :
Round 1 :
sc 6 into a magic loop (6)
Round 3 :
[sc 1, inc] 6x (18)
Round 4-5 :
sc 18 (2 rnds) (18)
Round 6 :
[sc 1, dec] 6x (12)
Info :
Break the yarn, sew 2 edges together. Sew the ears between rnd 5&8 of the head, 7-8 sts apart
— Body (yarn A) :
Round 1 :
sc 6 into a magic loop (6)
Round 2 :
inc 6, change to yarn B (12)
Round 3 :
[sc 1, inc] 6x, change to yarn A (18)
Round 4 :
[sc 1, inc, sc 1] 6x (24)
Round 5 :
[sc 3, inc] 6x, change to yarn B (30)
Round 6 :
[sc 2, inc, sc 2] 6x, change to yarn A (36)
Round 7 :
[sc 5, inc] 6x (42)
Round 8 :
sc 42, change to yarn B (42)
Round 9 :
sc 42, change to yarn A (42)
Round 10-11 :
sc 42 (2 rnds), break yarn A, change to yarn B (42)
Round 12 :
sc 42, break yarn B, change to yarn C (42)
Round 13 :
[sc 5, dec] 6x (36)
Round 14-15 :
sc 36 (2 rnds) (36)
Round 16 :
[sc 4, dec] 6x (30)
Round 18 :
[sc 3, dec] 6x (24)
Info :
Break the yarn, stuff firmly. Sew the body to the head
— Legs (yarn A, make 2) :
Round 1 :
sc 6 into a magic loop (6)
Round 3-5 :
sc 12 (3 rnds) (12)
Info :
Break the yarn, stuff slightly. Sew the legs between rnd 6&9 of the body
— Arms (yarn A, make 2) :
Round 1 :
ch 4, start on the 2nd st from the hook, sc 2, (sc 3) on the last st, continue on the opposite side, sc 1, inc (8)
Round 2 :
sc 8, break yarn A, change to yarn C (8)
Info :
Break the yarn, sew 2 edges together. Sew the arms between the body & the head
— Facial Features :
Info :
Use brown thread to sew the eyebrows (3 rnds above the eyes, 2 sts apart), the nose & the mouth
— Bee Headband (yarn B) :
Round 1 :
ch 45, slst on the 1st ch to make a ring, sc 45 (45)
Info :
Break the yarn, hide the remaining yarn
— Bee's Antennas (yarn A, make 2) :
Round 1 :
sc 6 into a magic loop (6)
Round 2 :
[sc 1, inc] 3x (9)
Round 4 :
[sc 1, dec] 3x, change to yarn B (6)
Round 5-8 :
sc 6 (4 rnds) (6)
Info :
Break the yarn, stuff slightly, sew the Antennas on the headband, 1-2 sts apart. Wear the Bee headband on Pooh's head
— PIGLET —
— Head (yarn A) :
Round 1 :
sc 6 into a magic loop (6)
Round 3 :
[sc 1, inc] 6x (18)
Round 4 :
[sc 1, inc, sc 1] 6x (24)
Round 5 :
[sc 3, inc] 6x (30)
Round 7 :
[sc 2, inc, sc 2] 6x (36)
Round 9 :
sc 8, [sc 1, inc] 3x, sc 8, [sc 1, inc] 3x, sc 8 (42)
Round 11 :
sc 8, [sc 1, inc, sc 1] 3x, sc 8, [sc 1, inc, sc 1] 3x, sc 8 (48)
Round 12-17 :
sc 48 (6 rnds), insert safety eyes between rnd 8&9, 2-3 sts apart (48)
Round 18 :
[sc 6, dec] 6x (42)
Round 19 :
[sc 5, dec] 6x (36)
Round 20 :
[sc 4, dec] 6x (30)
Round 21 :
[sc 3, dec] 6x (24)
Info :
Break the yarn, stuff firmly
— Nose (yarn B) :
Round 1 :
sc 6 into a magic loop (6)
Round 2 :
[sc 1, (sc 3) on the next st] 3x, break yarn B, change to yarn A (12)
Round 3 :
(blo) sc 12 (12)
Info :
Break the yarn, stuff slightly. Sew the nose under the eyes
— Ears (yarn B, make 2) :
Round 1 :
sc 4 into a magic loop (4)
Round 2 :
sc 1, inc 2, sc 1 (6)
Round 3 :
sc 2, inc 2, sc 2 (8)
Round 4 :
sc 3, inc 2, sc 3 (10)
Round 5 :
[sc 1, inc] 5x (15)
Round 7 :
[sc 1, inc, sc 1] 5x (20)
Round 9 :
[sc 3, inc] 5x (25)
Round 10-12 :
sc 25 (3 rnds) (25)
Round 13 :
[sc 3, dec] 5x (20)
Round 14 :
[sc 2, dec] 5x (15)
Round 15 :
[sc 1, dec] 5x (10)
Info :
Break the yarn, sew 2 edges together. Sew the ears between rnd 4&7 of the head, 5-6 sts apart
— Body (yarn B) :
Round 1 :
sc 6 into a magic loop (6)
Round 3 :
[sc 1, inc] 6x, change to yarn C (18)
Round 4 :
[sc 1, inc, sc 1] 6x, change to yarn B (24)
Round 5 :
[sc 3, inc] 6x (30)
Round 6 :
[sc 2, inc, sc 2] 6x (36)
Round 7 :
[sc 5, inc] 6x, change to yarn C (42)
Round 8 :
sc 42, change to yarn B (42)
Round 9-11 :
sc 42 (3 rnds), change to yarn C (42)
Round 12 :
sc 42, change to yarn B (42)
Round 13 :
[sc 5, dec] 6x (36)
Round 14-15 :
sc 36 (2 rnds), change to yarn C (36)
Round 16 :
[sc 4, dec] 6x, change to yarn B (30)
Round 18 :
[sc 3, dec] 6x (24)
Info :
Break the yarn, stuff firmly. Sew the body to the head
— Legs (yarn A, make 2) :
Round 1 :
sc 6 into a magic loop (6)
Round 3-5 :
sc 12 (3 rnds) (12)
Info :
Break the yarn, stuff slightly. Sew the legs between rnd 6&9 of the body
— Arms (yarn A, make 2) :
Round 1 :
ch 4, start on the 2nd st from the hook, sc 2, (sc 3) on the last st, continue on the opposite side, sc 1, inc (8)
Round 2-3 :
sc 8 (2 rnds) (8)
Info :
Break the yarn, sew 2 edges together. Sew the arms between rnd 17&18 of the body
— Facial Features :
Info :
Use brown thread to sew the eyebrows (2 rnds above the eyes, 2 sts apart) and the mouth (2 rnds under the nose). Use yarn B to sew the cheeks under the eyes
— Sunflower (yarn C) :
Round 1 :
ch 45, slst on the 1st ch to make a ring, break yarn C, change to yarn D, *sc 2, slst on the next st, ch 6, start on the 2nd st from the hook, sc 5*, repeat ** till the end, slst on the 1st st
Round 2 :
sc on the next st, *skip the next st, crochet on the sc 5 string, slst 1, hdc 1, (dc 2) on the next st, hdc 1, slst 1, ch 1, continue to crochet on the opposite side, slst 1, hdc 1, (dc 2) on the next st, hdc 1, slst 1, skip the next st, sc 1*, repeat ** till the end (we have total 15 petals)
Info :
Break the yarn, hide the remaining yarn. Wear the sunflower on the head
— EEYORE —
— Head (yarn A) :
Info :
We will change color if the letter color changes: Yarn A: black letters, Yarn B: red letters
Round 1 :
sc 6 into a magic loop (6)
Round 3 :
[sc 1, inc] 6x (18)
Round 4 :
[sc 1, inc, sc 1] 6x (24)
Round 5 :
[sc 3, inc] 6x (30)
Round 7 :
[sc 2, inc, sc 2] 6x (36)
Round 9 :
sc 8, [sc 1, inc] 3x, sc 8, [sc 1, inc] 3x, sc 8 (42)
Round 11 :
sc 9, [inc, sc 2] 2x, inc, sc 10, inc, [sc 2, inc] 2x, sc 9 (48)
Round 12 :
sc 16, sc 16, sc 16 (48)
Round 13-17 :
sc 15, sc 18, sc 15 (5 rnds), insert safety eyes between rnd 8&9, 3-4 sts apart (48)
Round 18 :
[sc 6, dec] 2x, [sc 6, dec] 2x, sc 1, sc 5, dec, sc 6, dec (42)
Round 19 :
[sc 5, dec] 2x, sc 1, sc 4, dec, sc 5, dec, sc 1, sc 4, dec, sc 5, dec (36)
Round 20 :
[sc 4, dec] 2x, sc 2, sc 2, dec, sc 4, dec, sc 1, sc 3, dec, sc 4, dec (30)
Round 21 :< /h3>
[sc 3, dec] 2x, sc 3, dec, sc 3, dec, sc 1, sc 2, dec, sc 3, dec (24)
Info :
Break the yarn, stuff firmly
— Inner Ears (yarn C, make 2) :
Round 1 :
ch 12, start on the 2nd st from the hook, sc 3, hdc 4, dc 3, (dc 6) on the last st, continue on the opposite side, dc 3, hdc 4, sc 3 (26)
Round 2 :
inc, sc 3, hdc 7, hdc inc 4, hdc 7, sc 3, inc, slst on the 1st st (32)
— Outer Ears (yarn A, make 2) :
Round 1 :
Repeat rnd 1 of the Inner Ears (26)
Round 2 :
inc, sc 3, hdc 4, dc 3, dc inc 4, dc 3, hdc 4, sc 3, inc, slst on the 1st st (32)
Info :
Do not break the yarn, place the inner ear above the outer ear, continue to use yarn A to crochet both edges
Round 3 :
sc 1, inc, sc 10, hdc 1, hdc inc, [dc 1, dc inc] 2x, hdc 1, hdc inc, sc 11, inc (32)
Info :
Break the yarn, fold the ears in half, sew 3 first sts together. Sew the ears between rnd 7&10 of the head
— Hair (yarn D) :
Round 1 :
[ch 5, slst on the 5th st from the hook] 14x
Info :
Break the yarn. Sew the hair in the middle of the head
— Body (yarn A) :
Round 1 :
sc 6 into a magic loop (6)
Round 3 :
[sc 1, inc] 6x (18)
Round 4 :
[sc 1, inc, sc 1] 6x (24)
Round 5 :
[sc 3, inc] 6x (30)
Round 6 :
[sc 2, inc, sc 2] 6x (36)
Round 7 :
[sc 5, inc] 6x (42)
Round 8-12 :
sc 42 (5 rnds) (42)
Round 13 :
[sc 5, dec] 6x (36)
Round 14-15 :
sc 36 (2 rnds) (36)
Round 16 :
[sc 4, dec] 6x (30)
Round 18 :
[sc 3, dec] 6x (24)
Info :
Break the yarn, stuff firmly. Sew the body to the head
— Arms (yarn A, make 2) :
Round 1 :
ch 4, start on the 2nd st from the hook, sc 2, (sc 3) on the last st, continue on the opposite side, sc 1, inc (8)
Round 2-3 :
sc 8 (2 rnds) (8)
Info :
Break the yarn, sew 2 edges together. Sew the arms between the head & the body
— Legs (yarn A, make 2) :
Round 1 :
sc 6 into a magic loop (6)
Round 3-5 :
sc 12 (3 rnds) (12)
Info :
Break the yarn, stuff slightly. Sew the legs between rnd 6&9 of the body
— Belly (yarn C) :
Round 1 :
ch 4, start on the 2nd st from the hook, sc 2, (sc 3) on the last st, continue on the opposite side, sc 1, inc (8)
Round 2 :
inc, sc 1, inc 3, sc 1, inc 2 (14)
Round 3 :
sc 1, inc, sc 1, [sc 1, inc] 3x, sc 1, [sc 1, inc] 2x (20)
Round 4 :
sc 1, inc, sc 2, [sc 1, inc, sc 1] 3x, sc 1, [sc 1, inc, sc 1] 2x, slst on the 1st st (26)
Info :
Break the yarn, sew the belly to the body
— Facial Features :
Info :
Use the black thread to embroider the face's line & eyebrows (2 rnds above the eyes) & the mouth. Use the pink thread to sew the cheeks under 2 eyes
— Tail (yarn D) :
Round 1 :
[ch 5, slst on the 5th st from the hook] 3x, slst on the 1st st, break yarn D, change to yarn A, ch 6
Info :
Break the yarn, sew the tail to the back of the body
— Carrot's Headband (yarn E) :
Round 1 :
ch 45, slst on the 1st ch to make a ring, sc 45 (45)
Info :
Break the yarn, hide the remaining yarn
— Carrots (yarn F, make 2) :
Round 1 :
[ch 11, slst on the 3rd st from the hook] (dc 3) on the same st, dc 3, hdc 2, sc 2, slst 1, ch 1, continue on the opposite side, slst 1, sc 2, hdc 2, dc 3, (dc 3) on the same st, slst on the 1st st, break yarn F, change to yarn E, [ch 5, slst on the 5th st from the hook] 3x
Info :
Break the yarn, sew 2 carrots on the headband, 5-6 sts apart. Wear the headband on Eeyore
— TIGGER —
— Head (yarn A) :
Info :
We will change color if the letter color changes: Yarn A: black letters, Yarn B: red letters
Round 1 :
sc 6 into a magic loop (6)
Round 3 :
[sc 1, inc] 6x (18)
Round 4 :
[sc 1, inc, sc 1] 6x (24)
Round 5 :
[sc 3, inc] 6x (30)
Round 7 :
sc 2, inc, sc 4, inc, sc 4, inc, sc 4, inc, [sc 4, inc] 2x, sc 2 (36)
Round 8 :
sc 13, sc 10, sc 13 (36)
Round 9 :
sc 8, [sc 1, inc] 2x, sc 1, inc, sc 8, inc, [sc 1, inc] 2x, sc 9 (42)
Round 10 :
sc 15, sc 12, sc 15 (42)
Round 11 :
sc 9, inc, sc 2, inc, sc 2, inc, sc 10, inc, [sc 2, inc] 2x, sc 9 (48)
Round 12 :
sc 17, sc 14, sc 17, break yarn B (48)
Round 13-17 :
sc 48 (5 rnds), insert safety eyes between rnd 10&11, 3-4 sts apart (48)
Round 18 :
[sc 6, dec] 6x (42)
Round 19 :
[sc 5, dec] 6x (36)
Round 20 :
[sc 4, dec] 6x (30)
Round 21 :
[sc 3, dec] 6x (24)
Info :
Break the yarn, stuff firmly
— Nose (yarn B) :
Round 1 :
sc 6 into a magic loop (6)
Round 3 :
[sc 3, inc] 3x (15)
Round 4-5 :
sc 15 (2 rnds) (15)
Info :
Break the yarn, stuff slightly. Sew the nose under the eyes
— Ears (yarn B, make 2) :
Round 1 :
sc 6 into a magic loop (6)
Round 2 :
inc 6, break yarn B, change to yarn A (12)
Round 3 :
sc 1, inc, hdc 1, hdc inc, [dc 1, dc inc] 2x, hdc 1, hdc inc, sc 1, inc (18)
Info :
Break the yarn, sew 2 ears between rnd 6&8 of the head
— Eyebrows (yarn C, make 2) :
Round 1 :
ch 6, start on the 2nd st from the hook, slst 1, sc 1, hdc inc, sc 1, slst 1 (6)
Info :
Break the yarn, sew the eyebrows 3 rnds above the eyes
— Body (yarn A) :
Round 1 :
sc 6 into a magic loop (6)
Round 3 :
[sc 1, inc] 6x (18)
Round 4 :
[sc 1, inc, sc 1] 6x (24)
Round 5 :
[sc 3, inc] 6x (30)
Round 6 :
[sc 2, inc, sc 2] 6x (36)
Round 7 :
[sc 5, inc] 6x (42)
Round 8-12 :
sc 42 (5 rnds) (42)
Round 13 :
[sc 5, dec] 6x (36)
Round 14-15 :
sc 36 (2 rnds) (36)
Round 16 :
[sc 4, dec] 6x (30)
Round 18 :
[sc 3, dec] 6x (24)
Info :
Break the yarn, stuff firmly. Sew the body to the head
— Arms (yarn A, make 2) :
Round 1 :
ch 4, start on the 2nd st from the hook, sc 2, (sc 3) on the last st, continue on the opposite side, sc 1, inc (8)
Round 2-3 :
sc 8 (2 rnds) (8)
Info :
Break the yarn, sew 2 edges together
— Legs (yarn A, make 2) :
Round 1 :
sc 6 into a magic loop (6)
Round 3-5 :
sc 12 (3 rnds) (12)
Info :
Break the yarn, stuff slightly. Sew the legs between rnd 6&9 of the body
— Belly (yarn B) :
Round 1 :
ch 4, start on the 2nd st from the hook, sc 2, (sc 3) on the last st, continue on the opposite side, sc 1, inc (8)
Round 2 :
inc, sc 1, inc 3, sc 1, inc 2 (14)
Round 3 :
sc 1, inc, sc 1, [sc 1, inc] 3x, sc 1, [sc 1, inc] 2x (20)
Round 4 :
sc 1, inc, sc 2, [sc 1, inc, sc 1] 3x, sc 1, [sc 1, inc, sc 1] 2x, slst on the 1st st (26)
Info :
Break the yarn, sew the belly to the body
— Tail (yarn A) :
Round 1 :
sc 6 into a magic loop (6)
Round 2-3 :
sc 6 (2 rnds), change to yarn C (6)
Round 4 :
sc 6, change to yarn A (6)
Round 5-7 :
sc 6 (3 rnds), change to yarn C (6)
Round 8 :
sc 6, break yarn C, change to yarn A (6)
Round 9-11 :
sc 6 (3 rnds) (6)
Info :
Break the yarn, stuff slightly. Sew the tail on the back of the body
— Facial Features & Details :
Info :
Use the black thread to embroider the eyebrows (1 rnds above the eyes) & the mouth. Use the pink thread to sew the cheeks under 2 eyes & the pink lines on the nose. Use yarn C to embroider 3 lines on the head & the body
— Headband (yarn D) :
Round 1 :
ch 45, slst on the 1st ch to make a ring, sc 45 (45)
Info :
Break the yarn, hide the remaining yarn
— Bud (yarn D) :
Round 1 :
[ch 5, start on the 2nd st from the hook, sc 4] 2x
Round 2 :
[slst on the 1st ch, ch 1, sc 1 on the same st of the slst, hdc inc, dc inc, (dc 3) on the last st, continue on the opposite side, dc inc, hdc inc, sc 1, slst 1] 2x
Info :
Break the yarn. Use yarn D to make the stem: ch 5, start on the 2nd ch from the hook, sc 4, break the yarn. Sew the stem on the bud, and sew the bud on the headband
— HEFFALUMP —
— Head (yarn A) :
Round 1 :
sc 6 into a magic loop (6)
Round 3 :
[sc 1, inc] 6x (18)
Round 4 :
[sc 1, inc, sc 1] 6x (24)
Round 5 :
[sc 3, inc] 6x (30)
Round 7 :
[sc 2, inc, sc 2] 6x (36)
Round 9 :
sc 8, [sc 1, inc] 3x, sc 8, [sc 1, inc] 3x, sc 8 (42)
Round 11 :
sc 8, [sc 1, inc, sc 1] 3x, sc 8, [sc 1, inc, sc 1] 3x, sc 8 (48)
Round 12-17 :
sc 48 (6 rnds), insert safety eyes between rnd 8&9, 2-3 sts apart (48)
Round 18 :
[sc 6, dec] 6x (42)
Round 19 :
[sc 5, dec] 6x (36)
Round 20 :
[sc 4, dec] 6x (30)
Round 21 :
[sc 3, dec] 6x (24)
Info :
Break the yarn, stuff firmly
— Trunk (yarn A) :
Round 1 :
sc 4 into a magic loop (4)
Round 2 :
[sc 1, inc] 2x (6)
Round 4 :
[sc 2, inc] 2x (8)
Round 6 :
[sc 3, inc] 2x (10)
Round 8 :
[sc 4, inc] 2x (12)
Info :
Break the yarn, sew 2 edges together
— Ears (yarn B, make 2) :
Round 1 :
sc 7 into a magic loop (7)
Round 2 :
inc 7, break yarn B, change to yarn A (14)
Round 3 :
sc 4, [(sc 1, hdc 1, dc 1) on the same st, (dc 1, hdc 1, sc 1) on the same st] 3x, sc 4 (26)
Info :
Break the yarn, fold the ear in half, sew the first 3 sts together. Sew 2 ears between rnd 5&8 of the head, 9-10 sts apart
— Hair (yarn C) :
Round 1 :
[ch 7, start on the 2nd st from the hook, inc 6] 3x
Info :
Break the yarn, sew the hair between 2 ears
— Body (yarn A) :
Round 1 :
sc 6 into a magic loop (6)
Round 3 :
[sc 1, inc] 6x (18)
Round 4 :
[sc 1, inc, sc 1] 6x (24)
Round 5 :
[sc 3, inc] 6x (30)
Round 6 :
[sc 2, inc, sc 2] 6x (36)
Round 7 :
[sc 5, inc] 6x (42)
Round 8-12 :
sc 42 (5 rnds) (42)
Round 13 :
[sc 5, dec] 6x (36)
Round 14-15 :
sc 36 (2 rnds) (36)
Round 16 :
[sc 4, dec] 6x (30)
Round 18 :
[sc 3, dec] 6x (24)
Info :
Break the yarn, stuff firmly. Sew the body to the head
< h3 class="section-title">— Arms (yarn A, make 2) :
Round 1 :
ch 4, start on the 2nd st from the hook, sc 2, (sc 3) on the last st, continue on the opposite side, sc 1, inc (8)
Round 2-3 :
sc 8 (2 rnds) (8)
Info :
Break the yarn, sew 2 edges together. Sew the arms between the head & the body
— Legs (yarn A, make 2) :
Round 1 :
sc 6 into a magic loop (6)
Round 3-5 :
sc 12 (3 rnds) (12)
Info :
Break the yarn, stuff slightly. Sew the legs between rnd 6&9 of the body
— Facial Features :
Info :
Use black thread to sew the line between the head, sew eyebrows 2 rnds above the eyes, sew 2 lines on the trunk
— Tail (yarn C) :
Round 1 :
[ch 5, slst on the 5th st from the hook] 3x, slst on the 1st st, break yarn C, change to yarn A, ch 6
Info :
Break the yarn, sew the tail to the back of the body
— Unicorn Headband (yarn D) :
Round 1 :
ch 45, slst on the 1st ch to make a ring, sc 45 (45)
Info :
Break the yarn, hide the remaining yarn
— Unicorn's Ears (yarn D, make 2) :
Round 1 :
sc 5 into a magic loop (5)
Round 2 :
inc, (hdc 1, dc 1) on the same st, (tr 1, ch 2, slst on the 2nd st from the hook, tr 1) on the same st, (dc 1, hdc 1) on the same st, inc (10)
Info :
Break the yarn, sew the ears on the headband, 4-5 sts apart
— Unicorn's Horn (yarn E) :
Round 1 :
sc 6 into a magic loop (6)
Round 2 :
[sc 1, inc] 3x (9)
Round 4 :
sc 9, break yarn E, change to yarn B (9)
Round 6 :
dec, sc 6, stuff slightly along (7)
Round 7 :
dec, sc 5, break yarn B, change to yarn D (6)
Info :
Break the yarn, weave in the last 4 sts. Sew the horn between 2 ears on the headband
This enchanting Winnie the Pooh & Friends bundle was designed to bring the magic of the Hundred Acre Wood into your hands! Each beloved character is crafted with careful attention to their unique personalities and iconic features. From Pooh's honey-loving sweetness to Tigger's bouncy energy, these patterns capture the essence of childhood nostalgia. The addition of charming accessories like headbands and flowers makes each character extra special and true to their storybook origins. Perfect for Disney fans, collectors, or as heartfelt gifts that will be treasured for years to come. 🧶 Happy crocheting! 🧵✨