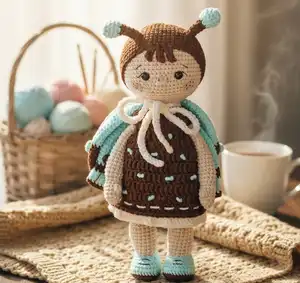
Create an enchanting handmade butterfly companion with this delightful crochet pattern! This adorable 24cm (9.45 inches) butterfly features a sweet sewn cap, delicate antennae, posable wire-enhanced arms, and beautifully detailed removable wings with embroidered accents. The pattern includes a charming removable dress decorated with French knot embroidery, making this butterfly perfect as a gift or a treasured addition to your amigurumi collection. With detailed instructions for facial features including embroidered nose, sculpted eyes, freckles, and rosy cheeks, you'll bring this whimsical character to life stitch by stitch.
Progress Tracker
0% Complete
— Head (in main color) :
Round 3 :
(1 sc, inc) x 6 (18)
Round 4 :
(2 sc, inc) x 6 (24)
Round 5 :
(3 sc, inc) x 6 (30)
Round 6 :
(4 sc, inc) x 6 (36)
Round 7 :
(5 sc, inc) x 6 (42)
Round 8 :
(6 sc, inc) x 6 (48)
Round 9 :
(7 sc, inc) x 6 (54)
Round 10 :
(8 sc, inc) x 6 (60)
Round 11-20 :
(60) 10 rounds
Info :
Insert safety eyes between rounds 17/18, 7 sts apart
Round 20 :
29 sc, (ch4, from the second ch from the hook crochet 3 sc along the chain, sc) x 3, 30 sc, sl st
Round 21 :
(8 sc, dec) x 6 (54)
Round 22 :
(7 sc, dec) x 6 (48)
Round 23 :
(6 sc, dec) x 6 (42)
Round 24 :
(5 sc, dec) x 6 (36)
Round 25 :
(4 sc, dec) x 6 (30)
Info :
Start to stuff the head
Round 26 :
(3 sc, dec) x 6 (24)
Round 27 :
(6 sc, dec) x 3 (21)
Round 28 :
21 sc, sl st (21)
Info :
Stuff the head. Cut the thread, weave in end inside of the head
— Sewn Cap (in brown color) :
Round 3 :
(1 sc, inc) x 6 (18)
Round 4 :
(2 sc, inc) x 6 (24)
Round 5 :
(3 sc, inc) x 6 (30)
Round 6 :
(4 sc, inc) x 6 (36)
Round 7 :
(5 sc, inc) x 6 (42)
Round 8 :
(6 sc, inc) x 6 (48)
Round 9 :
(7 sc, inc) x 6 (54)
Round 10 :
(8 sc, inc) x 6 (60)
Round 11 :
(19 sc, inc) x 3 (63)
Round 12-19 :
(63) 8 rounds
Info :
Cut the thread, leaving a long tail for sewing
— Head Details :
Infos :
Embroider the nose with the main thread YarnArt Jeans. Divide it into 4 thin strands and use 2 strands. Embroider the nose under the 18th round of the head (count the rounds from the top). Make 4 horizontal sts (the st length is 3 sc), then make the necessary number of vertical sts until the nose is convex. Make special needle sculpting for the eyes using the thread of main color. Using a needle, insert the thread into the hole on the head, bring it out at point 1, insert it at point 2 and bring it out at point 3, insert it at point 4 and bring it out into the hole on the head. Tighten the ends of the threads well and fix them with a knot. Embroider the eye whites with the cream thread YarnArt Jeans. Embroider the eyelids with the black sewing thread. Embroider the eyebrows with the brown thread YarnArt Jeans (divide it into 4 thin strands and use 1 strand). Draw freckles above the nose and on the cheeks. Sew the cap to the head, having fixed it with pins. Fix the cap to the head above the first round (count the rounds from the head bottom). In front the cap is located above the 18th round of the head (count the rounds from head bottom). Fix the first strand in the center, the other two are located at a distance of 2 sc from the central strand. Sew on a cap. Add blushes to the cheeks
— Antennae (make 2) :
Info :
Put a pin under the cap's fourth round in the center (count the rounds from the bottom). Step 6 stitches from the pin to both sides and put 2 pins. Remove the central pin, it is no longer needed. Start with brown color
Round 1 :
Step 1 st from the pin to both sides and crochet 6 sc in a round (6)
Info :
Change the brown thread to light turquoise. Cut the brown thread. Next, crochet in light turquoise color
Round 8-10 :
(12) 3 rounds
Info :
Cut the thread, leaving a thread tail. Pull the opening closed pulling a needle through front loops of stitches. Weave in the thread tail. Make another antennae in the same way
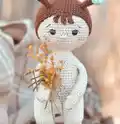
— Arms (make 2, in main color) :
Info :
For the arms you will need two pieces of wire 15 cm long. Bend the ends of the wire and wrap them with adhesive tape. Please note that if you don't use the wire, then stuff the arms to the middle
Round 2 :
(1 sc, inc) x 3 (9)
Round 3 :
(2 sc, inc) x 3 (12)
Round 5 :
2 sc, 3 DC bubble, 9 sc (12)
Round 7 :
(2 sc, dec) x 3 (9)
Round 8 :
(2 sc, inc) x 3 (12)
Round 9-14 :
(12) 6 rounds
Info :
Insert the wire, stuff the arm
Round 15-23 :
(12) 9 rounds
Info :
Stuff the last third of the arm slightly. Crochet the second arm in the same way
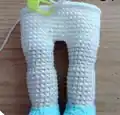
— Legs and Body :
Info :
Legs (make 2). Please note that by the time you start crocheting the body, you should already have crocheted the arms. Legs and body are crocheted as one piece. The arms are attached when crocheting the body. Stuff as you go. Start with brown color
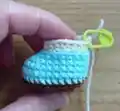
Round 1 :
Ch5, from the second ch from the hook: inc, 2 sc, 6 sc into one st, then on the other side of the chain: 2 sc, inc (14)
Round 2 :
Inc, 3 sc, 6 inc, 3 sc, inc (22)
Round 3 :
Inc, 3 sc, (1 sc, inc) x 6, 5 sc, inc (30)
Info :
Change the brown thread to light turquoise. Cut the brown thread. Next crochet in a light turquoise color
Round 5 :
9 sc, (dec, 2 sc) x 3, 9 sc (27)
Round 7 :
7 sc, (1 sc, dec) x 5, 5 sc (22)
Round 8 :
7 sc, dec, crochet 3 sc together, dec, 8 sc (18)
Info :
Change the light turquoise thread to main color thread. Cut the light turquoise thread. Next crochet in main color
Round 9 :
Into BLO (4 sc, dec) x 3 (15)
Round 10 :
(4 sc, inc) x 3 (18)
Round 11-17 :
(18) 7 rounds
Round 18 :
(4 sc, dec) x 3 (15)
Round 19 :
(4 sc, inc) x 3 (18)
Round 20-22 :
(18) 3 rounds
Info :
Change the main color thread to cream color thread. Cut the main color thread. Next crochet in cream color
Round 23 :
(5 sc, inc) x 3 (21)
Round 24 :
21 sc, sl st (21)
Info :
Cut the thread. Crochet the second leg in the same way but on the second leg crochet the 24th round not till the end (I crocheted 17 sc), stop in the middle on the inside of the leg. Next we will going to connect both legs. Crochet ch3. Join both legs with sl st. Make sure the legs are located parallel to each other. Place marker to indicate the beginning of the rounds (it should be located at the front side of the piece)
Round 25 :
21 sc around the first leg, 3 sc along the chain, 21 sc around the second leg, 3 sc along the chain (on its other side) (48)
Round 26-32 :
(48) 7 rounds
Round 33 :
(14 sc, dec) x 3 (45)
Info :
After the round 33 crochet necessary amount of sc to shift the stitch marker to the middle of the back. Change the cream thread to main color thread. Cut the cream thread. Next crochet in main color
Round 34-36 :
(45) 3 rounds
Round 37 :
(13 sc, dec) x 3 (42)
Round 38-40 :
(42) 3 rounds
Round 41 :
(12 sc, dec) x 3 (39)
Round 42-44 :
(39) 3 rounds
Info :
Stuff firmly. Next we are going to attach the arms. Fix the arms with pins. Pay attention to the position of the fingers
Round 45 :
(11 sc, dec) x 3 (36)
Round 46 :
8 sc, crochet next 6 sc through inner part of the arm and the body (the first arm is attached), 13 sc, crochet next 6 sc through inner part of the second arm and the body (the second arm is attached), 3 sc (36)
Info :
Please note! Your number of stitches crocheted before and after the place where the arms are attach may differ from mine
Round 47 :
(36) When you crochet to the place where the arms are attached, crochet 6 sc along their outer part
Round 48 :
(4 sc, dec) x 6 (30)
Info :
Stuff the body. Twist the ends of the wire, cut, fix with adhesive tape
Round 50 :
(3 sc, dec) x 6 (24)
Round 52 :
(6 sc, dec) x 3 (21)
Round 53 :
21 sc, sl st (21)
Info :
Cut the thread leaving a long tail. Stuff the body
— Bubble (make 20: 12 bubbles in brown color and 8 in light turquoise) :
Info :
Please note that by the time you start crocheting the wings, you should already have crocheted the bubbles. Ch3, into the third ch from the hook crochet 3 DC bubble. Cut the thread leaving a tail
— Lower Wing (make 2, don't stuff) :
Info :
Start with brown color
Round 1 :
Make a ch19, from the second ch from the hook: inc, 16 sc, 3 sc into one st, then on the other side of the chain: 16 sc, inc (39)
Info :
Change the brown thread to light turquoise. Don't cut the brown thread! Next crochet in a light turquoise color
Info :
Change the light turquoise thread to brown. Don't cut the light turquoise thread! Next crochet in a brown color
Info :
Change the brown thread to light turquoise. Cut the brown thread. Next crochet in a light turquoise color
Round 9-13 :
(39) 5 rounds
Infos :
We will now pause to fix the bubbles and make embroidery. For embroidery use the brown thread YarnArt Jeans (divide it into 4 thin strands and use 1 strand). Make vertical stitches between the second and seventh rounds, 3 sts apart. Please note! When embroider the first stitch, insert the needle from the wrong side of the wing. When the embroidery is finished, fix the ends of the threads with a knot on the wing's wrong side. Using a crochet hook attach the first bubble in the center between the 10th and 11th rounds. Count from the first bubble 7 sts to the right and left, and attach the second and third bubbles. In the same way fix 3 more bubbles on the other side of the wing. Continue to crochet the wing
Round 14-15 :
(39) 2 rounds
Round 16 :
1 sc, dec, 15 sc, dec, 1 sc, dec, 14 sc, dec (35)
Round 18 :
1 sc, dec, 13 sc, dec, 1 sc, dec, 12 sc, dec (31)
Round 20 :
1 sc, dec, 11 sc, dec, 1 sc, dec, 10 sc, dec (27)
Round 22 :
1 sc, dec, 9 sc, dec, 1 sc, dec, 8 sc, dec (23)
Round 24 :
1 sc, dec, 7 sc, dec, 1 sc, dec, 6 sc, dec (19)
Round 26 :
1 sc, dec, 5 sc, dec, 1 sc, dec, 4 sc, dec (15)
Round 28 :
(3 sc, dec) x 3 (12)
Round 29 :
1 sc, fold the wing in half and work 6 sc through two layers. Cut the thread. Crochet the second wing in the same way
— Upper Wing (make 2, don't stuff) :
Info :
Start with brown color
Round 2 :
(1 sc, inc) x 3 (9)
Round 3 :
(2 sc, inc) x 3 (12)
Round 4 :
(1 sc, inc) x 6 (18)
Round 6 :
(2 sc, inc) x 6 (24)
Round 8 :
(3 sc, inc) x 6 (30)
Round 9 :
(4 sc, inc) x 6 (36)
Round 10 :
(5 sc, inc) x 6 (42)
Round 12 :
(6 sc, inc) x 6 (48)
Round 14 :
(7 sc, inc) x 6 (54)
Info :
Change the brown thread to light turquoise. Cut the brown thread. Next crochet in a light turquoise color. We will now pause to fix the bubbles. Using a crochet hook attach the first bubble in the center between the 6th and 7th rounds. Count from the first bubble 5 rounds up and attach the second bubble. Count from the second bubble 7 sts to the right and left, and attach the third and fourth bubble
Round 17 :
25 sc, dec, 27 sc (53)
Round 18 :
24 sc, dec, 27 sc (52)
Round 19 :
24 sc, dec, 26 sc (51)
Round 20 :
24 sc, dec, 25 sc (50)
Round 21 :
23 sc, dec, 25 sc (49)
Round 22 :
23 sc, dec, 24 sc (48)
Round 23 :
21 sc, dec, 1 sc, dec, 22 sc (46)
Round 24 :
20 sc, dec, 1 sc, dec, 21 sc (44)
Round 25 :
19 sc, dec, 1 sc, dec, 20 sc (42)
Round 26 :
(5 sc, dec) x 6 (36)
Round 28 :
(4 sc, dec) x 6 (30)
Round 30 :
(3 sc, dec) x 6 (24)
Round 31 :
(2 sc, dec) x 6 (18)
Round 32 :
(1 sc, dec) x 6 (12)
Infos :
For embroidery use the brown thread YarnArt Jeans (divide it into 4 thin strands and use 1 strand). Make vertical stitches between the 15th and 31st rounds. Please note! When embroider the first stitch, insert the needle from the wrong side of the wing. When the embroidery is finished, fix the ends of the threads with a knot on the wing's wrong side. Please note! Don't make embroidery on the other side of the wing
Round 33 :
1 sc, fold the wing in half and work 6 sc through two layers. Cut the thread
Info :
Crochet the second wing in the same way. But on the second wing fix the bubbles and make embroidery on its reverse side. Thus, the wings will be symmetrical. Next we are going to crochet the fasteners and join 4 wings together. Crochet with cream color. Make a chain 51. Turn the chain, find the bumps on its other side. Insert the crochet hook under these bumps crochet from the second ch from the hook 50 sl st. Don't pull the loops tightly. Placed the upper wing on top of the lower and crochet through both pieces layers 6 sc. In the same way join the second pair of wings and crochet the second fastener. Please note the upper wings must be symmetrical! Weave in thread ends inside of the wings
— Dress :
Info :
Crochet with 2.5mm hook. Crochet in turning rows. Start every new row with 2 turning ch (which are counted as one DC stitch). Start with brown color. Leave a long starting tail
Row 1 :
Make a ch27, from the third ch from the hook crochet 25 DC (26)
Row 2 :
2 turning ch, inc, (1 DC, inc) x 12 (39)
Row 3 :
In this row we form the openings for the arms. 2 turning ch, 7 DC, ch6, skip 6 st, beginning from the 7th st crochet 11 DC, ch6, skip 6 st, beginning from the 7th st crochet 8 DC (39)
Row 4 :
2 turning ch, 1 DC, inc, (2 DC, inc) x 12 (52)
Row 5 :
2 turning ch, 51 DC (52) Connect the beginning and the end of the row with sl st
Info :
Next start every new row with 2 turning ch and connect the beginning and the end of the row with sl st
Row 6-10 :
2 turning ch, 51 DC, sl st (52) 5 rows
Info :
Attach the thread of cream color. Don't cut the brown thread, leave it in front of the work
Row 11 :
In cream color into BLO 2 turning ch, inc, (1 DC, inc) x 25, sl st (78)
Info :
Return to the brown thread and work 1 R with turning ch, 52 sc, sl st. Cut the thread, weave in thread ends inside of the dress
Infos :
Sew on the button. Using a long starting tail make ch for the buttonhole (its length depends on the diameter of your button). With cream thread YarnArt Jeans make horizontal stitches along the 10th round. For embroidery use light turquoise thread YarnArt Jeans. Divide it into 4 thin threads and use 2 of 4. Embroidery is made in the technique of French knot. Bring out the needle to the front side, make 6 turns of thread around the needle, pull the needle through the turns, insert the needle leaving 1 st from the entry point, bring out in the place of embroidery of the next knot. Embroider knots in the 3rd, 5th, 7th and 9th rounds. They are staggered at a distance of 5 DC from each other. When embroidering knots, I don't cut the thread after each knot. Decorate the shoes with embroidery
This enchanting Butterfly pattern combines intricate craftsmanship with whimsical charm to create a truly memorable handmade companion. The removable wings and dress add versatility and creative possibilities, while the posable wire-enhanced arms bring dynamic character to your finished piece. From the delicate French knot embroidery to the sweet sculpted facial features complete with freckles and blush, every element has been thoughtfully designed to capture the magic of creating something special with your own hands. This pattern offers intermediate crocheters a rewarding project that balances technical skill-building with pure creative joy. 🧶✨🦋