๐Ÿงถ Beautiful โœจ Detailed ๐Ÿ’ Adorable

Wine Tote Crochet Pattern

Wine Tote Crochet Pattern
4.7โ˜… Rating
3-4 Hours Time Needed
1.6K Made This
โœ‚๏ธ

Intermediate Level

Ideal for those with basic knitting experience, featuring slightly more advanced stitches and techniques to expand your skills.

โฑ๏ธ

Weekend Treat

Takes 5-7 hours, making it an enjoyable project to finish over a couple of days.

โ˜•

Warm Welcome

A comforting piece for home or gifts that brings handmade warmth to everyday moments and special occasions.

About This Wine Tote Crochet Pattern

This wine tote pattern is designed to create a functional and beautiful bottle carrier that starts from a circular base and builds upward to form a bottle-shaped holder. The pattern incorporates textured stitches, decorative perforated rows for visual appeal, and comfortable straps that make carrying easy. Working with macrame yarn gives the tote structure and durability, while the velvet yarn finishing adds a soft, luxurious touch that elevates the overall look and feel of the piece.

Wine Tote Crochet Pattern crochet pattern - detailed view of completed project

The combination of practical construction and elegant details makes this wine tote suitable for any occasion, from casual gatherings to formal celebrations. The perforated sections can be customized with decorative touches or kept simple for a minimalist aesthetic.

Why You'll Love This Wine Tote Crochet Pattern

I absolutely love this wine tote pattern because it transforms a simple gift into something truly special and memorable. There's something deeply satisfying about watching the flat circular base gradually curl inward to perfectly cradle a wine bottle, and I find the rhythm of the perforated rows both relaxing and beautiful to work. I especially appreciate how the velvet yarn finish adds that unexpected touch of luxury that makes recipients feel truly valued. This pattern has become my go-to project whenever I need a thoughtful handmade gift, and I love knowing that something I created with my own hands will be used and appreciated at special gatherings.

Wine Tote Crochet Pattern step 1 - construction progress Wine Tote Crochet Pattern step 2 - assembly progress Wine Tote Crochet Pattern step 3 - details and accessories Wine Tote Crochet Pattern step 4 - final assembly and finishing

Switch Things Up

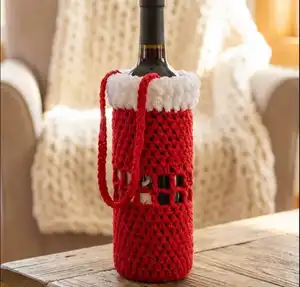
I love how versatile this wine tote pattern is for creative experimentation and personalization. For a festive holiday version, I often switch to red and green yarns or add metallic thread through the perforated sections to create sparkle that catches the light beautifully at dinner parties.

You can easily adapt this pattern to different bottle sizes by adjusting your increase rounds - I've made versions for champagne bottles by adding extra increase rounds and working more straight rows for the height. Some of my favorite variations include using chunky cotton yarn for a rustic farmhouse aesthetic or working with gradient yarns that create beautiful color transitions as you build upward.

I've discovered that adding a small pocket on the side using the same perforated technique makes a perfect spot for a wine opener or gift card. For spring celebrations, I love working this pattern in pastel velvet yarns throughout for an ultra-soft, luxurious feel. The straps can be braided instead of crocheted for different texture, or you can create a crossbody version by making one long continuous strap that threads through both sides.

Don't be afraid to play with the decorative possibilities of those perforated rows - I've woven ribbon, added tassels, and even threaded fairy lights through for evening garden parties. This pattern truly becomes your own creative canvas!

Common Mistakes & How to Fix Them

โœ— Not counting stitches carefully during increase rounds can throw off the bottle shape and make it too tight or loose โœ— Working the edge stitches too tightly in row five prevents the proper inward curl needed for the bottle form โœ— Skipping the perforated row spacing incorrectly causes misaligned decorative squares that disrupt the visual pattern throughout โœ— Making the straps too loose or not securing them tightly at connection points results in weak handles that won't support weight

Wine Tote Crochet Pattern

Create a charming handmade wine tote that's perfect for gifting or carrying your favorite bottle in style. This elegant crochet pattern features a structured base that cradles the bottle securely, decorative perforated rows for visual interest, and sturdy straps for comfortable carrying. Worked in macrame yarn with velvet accents, this practical accessory combines functionality with sophisticated design. Whether you're bringing wine to a dinner party or creating a thoughtful handmade gift, this tote adds a special touch that shows you care.

Intermediate 3-4 Hours

Materials Needed for Wine Tote Crochet Pattern

โ€” Main Fabric

  • 01
    100g Macrame yarn for main body structure
  • 02
    20g White velvet yarn for finishing rows

โ€” Tools Required

  • 01
    4.5mm crochet hook
  • 02
    Scissors
  • 03
    Yarn needle for weaving ends

Progress Tracker

0% Complete

โ€” Round 1 (Base):

Setup:

Make 6 ch, and connect to the first ch to form a ring. Make 10 hdc into the ring. Close the row by sinking into the top of the first hdc. (10 hdc)

โ€” Round 2:

Increase Round:

With 2 ch go to the top row. Make 2 hdc into each stitch. At the end of the row you will have a total of 20 hdc. Connect to the top of the first hdc. (20 hdc)

โ€” Round 3:

Increase Round:

Make 3 ch to go up to the 3rd row. Make 1 more hdc into the same ch. 1 hdc on the next ch, 2 hdc on the next ch. Alternate 1 hdc single, 2 hdc double throughout. Connect to the top of the first hdc. (30 hdc)

โ€” Round 4:

Increase Round:

Make 2 ch. Work pattern: 1 hdc, 1 hdc, 2 hdc single on next ch (meaning 2 hdc in same stitch, then 1 hdc single). Complete the row following this pattern, connect to the first hdc. (40 hdc)

โ€” Round 5:

Curl Formation:

Make 2 ch. Make 1 hdc on each ch, working only on the edge line (back loops) to create the inward curl for bottle shape. Connect to the first hdc. (40 hdc)

Info:

In rounds 4 and 5, the work will start to curl inwards and take the bottle form

โ€” Rounds 6-15:

Straight Rounds:

For all the next 10 rows: when closing each row, go to the top row with 1 ch and make 1 hdc on each ch throughout. (40 hdc each round)

โ€” Round 16:

First Perforated Row:

Go to the top row with 4 ch. Skip 1 ch and make 1 dc on the 2nd ch. Make 1 ch, make 2 ch, skip 1 ch and make 1 dc on the next ch. Complete the whole row like this. Connect to the 3rd of the first 4 ch groups and close.

โ€” Round 17:

Second Perforated Row:

Go up to the top row with 4 ch. Make 1 dc on top of the dc in the next row. Make 2 ch, make 1 dc on top of the next dc to form squares. Connect to the 3rd of the first group of 4 ch and close.

โ€” Round 18:

Return to Straight Rows:

Work only on the 2 ch spaces from bottom row. Make 2 hdc in every 2 ch space to complete the whole row. Do not knit tightly, knit more freely so it doesn't tighten. Connect to the first ch.

โ€” Rounds 19-26:

Straight Rounds:

Go to the top row with 1 ch. For this and the next 7 rows (total 8 rows), make 1 hdc on each ch throughout.

โ€” Round 27 (First Strap):

Strap Construction:

Make 40 ch (you can extend the length as desired). Skip 8 ch and connect on the 9th ch tightly. Complete the strap by making 1 hdc on each ch on the strap. Connect to the beginning and cut the rope, knot tightly.

โ€” Round 28 (Second Strap):

Second Strap:

Count 4 ch from the end of the first arch and tie into ch 5. Make 40 ch. Skip 8 ch and tie tightly to the 9th ch. Go back and make 1 hdc in all ch. Tie at the beginning and cut the rope, knot tightly.

โ€” Rounds 29-30 (Velvet Finish):

Velvet Rows:

Switch to velvet thread. Continue for a total of 2 rows by making 1 ch on each ch. Since the velvet rope is fluffy, try to feel the chains with your hand.

Info:

After knitting the straps, continue with velvet so the straps stay inside for a more beautiful look

โ€” Optional Decoration:

Finishing Touches:

For the perforated areas, you can decorate with velvet threads if desired. You can write a cute note on note paper and tie it, or keep it simple.

Assembly Instructions

  • After completing all rounds, weave in all yarn ends securely on the inside of the tote
  • Check that both straps are securely attached and evenly spaced on opposite sides of the tote opening
  • If desired, thread velvet yarn through the perforated sections for decorative detail
  • Gently shape the tote by hand to ensure the bottle form is properly defined
  • Test the tote with an actual wine bottle to ensure proper fit before gifting

Important Notes

  • ๐Ÿ’กCount your stitches carefully during increase rounds to maintain the correct bottle shape
  • ๐Ÿ’กWork the back loop only stitches loosely in round 5 to allow the proper inward curl
  • ๐Ÿ’กThe velvet yarn can be difficult to see stitches in, so work slowly and feel with your fingers
  • ๐Ÿ’กMake sure to pull straps tight when connecting them to prevent stretching under bottle weight
  • ๐Ÿ’กYou can adjust strap length by adding or reducing chains to suit your preference
  • ๐Ÿ’กThe perforated rows should be worked loosely to maintain flexibility in the design

This elegant wine tote pattern brings together practical functionality and beautiful design details to create the perfect handmade gift accessory. The structured base cradles bottles securely while the decorative perforated rows and velvet finishing touches add sophisticated charm that elevates any bottle presentation. Whether you're crafting for special occasions or building your handmade gift collection, this versatile pattern adapts beautifully to your creative vision. ๐Ÿงถ Happy crocheting and happy gifting! ๐Ÿทโœจ

You ask,

we answer.

FAQs

Can I use different yarn weights for this wine tote pattern?

While the pattern calls for macrame yarn with a 4.5mm hook, you can adapt it to other yarn weights by adjusting your hook size accordingly. Keep in mind that heavier yarn will create a sturdier tote, while lighter yarn may require additional support or modification to hold a wine bottle securely.

How do I ensure my wine tote is the right size for standard wine bottles?

The pattern is designed with specific stitch counts to fit standard 750ml wine bottles. The key is maintaining accurate stitch counts during the increase rounds and ensuring the inward curl happens properly in round 5. You can test fit with a bottle after completing the base rounds before continuing.

Is the velvet yarn finishing absolutely necessary?

The velvet yarn adds a luxurious touch and helps keep the straps positioned nicely inside the tote, but it's not structurally essential. You can continue with the macrame yarn for all rounds if you prefer a uniform look, or substitute with any coordinating yarn you have available.

Can I make the straps longer or shorter?

Absolutely! The pattern suggests 40 chains for each strap, but you can easily adjust this length to your preference. Just remember to maintain the same technique of skipping 8 chains and connecting on the 9th to create the loop attachment, regardless of total strap length.

How can I make my wine tote more decorative?

The pattern suggests threading velvet yarn through the perforated sections, adding a note card, or keeping it simple. You could also experiment with color changes, add embellishments like buttons or beads, or create a matching gift tag using leftover yarn.