🧶 Beautiful ✨ Detailed 💝 Adorable

White Rabbit Amigurumi Pattern

White Rabbit Amigurumi Pattern
4.4★ Rating
10-12 Hours Time Needed
2.3K Made This
✂️

Advanced Level

Designed for experienced knitters, these patterns involve intricate designs and complex techniques to challenge and inspire.

⏱️

Slow & Steady

A 10-12 hour project—great for savoring the process over several sessions.

🐰

Whimsical Buddy

Playful characters full of personality, designed to spark imagination and become cherished playtime favorites.

About This White Rabbit Amigurumi Pattern

This White Rabbit pattern captures the essence of Lewis Carroll's perpetually punctual character with meticulous detail. The pattern features a white bunny body with delicate pink accents on the ears and nose, plus adorable whisker details and expressive embroidered features. What makes this pattern special is the complete wardrobe including a blue vest, a red coat adorned with sweet heart appliqués, and an elaborate turquoise ruffled collar that gives the rabbit his distinguished Victorian gentleman appearance.

White Rabbit Amigurumi Pattern crochet pattern - detailed view of completed project

The pattern includes advanced techniques like color blocking, detailed clothing construction, and intricate assembly. The finished rabbit can sit independently thanks to carefully structured legs and tail positioning.

Why You'll Love This White Rabbit Amigurumi Pattern

I absolutely adore this White Rabbit pattern because it's truly a labor of love that results in such a rewarding finished piece. The combination of the sweet bunny shape with the elaborate clothing details makes this feel like creating a complete character rather than just a toy. I love how the pattern challenges your skills with the coat construction and ruffled collar while keeping the bunny body itself approachable. The embroidered facial details are my favorite part—pulling the thread to create the dimensional nose shape and adding those delicate whiskers brings so much personality to life. Every time I complete one, I'm amazed at how the pieces come together to create such a recognizable character, and the Victorian-style outfit with those tiny heart details never fails to make me smile.

White Rabbit Amigurumi Pattern step 1 - construction progress White Rabbit Amigurumi Pattern step 2 - assembly progress White Rabbit Amigurumi Pattern step 3 - details and accessories White Rabbit Amigurumi Pattern step 4 - final assembly and finishing

Switch Things Up

I love personalizing this White Rabbit pattern to create unique versions with different character interpretations. You can easily change the vest color from blue to burgundy or emerald green for a different Victorian aesthetic, or swap the red coat for navy or purple tones.

The heart appliqués on the coat can be replaced with other shapes like diamonds, clubs, or spades to reference the playing card theme from Wonderland. You could even embroider tiny clock symbols on the vest to emphasize the rabbit's obsession with being late.

For a simpler version, consider making the collar less elaborate by reducing one round of increases, or create a bow tie instead of the full ruffled collar for a dapper alternative look. The whisker hair details can be made longer or shorter depending on your preference.

I've experimented with adding actual fabric elements like a tiny fabric waistcoat or felt pocket watch that can be sewn or glued onto the finished piece. Some makers add wire to the ears to make them poseable, which creates wonderful display options.

The size can be adjusted by using sport weight or chunky yarn with appropriate hook sizes—a larger version makes an impressive statement piece while a miniature version using thread creates an adorable charm. You could also add reading glasses made from wire for an scholarly touch, or create a small carrot accessory for the rabbit to hold!

Common Mistakes & How to Fix Them

✗ Pulling embroidery thread too tightly when shaping the nose and face which can distort the head shape—use gentle tension to create dimension without warping ✗ Misaligning the coat pieces when sewing them to the body—always pin both front and back coat sections before attaching to ensure symmetrical placement ✗ Making the ruffled collar too loose or tight around the neck area—check the fit as you crochet and adjust chain length before completing the ruffle ✗ Forgetting to position legs correctly for sitting balance—test stability before final assembly and adjust leg angle so rabbit sits without support ✗ Rushing through the detailed facial embroidery which impacts the final expression—take time with eyebrow placement and whisker spacing for best character resemblance

White Rabbit Amigurumi Pattern

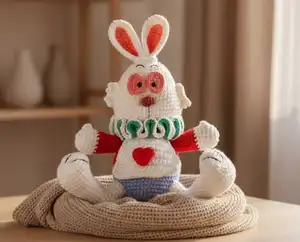
Create the charming White Rabbit from Alice in Wonderland with this delightful amigurumi pattern. This adorable bunny features a pristine white body with sweet pink inner ears, expressive embroidered face, and a fashionable outfit complete with a blue vest, red coat with heart details, and an elegant ruffled collar. Perfect for Wonderland enthusiasts, this pattern brings the beloved always-late rabbit to life in huggable form with careful attention to his distinctive Victorian-style clothing and endearing personality.

Advanced 10-12 Hours

Materials Needed for White Rabbit Amigurumi Pattern

— Main Fabric

  • 01
    White yarn - YarnArt Jeans 03 (50g, 160m)
  • 02
    Brick red yarn - Alize Diva 366 (100g, 350m)
  • 03
    Pink yarn - Susan Cotton 12 (50g, 120m)
  • 04
    Blue yarn - YarnArt Jeans 15 (50g, 160m)
  • 05
    Red yarn - YarnArt Jeans 90 (50g, 160m)
  • 06
    Turquoise yarn - Etrofil Jeans 55 (50g, 160m)

— Tools Required

  • 01
    Crochet hook size 1.75mm
  • 02
    Crochet hook size 2.5mm
  • 03
    Safety eyes size 6mm (1 pair)
  • 04
    Tapestry needles
  • 05
    Brown embroidery thread
  • 06
    Black embroidery thread
  • 07
    Pins
  • 08
    Stitch markers
  • 09
    Scissors
  • 10
    Polyester fiberfill stuffing

Progress Tracker

0% Complete

— Head (yarn A) :

Round 1 :

sc 6 into a magic loop (6)

Round 2 :

inc 6 (12)

Round 3 :

[sc 1, inc] 6x (18)

Round 4 :

[sc 1, inc, sc 1] 6x (24)

Round 5 :

[sc 3, inc] 6x (30)

Round 6 :

sc 30 (30)

Round 7 :

[sc 2, inc, sc 2] 6x (36)

Round 8 :

sc 36 (36)

Round 9 :

[sc 5, inc] 6x (42)

Round 10 :

sc 42 (42)

Round 11 :

[sc 3, inc, sc 3] 6x (48)

Round 12 :

sc 48 (48)

Round 13 :

sc 12, [sc 1, inc] 3x, sc 12, [sc 1, inc] 3x, sc 12 (54)

Round 14 :

sc 54 (54)

Round 15 :

sc 12, [sc 1, inc, sc 1] 3x, sc 12, [sc 1, inc, sc 1] 3x, sc 12 (60)

Round 16-20 :

sc 60 (5 rnds) (60)

Round 21 :

[sc 8, dec] 6x (54)

Round 22 :

[sc 7, dec] 6x (48)

Round 23 :

[sc 6, dec] 6x (42)

Round 24 :

[sc 5, dec] 6x (36)

Round 25 :

[sc 4, dec] 6x, stuff firmly (30)

Round 26 :

[sc 3, dec] 6x (24)

Infos :

Break the yarn with a long rest to sew later. Use pins to locate 2 points on the head (between rnd 16&17, 5 sts apart), cut a piece of yarn A and pull really hard to make a dent on the face, tie a knot and break the yarn. Continue to use pins to locate 2 points on the head (between rnd 15&16, 3 sts), cut a piece of yarn A and pull really hard

— Nose (yarn B, use 1.75-2mm hook) :

Round 1 :

sc 6 into a magic loop (6)

Round 2 :

[sc 1, inc] 3x (9)

Round 3 :

sc 9 (9)

Info :

Break the yarn with a long rest to sew later. Sew the nose on the dent we created before

— Eyes (yarn C, make 2) :

Round 1 :

ch 5, start on the 2nd st from the hook, sc 3, (sc 3) in the last stitch, continue to crochet on the other side, sc 2, inc (10)

Round 2 :

inc, sc 2, inc 3, sc 2, inc 2, slst on the 1st st (16)

Info :

Break the yarn with a long rest to sew later. Use pins to locate the eyes-between rnd 11&12-4 sts apart. Insert 6mm safety eyes on the eyes and place at the marked points

— Ears (yarn C, make 2) :

Round 1 :

ch 10, start on the 2nd st from the hook, sc 8, (sc 3) in the last stitch, continue to crochet on the other side, sc 8, ch 3, turn (19)

Round 2 :

dc 3, hdc 4, sc 1, inc 3, sc 1, hdc 4, dc 3, break yarn C, change to yarn A, ch 1, turn (22)

Round 3 :

sc 7, hdc 1, [hdc 1, hdc inc] 3x, hdc 1, sc 7, ch 1, turn (25)

Round 4 :

sc 8, [sc 2, inc] 3x, sc 8 (28)

Info :

Break the yarn, fold the ear in half, sew 2 edges together, sew on the top of the head

— Cheeks's Hair (yarn A, make 2) :

Round 1 :

ch 10, start on the 5th st from the hook, slst 1, [ch 4, slst on the next st] 5x

Info :

Break the yarn with a long rest to sew later

— Head's Hair (yarn A) :

Round 1 :

ch 8, start on the 5th st from the hook, slst 1, [ch 4, slst on the next st] 3x

Infos :

Break the yarn with a long rest to sew later. Sew the Cheek's Hair (rnd 13-18) & Head's Hair. Use black thread to embroider eyebrows (2 rnds above the eyes). Use brown thread to embroider a line under the nose, pull really hard to make the bunny's face more real

— Body (yarn D) :

Round 1 :

sc 6 into a magic loop (6)

Round 2 :

inc 6 (12)

Round 3 :

[sc 1, inc] 6x (18)

Round 4 :

[sc 1, inc, sc 1] 6x (24)

Round 5 :

[sc 3, inc] 6x (30)

Round 6 :

[sc 2, inc, sc 2] 6x (36)

Round 7 :

[sc 5, inc] 6x (42)

Round 8 :

[sc 3, inc, sc 3] 6x (48)

Round 9 :

[sc 7, inc] 6x (54)

Round 10-14 :

sc 54 (5 rnds), break yarn D, change to yarn E (54)

Round 15 :

sc 54 (54)

Round 16 :

[sc 7, dec] 6x (48)

Round 17-18 :

sc 48 (2 rnds) (48)

Round 19 :

[sc 6, dec] 6x (42)

Round 20 :

sc 42 (42)

Round 21 :

[sc 5, dec] 6x (36)

Round 22 :

sc 36 (36)

Round 23 :

[sc 4, dec] 6x (30)

Round 24 :

sc 30 (30)

Round 25 :

[sc 3, dec] 6x (24)

Round 26 :

sc 24 (24)

Info :

Break the yarn, stuff firmly, sew the body to the head

— Coat (yarn A, make 2) :

Round 1 :

ch 18, start on the 2nd st from the hook, sc 17, ch 1, turn (17)

Round 2 :

dec, sc 13, dec, ch 1, turn (15)

Round 3-4 :

sc 15, ch 1, turn (2 rnds) (15)

Round 5 :

dec, sc 11, dec, ch 1, turn (13)

Round 6-7 :

sc 13, ch 1, turn (2 rnds) (13)

Round 8 :

dec, sc 9, dec, ch 1, turn (11)

Round 9-10 :

sc 11, ch 1, turn (2 rnds) (11)

Round 11 :

dec, sc 7, dec, ch 1, turn (9)

Round 12 :

sc 9 (9)

Info :

Do not break the yarn, crochet sc across the border, inc on each corner

— Heart (yarn E, make 2) :

Round 1 :

ch 3 into a magic loop, dc 3, hdc 3, ch 1, dc 1, ch 1, hdc 3, dc 3, ch 2, slst into the magic loop

Infos :

Break the yarn with a long rest to sew later. Sew the hearts on the coat. Sew the coat on the body on the front and back side

— Collar (yarn F) :

Round 1 :

ch 33, start on the 2nd st from the hook, inc 32, ch 1, turn (64)

Round 2 :

inc 64, ch 1, turn (128)

Round 3 :

inc 128, change to yarn A, ch 1, turn (256)

Round 4 :

slst 256 (256)

Info :

Break the yarn with a long rest to sew later. Sew the collar between the body & the head

— Arms (yarn A, make 2) :

Round 1 :

sc 6 into a magic loop (6)

Round 2 :

inc 6 (12)

Round 3 :

[sc 1, inc] 6x (18)

Round 4 :

sc 18 (18)

Round 5 :

sc 8, Bobble (4 hdc in the same st), sc 9 (18)

Round 6 :

sc 18 (18)

Round 7 :

[sc 4, dec] 3x, change to yarn E (15)

Round 8-10 :

sc 15 (3 rnds) (15)

Round 11 :

[sc 3, dec] 3x (12)

Round 12-15 :

sc 12 (4 rnds) (12)

Info :

Break the yarn, stuff firmly, sew the arms on the body

— Legs (yarn A, make 2) :

Round 1 :

ch 6, start on the 2nd st from the hook, sc 4, (sc 3) in the last stitch, continue to crochet on the other side, sc 3, inc (12)

Round 2 :

inc, sc 3, inc 3, sc 3, inc 2 (18)

Round 3 :

sc 1, inc, sc 3, [sc 1, inc] 3x, sc 3, [sc 1, inc] 2x (24)

Round 4 :

sc 1, inc, sc 4, [sc 1, inc, sc 1] 3x, sc 3, [sc 1, inc, sc 1] 2x (30)

Round 5-8 :

sc 30 (4 rnds) (30)

Round 9 :

sc 15, dec 6, sc 3 (24)

Round 10-12 :

sc 24 (3 rnds) (24)

Round 13 :

sc 12, dec 6 (18)

Round 14-16 :

sc 18 (3 rnds) (18)

Round 17 :

sc 12, dec 3 (15)

Round 18-20 :

sc 15 (3 rnds), stuff firmly (15)

Round 21 :

sc 3, mark this last st as the 1st st for the following rnds (3)

Round 22 :

sc 9, ch 5, skip 5 sts, sc 1 (15)

Round 23 :

sc 15, stuff firmly (15)

Round 24 :

[sc 1, dec] 5x (10)

Round 25 :

dec 5 (5)

Infos :

Break the yarn, weave in the last 5 sts. Join yarn A on any st of the ch 5, continue to crochet: Round 1: sc 10 (10), Round 2: [sc 4, inc] 2x (12), Round 3: sc 12 (12), Round 4: [sc 5, inc] 2x, stuff firmly (14). Break the yarn with a long rest to sew later. Sew the legs on the body (between rnd 8-rnd 11 of the body)

— Tail (yarn A) :

Round 1 :

sc 6 into a magic loop (6)

Round 2 :

(blo) inc 6 (12)

Round 3 :

(blo) [sc 1, inc] 6x (18)

Round 4-5 :

(blo) sc 18 (2 rnds) (18)

Round 6 :

(blo) [sc 1, dec] 6x (12)

Round 7 :

(blo) sc 12, stuff firmly (12)

Info :

Break the yarn, join yarn A on the 1st flo st of rnd 2, crochet *ch 3, slst on the next st* on the flo sts from rnd 2-7. Sew the tail on the back- below the coat (make sure with the tail & the legs, the rabbit can sit on its self). Use black thread to embroider 3 black lines on the legs

Assembly Instructions

  • Create dimensional shaping on the head by using yarn to pull tight between specific rounds to form the bunny's facial structure
  • Sew the small pink nose onto the created facial dent for proper placement
  • Attach pink eye backing pieces with safety eyes inserted, positioning them between rounds 11-12 with 4 stitches spacing
  • Fold ears in half and sew edges together before attaching to the top of the head
  • Sew cheek hair pieces onto rounds 13-18 and head hair on top for the wispy fur effect
  • Embroider eyebrows with black thread 2 rounds above the eyes
  • Use brown thread to embroider under the nose, pulling firmly to create realistic bunny face dimension
  • Stuff body firmly and attach it securely to the completed head
  • Sew heart appliqués onto both coat pieces before attaching coats to front and back of body
  • Attach the elaborate ruffled collar between the body and head to frame the face
  • Sew stuffed arms to the sides of the body
  • Position and sew legs to body between rounds 8-11, ensuring rabbit can sit independently
  • Create fluffy tail by working back loop only rounds, then add front loop chain details before attaching below coat
  • Embroider three black lines on each leg for toe definition

Important Notes

  • 💡Use a smaller hook size for the nose piece to create appropriate proportions and tighter stitches
  • 💡Take care when pulling yarn to shape the face—too much tension can warp the head structure
  • 💡Pin coat pieces on both front and back before sewing to ensure even and symmetrical placement
  • 💡Test the sitting position before final assembly by positioning legs and tail to confirm balance and stability
  • 💡Work the collar with consistent increases to create proper ruffle effect—uneven tension will show in the finished piece
  • 💡Stuff the legs moderately to maintain shape while allowing flexibility for posing into sitting position

This enchanting White Rabbit pattern brings Alice in Wonderland's most beloved punctual character to life with incredible attention to detail. From the sweet embroidered face with dimensional nose to the elaborate Victorian-style outfit complete with hearts and ruffles, every element captures the rabbit's charm. The combination of delicate features and structured clothing makes this an impressive display piece that any Wonderland fan will treasure. Perfect for challenging your advanced crochet skills while creating pure magic! 🐰✨🧶

You ask,

we answer.

FAQs

How do I create the dimensional face shaping?

The pattern uses a unique technique where you thread yarn through specific stitches and pull tight to create indents. Mark the points with pins first, then use a piece of matching yarn threaded on a needle to go through the marked stitches, pull firmly to create the dent, tie off securely, and hide the ends. This creates the bunny's characteristic face shape.

What's the best way to attach the elaborate collar?

The collar is worked with dramatic increases to create the ruffle effect. After completing all four rounds with the color changes, position it around the neck area between the body and head. Pin it in place all the way around before sewing to ensure even distribution of the ruffles and proper fit.

How do I make sure the rabbit sits properly?

The key is in the leg and tail positioning. The legs should be attached between rounds 8-11 of the body at an angle that allows the feet to touch the ground. The tail must be positioned below the coat on the back to provide additional balance. Test the sitting position before final sewing and adjust as needed.

Can I simplify the coat design?

Yes, you can skip the heart appliqués if desired, though they add character charm. The coat itself with its tapered shaping is essential to the design. Make both pieces and attach them symmetrically to the front and back of the body for the best effect.

Why does the pattern call for two different hook sizes?

The smaller 1.75mm hook is used only for the tiny nose piece to create tighter, smaller stitches appropriate for that delicate feature. The 2.5mm hook is used for all other parts to maintain proper proportions and create the main body structure.