🧢 Beautiful ✨ Detailed πŸ’ Adorable

WALL-E Robot Amigurumi Pattern

WALL-E Robot Amigurumi Pattern
4.3β˜… Rating
12-15 Hours Time Needed
3.1K Made This
βœ‚οΈ

Advanced Level

Designed for experienced knitters, these patterns involve intricate designs and complex techniques to challenge and inspire.

⏱️

Slow & Steady

A 10-12 hour projectβ€”great for savoring the process over several sessions.

🧸

Cute Companion

An adorable friend to cherish, handcrafted with love to bring comfort and joy for years to come.

About This WALL-E Robot Amigurumi Pattern

This WALL-E amigurumi pattern is a comprehensive guide to creating the iconic robot from Disney-Pixar's beloved film. The pattern features advanced construction techniques including a wire-supported neck for posing, detailed binocular eyes with felt and cardboard assembly, articulated arms with finger details, and authentic treaded wheels. The cube-shaped body is reinforced with cardboard panels to maintain structure, while multiple gray tones recreate WALL-E's weathered appearance perfectly.

WALL-E Robot Amigurumi Pattern crochet pattern - detailed view of completed project

Every detail has been carefully designed to capture WALL-E's endearing character, from his expressive eyes to his functional treads. The pattern includes special assembly techniques to ensure your finished robot can be posed and displayed beautifully.

Why You'll Love This WALL-E Robot Amigurumi Pattern

I absolutely love this WALL-E pattern because it captures the heart and soul of one of Pixar's most beloved characters! The engineering involved in creating his poseable neck with wire support makes him feel truly alive, and watching those iconic binocular eyes come together is incredibly rewarding. I'm amazed by how the cardboard-reinforced cube body gives him authentic structure while the detailed wheels and articulated arms with tiny fingers make him instantly recognizable. This isn't just a crochet projectβ€”it's bringing movie magic to life with your own hands, creating a companion that radiates the same hope and charm that made us all fall in love with WALL-E on screen.

WALL-E Robot Amigurumi Pattern step 1 - construction progress WALL-E Robot Amigurumi Pattern step 2 - assembly progress WALL-E Robot Amigurumi Pattern step 3 - details and accessories WALL-E Robot Amigurumi Pattern step 4 - final assembly and finishing

Switch Things Up

I love experimenting with this WALL-E pattern to make each one unique! For color variations, I've tried using rust-colored yarn mixed with the grey to give him an even more weathered, authentic look - it really enhances that post-apocalyptic charm. Sometimes I use different shades of grey throughout the body panels instead of uniform color, creating a patchwork effect that makes him look like he's made from salvaged parts.

The eyes are my favorite area to customize - I've made versions with slightly larger binoculars for a more cartoonish look, or added tiny LED lights behind the pupils for a glowing effect (perfect for display!). You could also embroider small details on the body panels to simulate scratches and wear patterns.

For a softer version suitable for young children, I skip the wire entirely and use pipe cleaners instead, making him completely safe for play. I've also created mini versions using thinner yarn and smaller hooks - they make perfect keychains! Some makers add a small music box mechanism inside that plays the WALL-E theme. The wheels can be made functional with small bearings if you're feeling ambitious. I've even seen versions where crafters add a small potted plant accessory as a nod to the movie's environmental themes!

Common Mistakes & How to Fix Them

βœ— Skipping the wire reinforcement in the neck can result in a floppy head that won't hold poses - always use wire wrapped with tape for stability and safety βœ— Not using cardboard backing for the body panels will cause the cube shape to collapse and lose structure - cut precise measurements and glue firmly to each panel βœ— Forgetting to stuff the neck before inserting wire makes positioning difficult later - fill lightly with fiber before adding the wire support for best results βœ— Rushing the eye assembly without proper felt and cardboard backing creates wobbly lenses - take time to glue each layer precisely for professional-looking binoculars βœ— Sewing arms without checking symmetry leads to uneven positioning - pin both arms in place before final stitching to ensure balanced appearance on body cube

WALL-E Robot Amigurumi Pattern

Bring the beloved Pixar character to life with this charming WALL-E amigurumi pattern! This detailed crochet guide helps you create your own adorable waste-collecting robot complete with his iconic cube-shaped body, expressive binocular eyes, treaded wheels, and articulated arms. Perfect for Disney-Pixar fans and collectors, this pattern includes wire-supported neck construction for poseable display and comprehensive assembly instructions. Create this heartwarming companion that captures WALL-E's endearing personality in every stitch.

Advanced 12-15 Hours

Materials Needed for WALL-E Robot Amigurumi Pattern

β€” Main Fabric

  • 01
    Cotton yarn 3mm in grey (main color)
  • 02
    Cotton yarn 3mm in dark gray
  • 03
    Cotton yarn 3mm in mustard yellow
  • 04
    Small piece of red cotton yarn

β€” Tools Required

  • 01
    Crochet hook 2.5mm
  • 02
    Felt in black color
  • 03
    Felt in red color
  • 04
    Felt in grey color
  • 05
    Felt in white color
  • 06
    Paperboard/cardboard
  • 07
    Tapestry needle
  • 08
    Scissors
  • 09
    Fabric adhesive/glue
  • 10
    Fiber fill stuffing
  • 11
    Tape measure
  • 12
    Wire (for neck support)
  • 13
    Tape (to wrap wire)
  • 14
    Stitch markers

Progress Tracker

0% Complete

β€” Large Panel :

Info :

Make 4 of these

Row 1 :

18 ch, start from the 2nd stitch from the hook, 17 sc, 1 ch and turn, start from the 2nd stitch from the hook (17)

Row 2-13 :

17 sc, 1 ch, and turn, start from the 2nd stitch from the hook (17)

Row 14 :

17 sc, fasten off (17)

β€” Small Panel :

Info :

Make 2 of these

Row 1 :

16 ch, start from the 2nd stitch from the hook, 15 sc, 1 ch and turn, start from the 2nd stitch from the hook (15)

Row 2-13 :

15 sc, 1 ch, and turn, start from the 2nd stitch from the hook (15)

Row 14 :

15 sc, fasten off (15)

β€” Arms - First Part (Shoulder) :

Info :

Make 2

Round 1 :

MR 7 sc (7)

Round 2-3 :

7 sc, fasten off and leave long tail (7)

β€” Arms - Second Part (Arm) :

Info :

Make 2

Round 1 :

MR 7 sc (7)

Round 2-11 :

7 sc (7)

Info :

Fill the arms a little bit

Round 12 :

Flatten the arm and make 3 sl st, fasten off and leave a long tail

β€” Arm Union :

Info :

Take the first and second part. With the long tail that we left on the arm, join it to what will be the shoulder

β€” Fingers :

Row 1 :

10 ch, start from the 2nd stitch from the hook, 9 sc, 1 ch, and turn start from the 2nd stitch from the hook (9)

Row 2 :

9 sc, fasten off

β€” Neck :

Round 1 :

MR 6 sc (6)

Round 2-15 :

6 sc (6)

Info :

Fasten off and leave a long tail

Infos :

Cut a piece of wire that is 2 cm longer than the neck. Cover your wire with tape on the top, so that it does not come out of the neck. Introduce the wire to the neck, the part that does not have tape will help secure the neck inside the body. Fill the neck a little bit
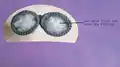
β€” Eyes :

Infos :

For the eyes we will use this mold, make 2 of cardboard and 2 of gray felt (the cardboard helps the eye to be firm). Measurements: 4.3 cm x 2.8 cm. Glue the felt to the cardboard and add the pupil. White felt and black felt for pupil (1.5 cm)

β€” Eyes - Front Part :

Round 1 :

MR 6 sc (6)

Round 2 :

6 inc (12)

Round 3 :

(1 sc, 1 inc) x6 (18)

Round 4 :

(2 sc, 1 inc) x6 (24)

Round 5 :

(3 sc, 1 inc) x6 (30)

Round 6 :

30 sc BLO

Round 7-9 :

30 sc, fasten off

β€” Eyes - Back Part :

Round 1 :

MR 6 sc (6)

Round 2 :

6 inc (12)

Round 3 :

(1 sc, 1 inc) x6 (18)

Round 4 :

18 sc BLO

Round 5-8 :

18 sc fasten off and cut the yarn leaving a long tail

β€” Middle Part of Lenses :

Round 1 :

MR 7 sc (7)

Round 2-7 :

7 sc (7)

Info :

Stuff with fiber and fasten off

β€” Glasses Chain :

Row 1 :

40 ch

Info :

Fasten off and cut the yarn leaving a long tail for assembly

β€” Eye Assembly :

Infos :

Insert the chain in the middle of the back and secure it on the inside (same with the other eye). Fill the back and sew to the front part. Center the part as much as possible. Glue the lenses to the inside edge

β€” Base for Wheels :

Row 1 :

40 ch, start from the 2nd stitch from the hook, 39 sc, 1 ch and turn, start from the 2nd stitch from the hook (39)

Row 2 :

39 sc, 1 ch, and turn, start from the 2nd stitch from the hook (39)

Row 3 :

39 sc, fasten off and leave a long tail (39)

β€” Wheels - Large Parts :

Info :

Make 2

Round 1 :

MR 6 sc (6)

Round 2 :

6 inc (12)

Round 3 :

12 sc BLO (12)

Round 4 :

6 dec (6)

Info :

Fasten off

β€” Wheels - Small Parts :

Info :

Make 4

Round 1 :

MR 8 sc (8)

Round 2 :

8 sc BLO (8)

Round 3 :

4 dec (4)

Info :

Fasten off

β€” Wheelset Assembly :

Infos :

Cut 3 rectangles out of cardboard (4cm x 4cm) and 3 out of felt. Join both and then glue them to what will be your wheel. With the tail of your wheel join the edge forming a triangle, inside the wheel glue 2 small parts and 1 large part

β€” Small Front Panel :

Row 1 :

17 ch, start from the 2nd stitch from the hook, 16 sc, 1 ch and turn, start from the 2nd stitch from the hook (16)

Row 2-3 :

16 sc, 1 ch, and turn, start from the 2nd stitch from the hook (16)

Row 4 :

16 sc, fasten off (16)

β€” Lower Corners :

Info :

Make 4

Row 1 :

8 ch, start from the 2nd stitch from the hook, 3 sc, skip 1 ch, 3 sc

Info :

Fasten off

β€” Upper Edge :

Row 1 :

61 ch, start from the 2nd stitch from the hook, 60 sc (60) fasten off

Assembly Instructions

  • Join the first and second arm parts using the long tail, sewing the arm to the shoulder piece to create articulated arms
  • Sew arms to the sides of the body panels with 3 chain spacing between attachment points as shown in pattern guide
  • Position the neck on one large panel, 3 rows down from top and centered. Insert wire through panel and bend tip to secure
  • Sew neck in place around the base using the long tail, then bend neck slightly and secure on both sides leaving small part attached to panel
  • Cut cardboard backing for all panels: 4.5cm x 5cm for 4 large panels, 4.5cm x 4cm for 2 small panels, and glue to each panel
  • Join all panels along edges to form cube shape, stuff with fiber filling, then attach the panel with neck (follow image for correct positioning)
  • Glue middle part of lenses to neck (5 rows from collar), then attach assembled binocular eyes to the sides of this support piece
  • Attach upper edge detail, small front panel, lower corners (two front and two back), and small button detail (MR 7 sc) as shown
  • Glue cardboard base and felt layer to finger pieces, then attach fingers to arms in L-shape configuration
  • Position and attach wheels approximately 8 rows from bottom on each side under the arms to elevate WALL-E properly

Important Notes

  • πŸ’‘Crochet tightly throughout the pattern for best structure and to prevent fiber fill from showing through stitches
  • πŸ’‘Use stitch markers on each round to keep track of your place, especially important when working in spirals
  • πŸ’‘Cover the top of wire with tape before inserting into neck to prevent it from poking through the crochet work
  • πŸ’‘Crochet all pieces first before assembly to make the final construction process easier and more organized
  • πŸ’‘The cardboard reinforcement in body panels and eyes is essential for maintaining proper shape and structure
  • πŸ’‘Pin all pieces in their proper positions before final sewing to ensure correct placement and symmetry
  • πŸ’‘Take time with the eye assembly as the binocular lenses are WALL-E's most distinctive feature and need precision

This enchanting WALL-E amigurumi pattern brings Pixar's most lovable robot to life in crochet form, complete with his signature cube body, expressive binocular eyes, and charming treaded wheels. The advanced construction techniques including wire-supported poseable neck and cardboard-reinforced structure create an authentic, display-worthy piece that captures every detail of this beloved character. Whether you're a Disney collector or Pixar enthusiast, this pattern offers a rewarding challenge that results in a truly special handmade treasure. πŸ€–πŸ§Άβœ¨

You ask,

we answer.

FAQs

What type of wire should I use for the neck support?

Use a wire that's sturdy enough to hold the neck in position but flexible enough to pose - florist wire or lightweight craft wire works well. The pattern specifies cutting it 2cm longer than the neck piece. Make sure to wrap the top with tape to prevent it from poking through the crochet.

Can I make WALL-E without the wire in the neck?

While you can omit the wire, it's highly recommended as it allows the neck to be poseable and gives WALL-E his characteristic head tilt. Without wire, the neck will be floppy and won't hold its shape well, diminishing the overall appearance of the finished piece.

What size should the finished WALL-E be?

Using 3mm cotton yarn and a 2.5mm hook with tight tension, WALL-E should measure approximately 4.5cm x 5cm for the body cube. The exact size will depend on your tension and how tightly you crochet.

Why does the pattern require cardboard reinforcement?

The cardboard backing in the body panels is essential to maintain WALL-E's distinctive cube shape. Without it, the crocheted panels would collapse and lose structure. The cardboard in the eyes also helps them stay firm and look more authentic like binocular lenses.

How do I attach the wheels to make WALL-E stand properly?

Position the wheels about 8 rows from the bottom of the body, directly under where the arms attach. They should elevate WALL-E slightly off the surface. The triangular cardboard structure inside each wheel provides stability for standing.

What's the best order for assembling all the pieces?

Follow the pattern assembly section carefully: first join arm pieces, then attach arms to panels, secure the neck with wire, join all body panels into cube shape, attach eye assembly to neck support, add body details and decorative elements, and finally attach wheels and fingers last.