🧢 Beautiful ✨ Detailed πŸ’ Adorable

Clyde the Chameleon Amigurumi Pattern

Clyde the Chameleon Amigurumi Pattern
4.7β˜… Rating
4-5 Hours Time Needed
3.9K Made This
βœ‚οΈ

Intermediate Level

Ideal for those with basic knitting experience, featuring slightly more advanced stitches and techniques to expand your skills.

⏱️

Weekend Treat

Takes 5-7 hours, making it an enjoyable project to finish over a couple of days.

🐰

Whimsical Buddy

Playful characters full of personality, designed to spark imagination and become cherished playtime favorites.

About This Clyde the Chameleon Amigurumi Pattern

This Clyde the Chameleon pattern is worked continuously from tail to nose, creating a seamless body with gradual shaping that mimics a real chameleon's form. The pattern features a unique casque (head veil) construction that gives Clyde his distinctive chameleon look, plus separately attached legs with split toes for extra character. The tail starts thin and the body gradually widens before tapering again at the head, creating that classic chameleon silhouette that makes this little guy so charming and realistic!

Clyde the Chameleon Amigurumi Pattern crochet pattern - detailed view of completed project

With detailed round-by-round instructions and helpful step-by-step photos throughout, you'll have all the guidance needed to bring Clyde to life. The pattern works up relatively quickly and uses approximately 100 yards of worsted weight yarn in your favorite color!

Why You'll Love This Clyde the Chameleon Amigurumi Pattern

I absolutely love this Clyde pattern because it captures the quirky charm of chameleons so perfectly! The way the body gradually increases from that tiny curled tail to the plump middle, then shapes into that distinctive domed head with the casque is just delightful to watch come together. I especially enjoy working the fun shaping techniques that create Clyde's bulging eyes and unique head structure - it's so satisfying to see the personality emerge as you crochet! The split-toe feet add such wonderful character, and choosing your own color makes each Clyde completely unique. This pattern taught me new shaping skills while creating an absolutely adorable friend I'm proud to display or gift!

Clyde the Chameleon Amigurumi Pattern step 1 - construction progress Clyde the Chameleon Amigurumi Pattern step 2 - assembly progress Clyde the Chameleon Amigurumi Pattern step 3 - details and accessories Clyde the Chameleon Amigurumi Pattern step 4 - final assembly and finishing

Switch Things Up

I love experimenting with this Clyde pattern by changing up the colors to create different chameleon moods! Instead of a single solid color, I've tried working in color-changing yarn that shifts gradually from green to blue to purple, mimicking how real chameleons change their appearance. The effect is absolutely stunning and makes each Clyde completely unique.

Another fun variation I enjoy is adding surface embroidery with a contrasting color to create spots, stripes, or geometric patterns along Clyde's body and tail. Using a simple chain stitch or French knots in bright colors like yellow, orange, or pink transforms him into a vibrant, tropical-looking creature.

I've also played with different eye options beyond the standard safety eyes - trying button eyes for a vintage look or even crocheting small colorful eye covers that make Clyde look sleepy or whimsical. You could also add small wire inside the tail before stuffing to make it poseable and create different curled positions.

For a magical twist, I sometimes use sparkly or metallic yarn for certain sections, or add tiny felt or embroidered details like eyelashes, a smile, or even little spots on the casque. These small personal touches make each chameleon feel like it has its own personality and story!

Common Mistakes & How to Fix Them

βœ— Forgetting to place stitch markers when instructed, especially before rounds 34 and 54, which can throw off the entire head shaping and casque placement βœ— Not working the extra stitches before rounds 34 and 54 without counting them, resulting in misaligned increases and a lopsided head structure βœ— Pulling the casque (veil) stitches too tightly when pinching and closing in round 64, which can create puckering instead of a smooth dome shape βœ— Attaching the legs with the wrong orientation, causing the feet to face backward instead of having the longer toes pointing toward head or tail βœ— Stuffing too loosely in the narrow tail section, making it floppy instead of maintaining its distinctive curled shape throughout the body βœ— Not inserting felt circles behind safety eyes before securing them, which can make eyes appear less prominent and realistic on the finished chameleon

Clyde the Chameleon Amigurumi Pattern

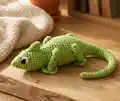
Create your own adorable Clyde the Chameleon with this delightful amigurumi pattern! This charming 10-inch chameleon features a unique curled tail, distinctive casque (veil) on the head, and four cute little legs. Perfect for both decoration and cuddling, Clyde works up beautifully in any color you choose. The pattern includes detailed instructions with helpful photos to guide you through each step, from the distinctive tapered tail to the sweet bulging eyes. Whether you're making a gift for a reptile lover or adding to your own collection, this lovable chameleon will bring a smile to anyone's face!

Intermediate 4-5 Hours

Materials Needed for Clyde the Chameleon Amigurumi Pattern

β€” Main Fabric

  • 01
    Worsted Weight (4) yarn in your choice of main color - 100 yards
  • 02
    Paintbox Aran or Stylecraft Special Aran recommended (super worsted/aran weight 4)

β€” Tools Required

  • 01
    4mm crochet hook
  • 02
    9mm safety eyes (2)
  • 03
    1/2 inch white felt circles (2)
  • 04
    Yarn needle
  • 05
    Stitch markers
  • 06
    Polyester stuffing
  • 07
    Scissors

Progress Tracker

0% Complete

β€” Body :

Info :

In your main color yarn, worked in the round, stuff as you go

Round 1 :

Sc x 3 into MR (3)

Rounds 2-5 :

Sc x 3 (3) - 4 rounds

Round 6 :

Sc Inc, Sc x 2 (4)

Rounds 7-10 :

Sc x 4 (4) - 4 rounds

Round 11 :

Sc Inc, Sc x 3 (5)

Rounds 12-15 :

Sc x 5 (5) - 4 rounds

Round 16 :

Sc Inc, Sc x 4 (6)

Rounds 17-20 :

Sc x 6 (6) - 4 rounds

Round 21 :

Sc Inc, Sc x 5 (7)

Rounds 22-24 :

Sc x 7 (7) - 3 rounds

Round 25 :

Sc Inc, Sc x 6 (8)

Rounds 26-28 :

Sc x 8 (8) - 3 rounds

Round 29 :

Sc Inc, Sc x 7 (9)

Rounds 30-31 :

Sc x 9 (9) - 2 rounds

Round 32 :

Sc Inc, Sc x 8 (10)

Round 33 :

Sc x 10 (10)

Info :

Sc x 2. Do not count these Sts. First stitch worked in round 34 is where your marker will go, and where the round begins

Round 34 :

Sc Inc x 2, Sc x 8 (12)

Round 35 :

Sc, Sc Inc x 2, Sc x 9 (14)

Round 36 :

Sc x 2, Sc Inc x 2, Sc x 10 (16)

Round 37 :

Sc x 16 (16)

Round 38 :

Sc x 4, Sc Inc x 2, Sc x 10 (18)

Round 39 :

Sc x 5, Sc Inc x 2, Sc x 11 (20)

Round 40 :

Sc x 6, Sc Inc x 2, Sc x 12 (22)

Round 41 :

Sc x 7, Sc Inc x 2, Sc x 13 (24)

Round 42 :

Sc Inc, Sc x 7, Sc Inc x 2, Sc x 7, Sc Inc, Sc x 6 (28)

Round 43 :

Sc Inc, Sc x 9, Sc Inc x 2, Sc x 9, Sc Inc, Sc x 6 (32)

Rounds 44-53 :

Sc x 32 (32) - 10 rounds

Info :

Sc x 3. Do not count these Sts. First stitch worked in round 54 is where your marker will go, and where the round begins

Round 54 :

Sc Dec, Sc x 9, Sc Dec x 2, Sc x 9, Sc Dec, Sc x 6 (28)

Round 55 :

Sc Dec, Sc x 7, Sc Dec x 2, Sc x 7, Sc Dec, Sc x 6 (24)

Round 56 :

Sc x 8, Sc Dec x 2, Sc x 12 (22)

Round 57 :

Sc x 7, Sc Dec x 2, Sc x 11 (20)

Round 58 :

Sc x 6, Sc Dec x 2, Sc x 10 (18)

Round 59 :

Sc, [Sc Inc, Sc x 5] x 2, Sc Inc, Sc x 4 (21)

Round 60 :

Sc, [Sc Inc x 2, Sc x 5] x 2, Sc Inc x 2, Sc x 4 (27)

Round 61 :

Sc x 10, Sc Inc x 4, Sc x 13 (31)

Round 62 :

Sc x 2, Sc Inc, Sc x 7, Sc Inc x 8, Sc x 7, Sc Inc, Sc x 5 (41)

Round 63 :

Sc x 41 (41)

Round 64 :

Sc x 13, Pinch together the 8 Sc Inc from round 62. Work a Sc Dec into the BLO of Sts 14 and 26 to close off the veil, leaving Sts 15-25 unworked. Sc x 13, Sc Dec (28)

Round 65 :

Sc x 3, Sc Dec, Sc x 7, Sc the next 3 Sts together, Sc x 7, Sc Dec, Sc x 4 (24)

Round 66 :

Sc x 3, [Sc Dec, Sc x 6] x 2, Sc Dec, Sc x 3 (21)

Round 67 :

Sc x 3, [Sc Dec, Sc x 5] x 2, Sc Dec, Sc x 2 (18)

Round 68 :

Sc x 2, [Sc Dec, Sc x 4] x 2, Sc Dec, Sc x 2 (15)

Info :

Cut small holes into felt circles and insert the safety eye into the hole. Then place one eye on each side of the top of the head between rounds 66 & 67 with about 4 Sts between them across the top and secure

Round 69 :

Sc x 2, [Sc Dec, Sc x 3] x 2, Sc Dec, Sc (12)

Round 70 :

[Sc Dec, Sc x 2] x 3 (9)

Round 71 :

[Sc Dec, Sc] x 3 (6)

Info :

FO, and leave a long tail

Info :

Thread tail onto your needle, and pick up the FLO of round 71. Pull to close

Info :

Insert needle into head and pull up to where the opening begins in round 64. Make sure the nose is stuffed firmly by adding if needed before closing the hole

Info :

Stitch the BLO of rounds 15-25 together to close the veil

Info :

Weave in end

β€” Legs (Make 4) :

Info :

In your main color yarn, worked in the round

Round 1 :

Sc x 6 into MR (6)

Rounds 2-10 :

Sc x 6 (6) - 9 rounds

Info :

Pinch closed and Sc x 3 across. Ch x 1, turn (3). The foot is worked in 2 parts starting from these Sts

Row 1A :

FLO: Sc x 3, Ch 1, turn (3)

Rows 2-4 :

Sc x 3 (3) - 3 rows

Info :

Sc x 3 down the side of the foot (3)

Row 1B :

In the unworked BLO, Sc x 3 (3)

Rows 2-3 :

Sc x 3 (3) - 2 rows

Info :

Sc x 2 down the side of the foot (2)

Info :

FO, leave long tail

Info :

Sew to the body. The longer sides will face the head on the front legs, and the tail on the back legs

Assembly Instructions

  • Position the four completed legs on the body - front legs should be attached with longer toes facing toward the head, back legs with longer toes facing toward the tail
  • Sew each leg securely to the body using the long tail left from fastening off, weaving through both the leg and body stitches multiple times for durability
  • After closing the nose in round 71, thread the tail through the head and pull it to where the casque opening begins in round 64 to reinforce the head shape
  • Carefully stitch the back loop only of rounds 15-25 together to close the casque (veil) on top of the head, creating the distinctive chameleon dome
  • Ensure all stuffing is firm throughout, especially in the narrow tail section and nose, to maintain proper shape and prevent sagging
  • Weave in all remaining yarn ends securely on the inside of the body where they won't be visible

Important Notes

  • πŸ’‘Use stitch markers consistently, especially before rounds 34 and 54, as these alignment points are critical for proper head shaping
  • πŸ’‘Work the extra stitches mentioned before rounds 34 and 54 without counting them into your stitch count - this repositions your starting point for symmetrical shaping
  • πŸ’‘Stuff the body continuously as you work rather than waiting until the end, as the narrow tail opening makes it difficult to stuff later
  • πŸ’‘When pinching the casque in round 64, work gently to create a smooth dome rather than pulling too tightly which can cause puckering
  • πŸ’‘Insert felt circles behind safety eyes before securing them between rounds 66-67 to make the eyes more prominent and realistic
  • πŸ’‘Pin legs in place before sewing to ensure proper positioning with longer toes facing the correct direction
  • πŸ’‘The pattern works from tail to nose, so you'll start with the thinnest part and gradually increase - keep track of where you are in the pattern

This delightful Clyde the Chameleon pattern brings the charm of these color-changing reptiles to your crochet hook! With its distinctive casque, gradual body shaping, and adorable split-toe feet, Clyde captures the quirky personality of real chameleons. The pattern includes detailed photos guiding you through trickier sections like the head veil construction and eye placement. Perfect for reptile enthusiasts or anyone who loves unique amigurumi characters! 🦎🧢✨

You ask,

we answer.

FAQs

Can I use a different yarn weight for this pattern?

Yes, you can use different yarn weights, but your finished chameleon will be a different size. The pattern specifies worsted weight (4) yarn with a 4mm hook for a 10-inch finished size. If you use lighter yarn and a smaller hook, Clyde will be smaller, and bulkier yarn with a larger hook will make him bigger. Just ensure your hook and yarn combination creates tight enough fabric that stuffing won't show through.

What does it mean to not count the stitches before rounds 34 and 54?

These uncounted stitches are used to reposition where your round begins, ensuring the increases and decreases align properly for symmetrical head shaping. Work the specified number of stitches, but don't include them in your stitch count. Then place your marker on the next stitch - this becomes your new round starting point. This technique is crucial for getting Clyde's head shape correct.

How do I create the casque (veil) on the head?

The casque is created by working increases in round 62 that temporarily expand the head, then in round 64 you pinch those increased stitches together and work a decrease through the back loops only to close it off, leaving some stitches unworked. This creates the distinctive domed shape on top of the chameleon's head. Follow the detailed instructions and reference the included photos for guidance.

Which direction should the legs face when I attach them?

The legs have one longer side and one shorter side on the split toes. For the front legs, attach them so the longer toe section faces toward the head. For the back legs, position them so the longer toes face toward the tail. This mimics how real chameleon feet grip branches and gives Clyde a natural, balanced appearance.

Can I make Clyde in multiple colors instead of one main color?

Absolutely! While the pattern is written for one main color, chameleons are known for their colorful patterns. You can easily add color changes throughout the body by switching yarns at the beginning of different rounds. Consider using greens, blues, yellows, or even rainbow stripes to create your own unique color-changing Clyde!