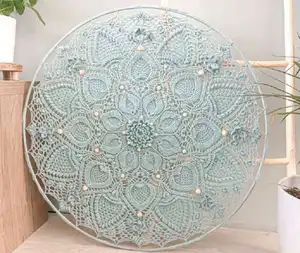
Transform your crochet skills with the stunning Virelle Mandala, a breathtaking circular masterpiece featuring 50 intricate rows of textured beauty. This exquisite pattern combines delicate lacework with dimensional elements including heart shapes, cluster stitches, and optional wooden beads to create a showstopping wall hanging or decorative piece. Perfect for intermediate to advanced crocheters who love detailed work, this mandala showcases front post and back post techniques that create mesmerizing texture and depth. The finished piece measures approximately 70cm in diameter when blocked on a ring, making it an impressive statement piece for any home. With clear row-by-row instructions, helpful charts, and detailed stitch explanations, you'll create a treasured heirloom that celebrates the meditative art of crochet.
Progress Tracker
0% Complete
— ROW 1 :
Instructions :
Start with a magic ring. Chain 3 (counts as dc), and work 11 dc in the ring. Slst in 3rd chain.
— ROW 2 :
Info :
In this row: front loops only. You work in the front loops from row 1.
Instructions :
In every stitch (so also in the slst from row 1): slst, ch 2, 2 dc, ch 2, slst. End with a slst in the first chain from this row. You have 12 leaves.
— ROW 3 :
Info :
In this row: back loops only. You're working in the back loops of row 1.
Instructions :
Slst in next. Chain 3 (counts as dc), dc in same. *2 dc in every stitch.* Repeat instructions between * until the end of the row. Slst in 3rd chain from the beginning of this row. You now have a total of 24 dc.
— ROW 4 :
Info :
In this row: front loops only. You're working in the front loops of row 3.
Instructions :
*In next stitch: [slst, ch 2, dc]. In the next: [dc, ch 2 and slst]. Repeat instructions between * until the end of the row. Slst in first chain from the beginning of this row. You have 12 leaves.
— ROW 5 :
Info :
In this row: back loops only. You're working in the back loops of row 3.
Instructions :
Slst in next. Ch 3 (counts as dc), dc in same. 1 dc in next. *2 dc in next, 1 dc in next.* Repeat instructions between * until the end of the row. Slst in 3rd chain from the beginning of this row. You have 36 dc.
— ROW 6 :
Info :
In this row: work in the front loops only. You're working in the front loops of row 5.
Instructions :
*In next: [slst, ch 2, dc]. In next: 2 tr. In next: [dc, ch 2, slst].* Repeat instructions between * until the end of the row. Slst in first chain from the beginning of this row. You have 12 leaves.
— ROW 7 :
Info :
In this row: back loops only. You're working in the back loops from row 5.
Instructions :
Ch 3 (counts as dc), dc in next, 2 dc in next. *2 dc (1 in each), 2 dc in next.* Repeat instructions between * until the end of the row. You now have 48 dc.
— ROW 8 :
Info :
In this row: front loops only. You're working in the front loops from row 7.
Instructions :
*In next: [slst, ch 2, dc]. In next: 2 tr. In next: 2 tr. In next: [dc, ch 2, slst].* Repeat instructions between * until the end of the row. Slst in the first chain from the beginning of this row. You have 12 leaves.
— ROW 9 :
Info :
In this row: back loops only. You're working in the back loops from row 7.
Instructions :
Slst in next. Ch 3 (counts as dc). 2 dc (1 in each). In next 2 dc (so 2 dc in 1). *3 dc (1 in each), 2 dc in 1.* Repeat instructions between * until the end of the row. Slst in 3rd chain from the beginning of this row. You have a total of 60 dc.
— ROW 10 :
Instructions :
Ch 1, sc in same st. Crochet 3 more sc and then 2 sc in next (2 in 1). *4 sc, 2 sc in next st.* Repeat instructions between * until the end of the row. You now have 72 sts. Skip ch and end with slst in first sc.
— ROW 11 :
Instructions :
Ch 1, sc in same st. Crochet 3 more sc, in next: [1 sc, ch 3, 1 sc]. *8 sc, in the next: [1 sc, 3 ch, and 1 sc].* Repeat instructions between * until the end of the row. You have 4 sts left at the end of the row; 1 sc in each. Skip the chain from the beginning of this row, end with a slst in the first sc.
— ROW 12 :
Instructions :
2 slst, ch 3. dc in next. Then ch 1, in the chain space: [1 dc + 3 ch + 1 dc]. Ch 1, skip 1 st. *3 dc, ch 1, fp-dc in next 2 sts (insert hook in the next stitch, to the back side, and to the front again through the next), ch 1, 3 dc. Ch 1, skip 1 st, in the chain space: [1 dc + 3 ch + 1 dc]. Ch 1, skip 1 st.* Repeat instructions between * until the end of the row. Then work: 3 dc, ch 1, fp-dc in next 2 sts, ch 1, 1 dc, and end with slst in the 3rd ch.
— ROW 13 :
Instructions :
Ch 3 (counts as dc). *Ch 2, skip 1 st, fp-dc in dc. 8 dc in chain space, fp-dc in dc. Ch 2, skip 1 st. 2 dc. Chain 1, fp-dc, ch 1. 2 dc.* Repeat instructions from * until the end of the row. End with a ch 2, skip 1 st, 2 dc, chain 1, fp-dc, ch 1, dc. Then a slst in the 3rd chain from the beginning of this row.
— ROW 14 :
Instructions :
2 slst. Then fp-slst in the fp-dc from the previous row, ch 3 (counts as fp-dc). Work another fp-dc in the same st. 8 dc. 2 fp-dc in 1. Ch 1. Skip 1 st. * 1 dc, ch 1, fp-dc, ch 1, 1 dc. Skip 1 st. Ch 1, 2 fp-dc in 1. 8 dc. 2 fp-dc in 1. Ch 1, skip 1 st.* Repeat instructions from * until the end of the row. End with 1 dc, ch 1, fp-dc, ch 1, 1 dc, ch 1, then work slst in the 3rd ch.
— ROW 15 :
Instructions :
Fp-slst, ch 3 (counts as fp-dc). 2 fp-dc in next. Sc between 1st and 2nd dc's. Then ch 1, and work a sc between the next two dc's. Repeat this until you have a total of 7 sc with a chain between each of the sc's. 2 fp-dc in 1, fp-dc. *ch 2, skip 1 st, fp-dc in fp-dc from previous row, skip 1 st, ch 2. Fp-dc, 2 fp-dc in 1. Work a sc between the 1st and 2nd dc's, chain 1, sc between next two stitches. You have 7 sc with a ch between each sc. 2 fp-dc in 1, fp-dc.* Repeat instructions from * until the end of the row. End with a fp-dc and ch 2, then a slst in the 3rd chain from the beginning of this row.
— ROW 16 :
Instructions :
Fp-slst, ch 3 (counts as fp-dc). Fp-dc, 2 fp-dc in 1. Sc in ch-1 space, chain 1, sc in next ch-1 space, chain 1, and repeat this until the end of the shell (so 6 sc and 5 chains in total). 2 fp-dc in 1, 2 fp-dc (1 in each). *ch 1, fp-dc in fp-dc from previous row, ch 1. 2 fp-dc, 2 fp-dc in 1. Sc in ch-1 space, chain 1, sc in ch-1 space, chain 1, sc in ch-1 space, repeat until end of the shell (so 6 sc and 5 chains in total). 2 fp-dc in 1, then 2 fp-dc (1 in each).* Repeat instructions between * until the end of the row. After the last leaf, you end with a ch 1, fp-dc, ch 1, and slst in the 3rd chain from the beginning of this row.
— ROW 17 :
Instructions :
Fp-slst, ch 3 (counts as fp-dc). Then 2 fp-dc (1 in each), 2 fp-dc in 1. 1 sc in ch-1 space, ch 1, sc in ch-1 space, ch 1, repeat (5 sc and 4 chains in total). 2 fp-dc in 1, 3 fp-dc (1 in each). *ch 1, fp-dc, ch 1. 3 fp-dc (1 in each), 2 fp-dc in 1. 1 sc in ch-1 space, ch 1, sc in next ch-1 space, ch 1, sc in ch-1 space, repeat (5 sc and 4 chains in total). 2 fp-dc in 1, 3 fp-dc (1 in each).* Repeat instructions between * until the end of the row. End with a ch 1, fp-dc, ch 1, and then a slst in the 3rd chain from the beginning of this row.
— ROW 18 :
Instructions :
Fp-slst, ch 3 (counts as fp-dc). 3 fp-dc (1 in each). 2 fp-dc in 1. Sc in ch-1 space, ch 1, repeat (4 sc and 3 chains in total). 2 fp-dc in 1, 2 fp-dc (1 in each), fp-dc2tog. *ch 2, fp-dc, ch 2. fp-dc2tog, 2 fp-dc (1 in each), 2 fp-dc in 1. Sc in ch-1 space, ch 1, sc in ch- 1 space, repeat (4 sc and 3 chains in total). 2 fp-dc in 1, 2 fp-dc (1 in each), fp-dc2tog.* Repeat instructions between * until the end of the row. End with a ch 2, fp-dc, ch 2, and a slst in the 3rd chain from the beginning of this row + the next fp-dc (this way you 'crochet them together').
— ROW 19 :
Instructions :
2 slst (1 in each). Fp-slst in next, ch 3 (counts as fp-dc). Fp-dc, 2 fp-dc in 1. Sc in ch-1 space, ch 1, sc in next ch-1 space, repeat (3 sc and 2 chains in total). 2 fp-dc in 1, 2 fp-dc (1 in each), fp-dc2tog. *ch 2. In next: [fp-dc, ch 1, fp-dc]. ch 2, fp-dc2tog, 2 fp-dc (1 in each), 2 fp-dc in 1. Sc in ch-1 space, ch 1, sc in next ch-1 space, ch 1, sc in ch-1 space (so 3 sc and 2 chains in total). 2 fp-dc in 1, 2 fp-dc (1 in each), fp-dc2tog.* Repeat instructions between * until the end of the row. End with: in next [fp-dc, ch 1, fp-dc]. Ch 2, fp-dc2tog (you work in the ch 3 + the next fp-dc from the previous row, and the next fp-dc). Slst in 3rd chain from the beginning of this row.
— ROW 20 :
Instructions :
Fp-slst in next fp-dc, ch 3 (counts as fp-dc). Fp-dc in next, 2 fp-dc in 1. Sc in ch-1 space, ch 1, sc in next ch-1 space. 2 fp-dc in 1, 2 fp-dc (1 in each), fp-dc2tog. *ch 3, 2 fp-dc in 1, ch 2, 2 fp-dc in 1, ch 3. fp-dc2tog, 2 fp-dc (1 in each), 2 fp-dc in 1. Sc in ch-1 space, ch 1, sc in next ch-1 space. 2 fp-dc in 1, 2 fp-dc (1 in each), fp-dc2tog.* Repeat instructions between * until the end of the row. End with 2 fp-dc in 1, ch 2, 2 fp-dc in 1, ch 3. fp-dc2tog, slst in 3rd chain from the beginning of this row.
— ROW 21 :
Instructions :
Fp-slst in next fp-dc, ch 3 (counts as fp-dc). Fp-dc2tog (skip the space with sc's and chains). 2 fp-dc (1 in each), fp-dc2tog. *ch 3, 2 fp-dc (1 in each), ch 3, dc in chain space, ch 3, 2 fp-dc (1 in each), ch 3. fp-dc2tog, 2 fp-dc (1 in each), fp-dc2tog (skip the space with the sc's and chains), 2 fp-dc (1 in each), fp-dc2tog.* Repeat instructions between * until the end of the row. End with a ch 3, 2 fp-dc (1 in each), ch 3, dc in ch space, ch 3, 2 fp-dc (1 in each), ch 3. Fp-dc2tog, and a slst in the 3rd chain from the beginning of this row.
— ROW 22 :
Instructions :
Fp-slst in same (the beginning chain from the previous row), ch 3 (counts as fp-dc). Fp-dc in the fp-dc2tog from the previous row (you insert in the top loops as shown in the picture). Fp-dc in next. Fp-dc2tog. *ch 3, 2 fp-dc (1 in each), ch 3. Clst in first chain space, ch 4, clst in second chain space. Ch 3, 2 fp-dc (1 in each), ch 3. Fp-dc2tog, 3 fp-dc (1 in each, the second one goes in the fp-dc2tog from the previous row, where you insert through the loops in the top as shown in the picture). Then a fp-dc2tog.* Repeat instructions between * until the end of the row. End with a clst, ch 3, 2 fp-dc (1 in each), ch 3 and fp-dc2tog. Then a slst in the 3rd chain from the beginning of this row.
— ROW 23 :
Instructions :
Fp-slst in next, ch 3 (counts as fp-dc). You start in the center of the leaf. Fp-dc2tog. *ch 3, 2 fp-dc (1 in each), ch 3. 2 fp-dc in clst from previous row (you insert from front to the back side, and going behind the clst, you go to the front again). Ch 5, 2 fp-dc in next clst from previous row (same instructions as before). Ch 3, 2 fp-dc in 1, ch 3. Fp-dc2tog, fp-dc, fp-dc2tog.* Repeat instructions between * until the end of the row. End with a fp-dc2tog and a slst in the 3rd chain from the beginning of this row.
— ROW 24 :
Instructions :
Work a slst in the fp-dc2tog and the 3 chains (so 1 slst in each) and in the next fp-dc. *To make a heart shape, you follow these instructions: You have 4 fp-dc in total to work with. Step 1: crochet together the next two fp-dc (so the two in the middle, which means you skip the first fp-dc for now). Step 2: now you go back to the first fp-dc (the fp-dc before the ones you just crocheted together). Crochet together the 1st and 4th fp-dc (the two fp-dc on the outsides). Step 3: work a slst around all fp-dc (you insert in between the second and third fp-dc's, which you crocheted together in step 1, but you also go around the other two, so that the slst holds them all in place). Then you continue: ch 4, dc in chain space, ch 3, dc in chain space, ch 4. You now reach the second part of the heart shape. You repeat the same steps as before (steps 1-3). Ch 3, dc in chain space, ch 3. Fp-dc3tog. Ch 3, dc in chain space, ch 3.* Repeat instructions between * until the end of the row. End with a slst in the slst from the first heart shape.
— ROW 25 :
Instructions :
Work a slst in each of the next 4 chains. Fp-slst in dc, ch 3 (counts as fp-dc). *5 dc in chain space between dc's. Fp-dc in next dc. Ch 4, sc in slst from heart, ch 4. 3 fp-dc in 1 (in the dc), ch 4, skip the fp-dc3tog, 3 fp-dc in 1 (in the next dc). Ch 4, sc in slst from heart. Ch 4, fp-dc.* Repeat instructions between * until the end of the row. After the last ch 4, you end with a slst in the 3rd chain from the beginning of this row.
— ROW 26 :
Instructions :
Fp-slst in same stitch (so the chain 3 from the beginning of the previous row), ch 3 (counts as fp-dc). *In the front loops only of row 25: [in the first and second 2 dc (so 2 in each), in the third a dc + picot + dc, in the fourth and fifth 2 dc (so 2 in each)]. Now continue as normal (so not front loops only). Fp-dc, ch 4, sc in sc, ch 4. 3 fp-dc (1 in each). Ch 1, work a bead (12 mm) in the chain space with a dc, ch 1, 3 fp-dc (1 in each). Ch 4, sc in sc, ch 4. Fp-dc.* Repeat instructions between * until the end of the row. End with a slst in 3rd chain.
— ROW 27 :
Instructions :
Fp-slst in same, ch 3 (counts as fp-dc). Fp-dc in same. *in each of the next 5 stitches, work in the back loops only (back loops from row 25): 2 tr (you have 10 tr in total). 2 fp-dc in 1. Ch 3, sc in sc, ch 6. Fp-dc6tog (you skip the bead). Ch 6, sc in sc, ch 3. 2 fp-dc in 1.* Repeat instructions between * until the end of the row. End with a ch 3, slst in 3rd loop from the beginning of this row.
— ROW 28 :
Instructions :
Fp-slst in same, ch 3 (counts as fp-dc). 2 fp-dc in next (so 2 in 1). *ch 2, sc between 1st and 2nd tr. Ch 3. Repeat this until you have a total of 8 bows consisting a sc between the tr, and a ch 3. You end with a sc between the 9th and 10th tr's. Ch 2, 2 fp-dc in 1. Fp-dc. Ch 1, sc in sc. Ch 5, in rhe fp-dc6tog from previous row: [dc, ch 2, dc, ch 2, dc]. Ch 5, sc in sc, ch 1. Fp-dc, 2 fp-dc in 1.* Repeat instructions between * until the end of the row. End with a ch 1 and slst in 3rd chain from the beginning of this row.
— ROW 29 :
Instructions :
Fp-slst in same, ch 3 (counts as fp-dc). Fp-dc, 2 fp-dc in 1. *ch 2, sc in first ch-3 space. Ch 3, sc in next chain space. Repeat this, ending with the sc in the last chain space (7 bows in total). Ch 2, 2 fp-dc in 1, 2 fp-dc (1 in each). Ch 3, skip the sc in sc. Fp-dc in first dc, ch 2, dc in chain space, ch 2, fp-dc in second dc, ch 2, dc in chain space, fp-dc in third dc. Ch 3, skip the sc in sc. 2 fp-dc (1 in each), 2 fp-dc in 1.* Repeat instructions between * until the end of the row. End with a ch 3, and a slst in the 3rd chain from the beginning of this row.
— ROW 30 :
Instructions :
Fp-slst in same, ch 3 (counts as fp-dc). 2 fp-dc (1 in each), 2 fp-dc in 1. *ch 2, sc in first ch-3 space. Ch 3, sc in next chain space. Repeat this, ending with the sc in the last chain space (6 bows in total). Ch 2, 2 fp-dc in 1, fp-dc, fp-dc2tog. Ch 3, 4x: [fp-dc, ch 1]. Fp-dc, ch 3. Fp-dc2tog, fp-dc, 2 fp-dc in 1.* Repeat instructions between * until the end of the row. After the last ch 3, you end with a slst through the 3rd chain + the next fp-dc of this row (so insert in the chain and the top loops of the next fp-dc).
— ROW 31 :
Instructions :
Fp-slst in beginning chain + the first fp-dc from the previous row, ch 3 (counts as fp-dc). 2 fp-dc (1 in each), 2 fp-dc in 1. ch 2, sc in first ch-3 space. Ch 3, sc in next chain space. Repeat this, ending with the sc in the last chain space (5 bows in total). Ch 2, 2 fp-dc in 1, fo-dc, fp-dc2tog. Ch 3, 2 fp-dc (1 in each), ch 1, Fp-dc in middle fp-dc, ch 1, 2 fp-dc (1 in each). Ch 3, fp-dc2tog, fp-dc, 2 fp-dc in 1. Repeat instructions between * until the end of the row. After the last ch 3, you end with a slst in the 3rd chain from the beginning of this row + the next fp-dc (you insert through the chain and immediately through the next fp-dc).
— ROW 32 :
Instructions :
Fp-slst in beginning chain from previous row + the next fp-dc, ch 3 (counts as fp-dc). 2 fp-dc (1 in each), 2 fp-dc in 1. ch 2, sc in first ch-3 space. Ch 3, sc in next chain space. Repeat this, ending with the sc in the last chain space (4 bows in total). Ch 2, 2 fp-dc in 1, fp-dc, fp-dc2tog. Ch 3, 2 fp-dc (1 in each), ch 2, in the next fp-dc: [clst (work with tr for this clst), ch 2, clst in same (again with tr)]. Ch 2, 2 fp-dc (1 in each). Ch 3, fp-dc2tog, fp-dc, 2 fp-dc in 1. Repeat instructions between * until the end of the row. After the last ch 3, you end with a slst in the beginning chain + the next fp-dc (you insert in the 3rd chain and immediately through the next fp-dc).
— ROW 33 :
Instructions :
Fp-slst in beginning chain from previous row + the next fp-dc, ch 3 (counts as fp-dc). 2 fp-dc (1 in each), 2 fp-dc in 1. ch 2, sc in first ch-3 space. Ch 3, sc in next chain space. Repeat this, ending with the sc in the last chain space (3 bows in total). Ch 2, 2 fp-dc in 1, fp-dc, fp-dc2tog. Ch 3, 2 fp-dc (1 in each). ch 3, 7 dc in chain space between the clst's, ch 3. 2 fp-dc (1 in each), ch 3. Fp-dc2tog, fp-dc, 2 fp-dc in 1. Repeat instructions between * until the end of the row. After the last ch 3, you end with a slst in the beginning chain + the next fp-dc (you insert in the 3rd chain and immediately through the next fp-dc).
— ROW 34 :
Instructions :
Fp-slst in the beginning chain from previous row + the next fp-dc, ch 3 (counts as fp-dc). 2 fp-dc (1 in each), 2 fp-dc in 1. ch 2, sc in first ch-3 space. Ch 3, sc in next chain space, ch 3, sc in chain space (you have 2 bows). Ch 2, 2 fp-dc in 1, fp-dc, fp-dc2tog. Ch 3, 2 fp-dc (1 in each), ch 3. Now work in the front loops only of the next 7 stitches: [sc in next dc, ch 3, sc in next, ch 3, repeat this, ending with the sc in the 7th dc]. You have 6 bows in total. Continue with a ch 3, 2 fp-dc (1 in each), ch 3. Fp-dc2tog, fp-dc, 2 fp-dc in 1. Repeat instructions between * until the end of the row. After the last ch 3, you end with a slst trough the beginning chain + the next fp-dc (you insert in the 3rd chain and immediately through the next fp-dc).
— ROW 35 :
Instructions :
Fp-slst in the beginning chain from previous row + the next fp-dc, ch 3 (counts as fp-dc). 2 fp-dc (1 in each), 2 fp-dc in 1. ch 2, sc in chain space, ch 3, sc in chain space. Ch 2, 2 fp-dc in 1, fp-dc, fp-dc2tog. Ch 3, 2 fp-dc (1 in each), ch 3. Now work in the back loops only (the back loops from the next 7 stitches, from row 33, you worked in the front loops of these stitches in row 34): [2 dc, 1 dc, 2 dc, 1 dc, 2 dc, 1 dc, 2 dc]. Continue with a ch 3, 2 fp-dc (1 in each), ch 3. Fp-dc2tog, fp-dc, 2 fp-dc in 1. Repeat instructions between * until the end of the row. After the last ch 3, you end with a slst trough the beginning chain + the next fp-dc (you insert in the 3rd chain and immediately through the next fp-dc).
— ROW 36 :
Instructions :
Fp-slst in the beginning chain from previous row + the next fp-dc, ch 3 (counts as fp-dc). 2 fp-dc (1 in each), 2 fp-dc in 1. ch 2, sc in chain space, ch 2. 2 fp-dc in 1, fp-dc, fp-dc2tog. Ch 3, 2 fp-dc (1 in each), ch 4. Now work in the front loops only (the front loops from row 35): [sc in next dc, ch 3, sc in next, ch 3, repeat this, ending with the sc in the last dc]. You have 10 bows in total. Ch 4, 2 fp-dc (1 in each), ch 3. Fp-dc2tog, fp-dc, 2 fp-dc in 1. Repeat instructions between * until the end of the row. After the last ch 3, you end with a slst trough the beginning chain + the next fp-dc (you insert in the 3rd chain and immediately through the next fp-dc).
— ROW 37 :
Instructions :
Fp-slst in the beginning chain from previous row + the next fp-dc, ch 3 (counts as fp-dc). Fp-dc, 2 fp-dc in 1. You skip the part with the chain bows. 2 fp-dc in 1, fp-dc, fp-dc2tog. Ch 3, 2 fp-dc (1 in each), ch 4. Now work in the back loops only (the back loops from row 35, you worked in the front loops in row 36): [a dc, then a ch 1, dc in next]. You have 11 dc's and 10 chains in total. Ch 4, 2 fp-dc (1 in each), ch 3. Fp-dc2tog, fp-dc, 2 fp-dc in 1. Repeat instructions between * until the end of the row. After the last ch 3, you end with a slst trough the beginning chain + the next fp-dc (you insert in the 3rd chain and immediately through the next fp-dc).
— ROW 38 :
Instructions :
Fp-slst in the beginning chain from previous row + the next fp-dc, ch 3 (counts as fp-dc). 2 fp-dc (1 in each). Fp-dc2tog, fp-dc, fp-dc2tog. ch 3, 2 fp-dc (1 in each). Clst in first dc (insert all dc's for the clst as fp-dc's). Ch 1, dc in first chain space. Ch 1, 2 dc in next chain space. Repeat this until you have 8 sets of 2 dc with in between each set a ch 1. After the last 2 dc you continue with a ch 1, dc in last chain space, ch 1, clst in dc (work with fp-dc's). Ch 3, 2 fp-dc (1 in each), ch 3. Fp-dc2tog, fp-dc, fp-dc2tog, fp-dc, fp-dc2tog. Repeat instructions between * until the end of the row. After the last ch 3, you end with a slst trough the beginning chain + the next fp-dc (you insert in the 3rd chain and immediately through the next fp-dc).
— ROW 39 :
Instructions :
Fp-slst in the beginning chain from previous row + the next fp-dc, ch 3 (counts as fp-dc). Fp-dc4tog. ch 3, 2 fp-dc (1 in each), ch 3, 2 dc in next chain space, ch 3. Clst in dc (work with fp-dc). Ch 1, dc in first chain space. Ch 1, 2 dc in next chain space. Repeat this until you have 7 sets of 2 dc with in between each set a ch 1. After the last 2 dc you continue with a ch 1, dc in next chain space, ch 1, clst in dc (work with fp-dc). Ch 3, 2 dc in chain space, ch 3, 2 fp-dc (1 in each), ch 3. Fp-dc5tog. Repeat instructions between * until the end of the row. After the last ch 3, you end with a slst in the 3rd chain + the fp-dc4tog. Fasten off.
— ROW 40 :
Instructions :
Join with a fp-slst in the first dc (the dc directly after the first clst from the previous row). Ch 3 and work 3 fp-dc in the same (now finish the clst: the ch 3 counts as the first fp-dc, so you insert your hook through the 3rd chain and then through the last fp-dc, and pull through). Ch 1, dc in first chain space. Ch 1, 2 dc in next chain space. Repeat this until you have 6 sets of 2 dc with in between each set a ch 1. After the last 2 dc you continue with a ch 1, dc in next chain space, ch 1, clst in dc (work with fp-dc). Ch 3, 2 fp-dc (1 in each), dc in next chain space, ch 3, 2 fp-dc (1 in each). Ch 1, bead with dc in the top of the leaf (use a 15 mm bead). Ch 1. 2 fp-dc (1 in each), ch 3, dc in next chain space, ch 3, 2 fp-dc (1 in each), ch 3. Clst in dc (work with fp-dc). Repeat instructions between * until the end of the row. After the last ch 3, end with a slst in the first clst.
— ROW 41 :
Instructions :
Slst in chain after the clst, fp-slst in dc, ch 3 (counts as first fp-dc from clst), 3 fp-dc in same and finish the clst. Ch 1, dc in first chain space. Ch 1, 2 dc in next chain space. Repeat this until you have 5 sets of 2 dc with in between each set a ch 1. After the last 2 dc you continue with a ch 1, dc in next chain space, ch 1, clst in dc (work with fp-dc). Ch 3, 2 fp-dc (1 in each), ch 3. In the dc: [fp-dc, ch 1, dc (insert the normal way so in the top loops of the stitch), ch 1, fp-dc (insert above the previous fp-dc)]. So you now have 2 fp-dc with a dc in between. Ch 3, 2 fp-dc (1 in each), fp-dc in dc with bead, 2 fp-dc (1 in each), ch 3. In the dc (as described earlier in this row): [fp-dc, ch 1, dc, ch 1, fp-dc]. Ch 3, 2 fp-dc (1 in each), ch 3. Clst in dc (work with fp-dc). Repeat instructions between * until the end of the row. After the last ch 3, end with a slst in the clst.
— ROW 42 :
Instructions :
Slst in chain after the clst, fp-slst in dc, ch 3 (counts as first fp-dc from clst), 3 fp-dc in same and finish the clst. Ch 1, dc in first chain space. Ch 1, 2 dc in next chain space. Repeat this until you have 4 sets of 2 dc with in between each set a ch 1. After the last 2 dc you continue with a ch 1, dc in next chain space, ch 1, clst in dc (work with fp-dc). Ch 3, 2 fp-dc (1 in each), ch 3. 2 fp-dc in 1, ch 1, fp-dc in dc, ch 1, 2 fp-dc in 1. Ch 3, fp-dc2tog, fp-dc in dc, fp-dc2tog, ch 3. 2 fp-dc in 1, ch 1, fp-dc in dc, ch 1, 2 fp-dc in 1. Ch 3, 2 fp-dc (1 in each), ch 3. Clst in dc (work with fp-dc). Repeat instructions between * until the end of the row. After the last ch 3, work a slst in the first clst.
— ROW 43 :
Instructions :
Slst in chain after the clst, fp-slst in dc, ch 3 (counts as first fp-dc from clst), 3 fp-dc in same and finish the clst. Ch 1, dc in first chain space. Ch 1, 2 dc in next chain space. Repeat this until you have 4 sets of 2 dc with in between each set a ch 1. After the last 2 dc you continue with a ch 1, dc in next chain space, ch 1, clst in dc (work with fp-dc). Ch 3, 2 fp-dc (1 in each), ch 3. Dc in ch space, ch 3. 2 fp-dc (1 in each), ch 1, clst in fp-dc (work with fp-dc), ch 1, 2 fp-dc (1 in each). Ch 3, 3 fp-dc (1 in each), ch 3. 2 fp-dc (1 in each), ch 1, clst in fp-dc (work with fp-dc), ch 1, 2 fp-dc (1 in each). Ch 3, dc in chain space, ch 3, ch 3, 2 fp-dc (1 in each), ch 3. Clst in first dc (work with fp-dc). Repeat instructions between * until the end of the row. After the last ch 3, end with a slst in the first clst.
— ROW 44 :
Instructions :
Slst in chain after the clst, fp-slst in dc, ch 3 (counts as first fp-dc from clst), 3 fp-dc in same and finish the clst. Ch 1, dc in first chain space. Ch 1, 2 dc in next chain space. Repeat this until you have 3 sets of 2 dc with in between each set a ch 1. After the last 2 dc you continue with a ch 1, dc in next chain space, ch 1, clst in dc (work with fp-dc). Ch 3, 2 fp-dc (1 in each), ch 3. In dc: [2 fp-dc, ch 1, dc (insert in the top loops), ch 1, 2 fp-dc (make sure to insert above the previous two fp-dc)]. Ch 3, fp-dc4tog (skip the clst). Ch 4, fp-dc, 2 fp-dc in 1, fp-dc, ch 4. Fp-dc4tog (skip clst), ch 3. In dc: [2 fp-dc, ch 1, dc (insert in the top loops), ch 1, 2 fp-dc (make sure to insert above the previous two fp-dc)]. Ch 3, 2 fp-dc (1 in each), ch 3. Clst in dc (work with fp-dc). Repeat instructions between * until the end of the row. After the last ch 3, end with a slst in the first clst.
— ROW 45 :
Instructions :
Slst in chain after the clst, fp-slst in dc, ch 3 (counts as first fp-dc from clst), 3 fp-dc in same and finish the clst. ch 1, dc in chain space, ch 1. 2 dc in chain space, ch 1, 2 dc in chain space. Ch 1, dc in chain space, ch 1, clst in dc (work with fp-dc). Ch 3, 2 fp-dc (1 in each), ch 3. 2 fp-dc (1 in each), ch 1, clst in dc (work with fp-dc), ch 1, 2 fp-dc (1 in each). Ch 5, fp-sc in fp-dc4tog, ch 5. 4 fp-dc (1 in each). Ch 5, fp-sc in fp-dc4tog, ch 5. 2 fp-dc (1 in each), ch 1, clst in dc (work with fp-dc), ch 1, 2 fp-dc (1 in each). Ch 3, 2 fp-dc (1 in each), ch 3. Clst in dc (work with fp-dc). Repeat instructions between * until the end of the row. After the last ch 3, end with a slst in the first clst.
— ROW 46 :
Instructions :
Slst in chain after the clst, fp-slst in dc, ch 3 (counts as first fp-dc from clst), 3 fp-dc in same and finish the clst. ch 1, dc in chain space, ch 1, dc in chain space, ch 1, clst in dc (work with fp-dc). Ch 3, 2 fp-dc (1 in each), ch 3. Dc in chain space, ch 3. Fp-dc4tog (skip the clst). Ch 4, sc in next chain space, ch 4, sc in next chain space, ch 4. 4 fp-dc (1 in each). Ch 4, sc in next chain space, ch 4, sc in next chain space, ch 4. Fp-dc4tog (skip the clst). Ch 3, dc in chain space, ch 3, 2 fp-dc (1 in each), ch 3. Clst in dc (work with fp-dc). Repeat instructions between * until the end of the row. After the last ch 3, work a slst in the first clst.
— ROW 47 :
Instructions :
Slst in chain after the clst, fp-slst in dc, ch 3 (counts as first fp-dc from clst), 3 fp-dc in same and finish the clst. ch 1, clst in dc (work with fp-dc). Ch 3, 2 fp-dc (1 in each), ch 3. In dc: [2 fp-dc, ch 1, dc (insert in the top loops), ch 1, 2 fp-dc (insert above previous two fp-dc)]. Ch 3, fp-sc in fp-dc4tog, ch 3. Ch 3, sc in chain space, ch 4, sc in chain space, ch 4, sc in chain space, ch 4. Fp-dc2tog, ch 3, fp-dc2tog. Ch 4, sc in chain space, ch 4, sc in chain space, ch 4, sc in chain space. Ch 3, fp-sc in fp-dc4tog, ch 3. In dc: [2 fp-dc, ch 1, dc (insert in the top loops), ch 1, 2 fp-dc (insert above previous two fp-dc)]. Ch 3, 2 fp-dc (1 in each), ch 3. Clst in dc (work with fp-dc). Repeat instructions between * until the end of the row. After the last ch 3, end with a slst in the first clst.
— ROW 48 :
Instructions :
Slst in chain space, ch 3. ch 1, 2 fp-dc (1 in each), ch 3, 2 fp-dc (1 in each), ch 1, clst in next, ch 1, 2 fp-dc (1 in each). Ch 4, skip the first chain space, sc in next chain space, ch 4, sc in chain space, ch 4, sc in chain space. Ch 1, skip next chain space, in the chain space between the fp-dc crocheted together: [6 dc with in between each dc a ch 1], so you have 6 dc and 5 ch in total. Ch 1, skip chain space, sc in next chain space. Ch 4, sc in chain space, ch 4, sc in chain space, ch 4, skip chain space. 2 fp-dc (1 in each), ch 1, clst in dc (work with fp-dc), ch 1, 2 fp-dc (1 in each). Ch 3, 2 fp-dc (1 in each), ch 1, dc in chain space at the top of the leaf. Repeat instructions between * until the end of the row. After the last two fp-dc (1 in each) and ch 1, end with a slst in the 3rd chain from the beginning of this row. Fasten off.
— ROW 49 :
Instructions :
Join with a fp-dc or a fp-slst and ch 3, in the first dc of the 6 dc's in the chain space. Work 3 more fp-dc's in the same and finish the clst. Ch 1. 2x: [clst in next dc, ch 1], clst in chain space, ch 1, 2x: [clst in next dc, ch 1]. Clst in last dc. You now have a total of 7 clst stitches. Ch 1, skip next chain space. 3x: [sc in next chain space, ch 4]. Fp-dc4tog (skip the clst). Ch 4, sc in next chain space, ch 4. Crochet together the 2 fp-dc + dc + 2 fp-dc (so fp-dc5tog). Ch 4, sc in next chain space, ch 4. Fp-dc4tog (skip the clst). 3x: [ch 4, sc in next chain space]. Ch 1, skip the next chain space. Clst in dc (work with fp-dc). Repeat instructions between * until the end of the row. After the last ch 4, sc and ch 1, end with a slst in the first clst. Fasten off.
— ROW 50 :
Instructions :
Join with a sc in one of the top of the leaf in which you worked a fp-dc5tog in the previous row. ch 4, sc in chain space, ch 4, sc in chain space, ch 4. Fp-sc in the fp-dc4tog. 4x: [ch 4, sc in chain space]. After the sc in the ch-1 space, continue with a ch 4, sc in the 3rd chain space between the clst's. Ch 1, sc in next chain space between clst's. Ch 4, sc in next chain space between clst's, ch 4, sc in next chain space between clst's. 3x: ch 4, sc in chain space]. Ch 4, fp-sc in fp-dc4tog. Ch 4, sc in next chain space, ch 4, sc in next chain space, ch 4, sc in top of the leaf (the fp-dc5tog). Repeat instructions between * until the end of the row. Work a slst in the first sc of this row (the sc in the top of the leaf with which you joined at the beginning of this row). Fasten off.
— Finishing - Flowers (8x) :
Step 1 :
Make a magic ring, make sure to leave a long tail for sewing.
Step 2 :
Work 12 sc in the magic ring, slst in first sc.
Step 3 :
Ch 3, now work 5 unfinished dc's in the same stitch (so you yarn over, insert and pull up a loop, yarn over and pull through 2, and do this 5x in total).
Step 4 :
You now have 6 loops on your hook. Yarn over and pull through the first loop.
Step 5 :
Yarn over, pull through 2. Repeat until all loops are done.
Step 6 :
Now work a sc between the 1st and 2nd dc in the top of the stitches between the loops (as shown in the picture). Sc in next, in next: [sc, ch 2, sc]. Sc in next, sc in next.
Step 7 :
Ch 3, slst in same stitch (so the sc where you started in step 3).
Step 8 :
Skip the next stitch (this one will be a little hidden, so make sure you skip just one stitch!). Slst in next. Now go back to step 3 and repeat the steps. You will have a total of 6 leaves for the flower. Make a total of 8 flowers.
Attaching Flowers :
Attach the flowers in row 43, in the 2 fp-dc (the middle two fp-dc's from the four in total). Using the tail you left in step 1, sew the flower on the mandala with a tapestry needle. Go through the loops of the stitches, and go back to the flower and insert in one of the loops on the back. Go back and forth a couple of times, until the flower is sewed on firmly.
— Attaching Mandala to Ring :
Instructions :
You need a 70 cm ring. Attach in each of the tops of the leaves (you worked a sc in the fp-dc5tog, so go through this sc). Then skip 3 chain spaces, and attach the next chain space. Skip 3 chain spaces again and attach in the chain 1 behind the top of the clst stitches. Keep attaching these to the ring, when crocheting around the ring you will work about 20-25 sc's between each point attached to the ring.
— Extra Beads in Center :
Instructions :
You can choose to add extra beads right at the outside of the flower in the center of the mandala. You need 8 beads, 10 mm. Attach them using a thread, on the top of the leaves lined with the fp-dc, and between two leaves, alternating (see photo).
The Virelle Mandala is a stunning testament to the artistry of advance crochet, combining intricate lacework with dimensional texture to create a breathtaking wall hanging that commands attention. Each of the 50 rows builds upon the last, introducing new techniques and stitch patterns that challenge your skills while rewarding you with visible progress. The optional beads and delicate flowers add personalized touches that make each mandala unique, while the meditative rhythm of working through each round provides a peaceful escape from daily life. When blocked and mounted on its ring, this masterpiece becomes a cherished heirloom that showcases your dedication to the craft. Happy crocheting and may every stitch bring you joy!