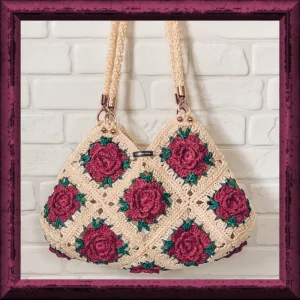
You're going to love how this romantic floral tote comes together! It's the perfect project for when you want to create something that looks incredibly intricate but is actually made of manageable pieces. I've designed this to be your go-to summer accessory, whether you're heading to the farmer's market or a sunny brunch date with friends.
Progress Tracker
0% Complete
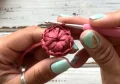
— 1. The Floral Square (Make 17) :
Round 1 :
start with ch 2, then work 6 sc into the second ch from hook. close with sl st to first sc and ch 1.
Round 2 :
work 12 sc directly into the center hole of the ring. ch 1.
Round 3 :
(ch 4, skip 3 stitches, sl st into the 4th stitch) repeat 3 times to create 3 arcs. tighten and trim your starting tail.
Round 4 :
into each ch-4 arc work (ch 2, 3 dc, ch 2, sl st in the previous round's sl st). repeat for all 3 arcs.
Round 5 :
working behind the petals, (ch 4, sl st into the back 2 loops of the center dc of the petal, ch 4, sl st into the previous sl st) repeat 3 times to create 6 arcs.
Round 6 :
into each of the 6 arcs work (1 sc, 3 dc, 1 sc, sl st into the sl st of the previous round).
Round 7 :
ch 2, sl st into the back 2 loops of the center dc of a petal, (ch 4, sl st into the back 2 loops of the next petal's center dc) repeat 5 times, ch 4, skip first 2 ch and sl st into the start. (6 arcs total).
Round 8 :
into each arc work (1 sc, 1 dc, 3 tr, 1 dc, 1 sc, sl st into the previous sl st). do not sl st the final petal; fasten off and hide the end.
Round 9 :
using green yarn, attach with ch 4 (using 2 threads) to a petal center. sc in next petal center, ch 3, (2 dc together, ch 4, 2 dc together) in sl st between petals. ch 4, sc in 3rd petal center, ch 4, (2 dc together, ch 4, 2 dc together) in next sl st. ch 3, sc in 4th petal, ch 3, sc in 5th petal, ch 3, (2 dc together, ch 4, 2 dc together) in next sl st. ch 4, sc in 6th petal, ch 4, (2 dc together, ch 4, 2 dc together) in next sl st. ch 3, fasten off.
Round 10 :
using background yarn, attach under an arc with ch 3 (2 threads). work 2 dc in same arc, 4 dc in next, 3 dc in next. in corner arc work (3 dc, ch 3, 3 dc). work 5 dc in each of next 2 arcs, then (3 dc, ch 3, 3 dc) in corner. repeat pattern for other side: 3 dc, 4 dc, 3 dc, then corner (3 dc, ch 3, 3 dc). work 5 dc in each of next 2 arcs, final corner (3 dc, ch 3, 3 dc), and sl st to start. ch 1.
Round 11 :
work 1 sc in every stitch around (16 sc per side). in each corner ch-space, work (2 sc, ch 2, 2 sc). fasten off and hide ends. steam the square to 12cm.
— 2. Joining the Canvas :
Info :
Arrange your 17 squares in a diamond-shaped grid as shown in the layout diagram.
Step 1 :
join squares using sl st through both layers on the front side. use a double strand of yarn and work 22 sl st along each side to connect them.
Step 2 :
once all squares are joined into a flat sheet, steam all the seams with an iron to flatten them out.
— 3. Side Seams :
Step 1 :
fold the joined canvas in half crosswise.
Step 2 :
following the assembly arrows, connect the side parts using 22 sl st per square side. the resulting seam should create a three-sided pyramid shape.
Step 3 :
place a rolled towel inside the bag and steam both side seams to set the shape.
— 4. Top Edging & Base Trim :
Round 1 :
attach yarn near a side seam. work split sc into each stitch. when you reach a corner arc of a square, work 9 dc into that space to create a handle anchor.
Round 2 :
continue with split sc along the edges. at the junctions where squares meet, work 3 sc together. repeat the 9 dc shells at each of the four handle points.
Round 3 :
work 1 sl st into every stitch of the previous row to provide a firm, finished edge. fasten off and hide ends.
— 5. Handles (Make 2) :
Round 1 :
begin with ch 2, then place 6 sc into the second ch from your hook. work in a continuous spiral.
Round 2 :
work 1 sc into each of the 6 stitches.
Round 3 :
work 6 sc, but insert your hook specifically into only the left-hand vertical leg of the sc from the previous round.
Round 4-Y :
continue working 6 sc into the left vertical leg of the stitches until the handle measures approximately 50 cm. stretch the cord well, then fasten off and hide the tails.
— 6. Final Assembly & Lining :
Hardware :
pass the 9-dc shells through the handle holders. insert handle ends into the holders and secure them tightly with the screwdriver and bolts. use a drop of polish to lock the screws.
Feet :
screw two decorative legs into the bag near each of the four handle holders.
Lining :
cut your fabric to match the bag's flat shape. sew the side seams, hem the top edge by 5mm, and pin it inside the bag.
Finishing :
sew the lining to the bag using hidden stitches around the top edge. steam the final seams through a damp cloth if needed.
You've done it! There is nothing quite like the feeling of carrying a bag you made with your own two hands, especially one as stunning as this. This rose garden tote is bound to be a conversation starter every time you take it out. I hope you enjoyed every stitch of those seventeen squares and that this bag accompanies you on many sunny adventures. Don't forget to show off your finished masterpiece to your fellow makers—you've earned those bragging rights! Happy crocheting! 🧶✨🌹