🧶 Beautiful ✨ Detailed 💝 Adorable

Victor Fox Amigurumi Pattern

Victor Fox Amigurumi Pattern
4.8★ Rating
4-5 Hours Time Needed
2.4K Made This
✂️

Intermediate Level

Ideal for those with basic knitting experience, featuring slightly more advanced stitches and techniques to expand your skills.

⏱️

Weekend Treat

Takes 5-7 hours, making it an enjoyable project to finish over a couple of days.

🧸

Cute Companion

An adorable friend to cherish, handcrafted with love to bring comfort and joy for years to come.

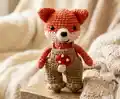
About This Victor Fox Amigurumi Pattern

Victor Fox is part of the Little Friends Collection's autumn chapter, designed to capture the cozy essence of fall. This intermediate-level pattern uses X-stitches for a denser, more defined appearance in the body while utilizing V-stitches for the clothing to create softer, more flexible garments. The pattern includes detailed instructions for creating Victor's distinctive two-toned face with color changes, plus complete wardrobe options including sweaters with decorative embroidery, long overalls with mushroom or heart appliqués, and a practical hooded raincoat.

Victor Fox Amigurumi Pattern crochet pattern - detailed view of completed project

Standing at 10cm tall, Victor is perfectly sized for little hands and makes an ideal companion for imaginative autumn adventures. The pattern also includes instructions for creating charming accessories like a woven basket, mushrooms, acorns, pumpkins, and colorful autumn leaves to complete the seasonal scene.

Why You'll Love This Victor Fox Amigurumi Pattern

I absolutely love this pattern because it combines practical amigurumi skills with creative seasonal charm! The color-changing technique for Victor's snout teaches valuable skills while creating an adorable result. What really makes this special is the complete wardrobe system with interchangeable outfits, allowing endless customization and play possibilities. I'm particularly fond of the thoughtful details like the belly button bobble stitch, the tiny embroidered hearts and pumpkin appliqués, and the way the clothes are designed to be easy for small hands to dress and undress. The autumn accessories add that perfect finishing touch, making this not just a toy but a whole seasonal story to create and cherish.

Victor Fox Amigurumi Pattern step 1 - construction progress Victor Fox Amigurumi Pattern step 2 - assembly progress Victor Fox Amigurumi Pattern step 3 - details and accessories Victor Fox Amigurumi Pattern step 4 - final assembly and finishing

Switch Things Up

I love experimenting with Victor's color palette to create different fox variations! Instead of the traditional orange fox color, try making an arctic fox using all white and light gray, or a sweet pastel fox in soft pink or lavender. You could even create a magical galaxy fox with deep purples, blues, and add some sparkly yarn for a cosmic effect.

For the wardrobe, the possibilities are truly endless. I've made preppy versions with tiny argyle patterns embroidered on the sweaters, beach-ready versions with striped shirts and little shorts, and even holiday-themed outfits with tiny Santa hats and scarves. The raincoat can be made in any bright color - imagine a cheerful red, a sweet mint green, or even a rainbow striped version!

The accessories offer wonderful customization opportunities too. Instead of autumn mushrooms, create spring flowers with green stems and colorful petals, or winter pinecones using brown and tan yarns with a different stitch texture. The basket can be made in rainbow colors for an Easter version or in festive reds and greens for Christmas.

I particularly enjoy adding personality through facial expressions. Try embroidering the eyes closed for a sleeping fox, add little eyebrows for more character, or experiment with different mouth shapes - a tiny surprised 'o' shape is absolutely precious! You can also add accessories like tiny glasses, bows, or even a little backpack using the same techniques from the pattern.

Common Mistakes & How to Fix Them

✗ Forgetting to place unused yarn behind stitches during color changes on rounds 12-18, which can create messy visible strands across the front of the work ✗ Over-stuffing the muzzle or arms, making them too firm and losing the soft, huggable quality that makes Victor so appealing to touch and hold ✗ Not using stitch markers consistently at the beginning of each spiral round, leading to confusion about round counts and misaligned features on the face ✗ Skipping the adjustment of bobble stitch placement on round 15 to center the belly button, resulting in an off-center detail that affects overall appearance ✗ Using V-stitches instead of X-stitches for the body parts, creating a looser fabric that may show stuffing through the stitches and lack definition ✗ Neglecting to check clothing fit during construction, then discovering garments are too tight or loose when using different tension or hook sizes than recommended

Victor Fox Amigurumi Pattern

Create your own adorable Victor Fox with this charming autumn-themed amigurumi pattern! This sweet 10cm fox features a distinctive cream-colored snout, expressive safety eyes, and delightful details including embroidered features and rosy cheeks. Perfect for collectors and gift-givers alike, Victor comes with a complete wardrobe including cozy sweaters, practical overalls, and an adorable yellow raincoat. This pattern combines classic amigurumi techniques with creative color changes and includes detailed instructions for creating multiple autumn-inspired outfits and accessories.

Intermediate 4-5 Hours

Materials Needed for Victor Fox Amigurumi Pattern

— Main Fabric

  • 01
    DK Cotton by Ricorumi (25g/57m) in color 025 fox for main body
  • 02
    DK Cotton by Ricorumi in color 002 cream for snout and muzzle details
  • 03
    DK Cotton by Ricorumi in color 060 black for nose and mouth embroidery
  • 04
    DK Cotton by Ricorumi in colors 052 light brown, 075 reed, 057 chocolate, 076 marsh green for sweater and pants outfits
  • 05
    DK Cotton by Ricorumi in colors 078 khaki, 064 mustard for overalls
  • 06
    DK Cotton by Ricorumi in color 006 yellow for raincoat
  • 07
    DK Cotton by Ricorumi in colors 002 cream, 064 mustard for decorative embroidery and appliqués
  • 08
    DK Cotton by Ricorumi in colors 024 smokey orange, 029 red wine for appliqué details

— Tools Required

  • 01
    2.5mm crochet hook for body and clothing
  • 02
    3mm crochet hook for raincoat pieces
  • 03
    5mm safety eyes (1 pair)
  • 04
    Yarn needle for sewing and embroidery
  • 05
    Stitch markers for round tracking
  • 06
    Polyester fiberfill for stuffing
  • 07
    Scissors
  • 08
    Blusher for cheeks
  • 09
    12 snap buttons (6mm diameter) for clothing closures
  • 10
    Small piece of wire or pipe cleaner (optional for posable arms)

Progress Tracker

0% Complete

— Head :

Round 1 :

sc 6 into the ring (6)

Round 2 :

inc x6 (12)

Round 3 :

(sc 1, inc) x6 (18)

Round 4 :

(sc 2, inc) x6 (24)

Round 5 :

(sc 3, inc) x6 (30)

Round 6-7 :

sc around (30)

Round 8 :

(sc 4, inc) x6 (36)

Round 9-11 :

sc around (36)

Info :

On round 12, start alternating colors to form cream snout. At each color change, make the last yarn under in the new color. Place unused yarn behind stitches from round 12 to 18.

Round 12 :

(sc 17, inc) in color 025 fox, (sc 17, inc) in color 002 cream (38)

Round 13-15 :

sc 19 in color 025 fox, sc 19 in color 002 cream (38)

Round 16 :

[(sc 2, dec) x4, sc 3] in color 025 fox, [(sc 2, dec) x4, sc 3] in color 002 cream (30)

Info :

Insert 5mm safety eyes between rounds 10 and 11, 7 stitches apart, centering them above the cream part. Stuff the head firmly.

Round 17 :

(sc 1, dec) x5 in color 025 fox, (sc 1, dec) x5 in color 002 cream (20)

Round 18 :

dec x5 in color 025 fox, dec x5 in color 002 cream (10)

Info :

Finish stuffing. Fasten off leaving a long tail. With yarn needle and color 002 cream, make a whip stitch in the front loops of the last 10 stitches and tighten to close the hole. Weave in end.

— Muzzle :

Round 1 :

sc 6 into the ring (6)

Round 2 :

(sc 2, inc) x2 (8)

Round 3 :

(sc 3, inc) x2 (10)

Round 4 :

sc 2, inc, sc 4, inc, sc 2 (12)

Info :

Fasten off leaving tail for sewing. Using color 060 black, embroider nose at end of muzzle. Stuff muzzle lightly and sew between rounds 11 and 14, centered between eyes. Using color 060 black, embroider smiling mouth under muzzle, 3 stitches wide. Put blusher on cheeks.

— Ears (make 2) :

Round 1 :

sc 6 into the ring (6)

Round 2 :

(sc 1, inc) x3 (9)

Round 3 :

sc around (9)

Round 4 :

(sc 2, inc) x3 (12)

Round 5 :

(sc 3, inc) x3 (15)

Round 6 :

sc around (15)

Info :

Fasten off leaving tail for sewing. Sew ears on each side of head between rounds 4 and 8.

— Legs (make 2) :

Round 1 :

sc 5 into the ring (5)

Round 2 :

inc x5 (10)

Round 3 :

BLO sc around (10)

Round 4 :

sc 1, dec x4, sc 1 (6)

Round 5 :

FLO sc 1, inc x4, sc 1 (10)

Round 6-9 :

sc around (10)

Info :

Stuff legs firmly. For 1st leg: fasten off and weave in end. For 2nd leg: don't fasten off, make a few replacement sc (3 recommended) to be in middle of inner part of leg, continue with body.

— Body :

Round 10 :

ch 2, insert hook in leg 1 (in middle of inner part): sc 4, inc, sc 5, on other side of chain 2: inc x2, back on leg 2: sc 5, inc, sc 4 (28)

Round 11-14 :

sc around (28)

Info :

On round 15, adjust number of stitches before and after bobble stitch if necessary so belly button is centered.

Round 15 :

sc 15, 3dc-bobble stitch, sc 12 (28)

Round 16-17 :

sc around (28)

Round 18 :

(sc 5, dec) x4 (24)

Round 19 :

sc around (24)

Round 20 :

(sc 4, dec) x4 (20)

Round 21 :

sc around (20)

Round 22 :

(sc 3, dec) x4 (16)

Info :

Fasten off leaving tail for sewing. Stuff body firmly. Sew head on body.

— Arms (make 2) :

Round 1 :

sc 6 into the ring (6)

Round 2-10 :

sc around (6)

Info :

Fasten off leaving tail for sewing. Don't stuff arms. Sew on each side of body between rounds 20 and 21. Optional: insert small piece of wire into body and thread arms onto it before sewing for posable arms.

— Tail :

Round 1 :

sc 6 into the ring (6)

Round 2-10 :

sc around (6)

Info :

Fasten off leaving tail for sewing. Stuff tail lightly. Sew on back of body between rounds 11 and 12.

Assembly Instructions

  • Attach the muzzle to the head between rounds 11 and 14, centered between the safety eyes, stuffing it lightly before fully securing
  • Embroider the black nose at the end of the muzzle, then add the smiling mouth underneath, 3 stitches wide
  • Sew the ears on each side of the head between rounds 4 and 8, ensuring they're positioned symmetrically
  • Join the two legs with chain 2, paying attention to foot orientation, then continue crocheting the body in spiral
  • Stuff the body firmly and attach the head, ensuring the cream snout portion faces forward
  • Attach the unstuffed arms to each side of the body between rounds 20 and 21, optionally inserting wire for posability
  • Sew the lightly stuffed tail to the back of the body between rounds 11 and 12, centered on the back seam

Important Notes

  • 💡This pattern uses X-stitches for the body (yarn under instead of yarn over) creating denser, more defined stitches compared to regular V-stitches
  • 💡Clothing is made with V-stitches for a softer, more flexible fabric that's easier for small hands to dress and undress
  • 💡Always place unused yarn behind your work during color changes on rounds 12-18 to keep the front clean and professional
  • 💡Use stitch markers at the beginning of each spiral round to avoid losing your place and ensure accurate stitch counts
  • 💡Clothing sizes may vary based on individual crochet tension - don't hesitate to change hook size or add/remove rounds for proper fit
  • 💡The belly button bobble stitch on round 15 should be adjusted to stay centered - count stitches carefully before and after it
  • 💡Pin all pieces in position before sewing to ensure proper placement and symmetry, especially for the face features

Victor Fox brings the magic of autumn right into your hands with his sweet two-toned face and cozy seasonal wardrobe! This intermediate pattern teaches valuable color-changing techniques while creating an absolutely adorable woodland companion. With multiple outfit options and charming accessories like mushrooms and pumpkins, you'll have endless opportunities for creative expression. Perfect for gift-giving or adding to your own amigurumi collection! 🦊🍂 Happy crocheting! 🧶✨

You ask,

we answer.

FAQs

What's the difference between X-stitches and V-stitches used in this pattern?

X-stitches are made by yarning under instead of over when inserting your hook, creating a denser, more defined fabric. This pattern uses X-stitches for Victor's body parts for better structure and V-stitches (regular single crochet) for clothing to make softer, more flexible garments that are easier to put on and take off.

Can I make Victor larger or smaller than the 10cm size?

Yes! Use a larger hook (3mm or 3.5mm) and thicker yarn for a bigger fox, or a smaller hook (2mm) with finer yarn for a tinier version. Just remember to adjust your safety eye size accordingly - go up to 6-7mm for larger versions or down to 4mm for smaller ones.

How do I manage the color changes on the head without making a mess?

The key is placing the unused color behind your stitches as you work rounds 12-18. Make the last 'yarn under' of each section in the new color to create a clean transition. Practice the color change technique on a sample swatch first if you're new to this method.

Do the clothes really fit well, and can a child dress and undress Victor?

Yes! The clothes are designed with V-stitches for flexibility and include snap buttons for easy closure. However, fit depends on your tension - if your stitches are tight, go up a hook size for the clothes. If loose, go down a size. The pattern recommends testing fit as you go.

Are the accessories like the basket and mushrooms difficult to make?

The accessories use basic stitches but introduce fun techniques like spike stitches for the basket's texture. They're great practice pieces and most can be completed in under 30 minutes each. The pattern includes clear instructions for all details including the decorative knot stitches on mushroom caps.

Can I use different yarn brands instead of Ricorumi?

Absolutely! Any DK weight cotton or acrylic yarn will work. Just make sure to use yarns of similar weight and maintain consistent tension. You may need to adjust your hook size slightly depending on the yarn's thickness and your personal tension to achieve the correct size.