๐Ÿงถ Beautiful โœจ Detailed ๐Ÿ’ Adorable

Evil Queen Amigurumi Pattern

Evil Queen Amigurumi Pattern
4.0โ˜… Rating
5-6 Hours Time Needed
3.2K Made This
โœ‚๏ธ

Advanced Level

Designed for experienced knitters, these patterns involve intricate designs and complex techniques to challenge and inspire.

โฑ๏ธ

Weekend Treat

Takes 5-7 hours, making it an enjoyable project to finish over a couple of days.

๐Ÿ‘‘

Elegant Drape

Soft flow with graceful movement, designed to flatter all body types with sophisticated comfort.

About This Evil Queen Amigurumi Pattern

This Evil Queen amigurumi pattern is a sophisticated design that captures the dramatic elegance of Disney's most iconic villain. The pattern features intricate details including a beautiful purple dress with red belt accent, a stunning two-layer cape combining white and black for dramatic contrast, and a golden crown with embroidered gem detail. The sleek black hair is styled to frame the face perfectly, giving the Queen her signature regal appearance. The construction involves advanced techniques including creating a dimensional cape by sewing two separate pieces together and working detailed embroidery for facial features that convey her cold beauty and commanding presence.

Evil Queen Amigurumi Pattern crochet pattern - detailed view of completed project

The pattern uses the Master Head and Master Body construction with specialized additions for the Queen's unique appearance. You'll work with multiple color changes, detailed cape construction with slip stitch ribbing, and dimensional crown shaping. The facial embroidery includes arched eyebrows and enhanced eyes that give her a haughty, imperious expression.

Why You'll Love This Evil Queen Amigurumi Pattern

I'm absolutely captivated by how this pattern transforms simple yarn into such a commanding, theatrical character! What I love most is the dramatic cape construction - working two separate pieces in contrasting colors and then sewing them together creates this incredible layered effect that actually drapes and flows like real fabric. It's so satisfying to see it come together! The crown is another favorite element - it's surprisingly simple to construct but looks incredibly regal once embroidered with the gem detail. I find the color palette really striking too; the deep purples and blacks against the skin tone create such visual impact. The facial embroidery is where the Queen's personality really shines through - those arched eyebrows and enhanced eyes give her that perfect haughty expression. This pattern teaches valuable advanced techniques like multi-piece construction, dimensional accessories, and expressive facial details. Whether you're a Disney villain fan or just love creating elegant, dramatic characters, this Evil Queen is a showstopper that looks amazing displayed alone or alongside Snow White for the complete fairy tale story!

Evil Queen Amigurumi Pattern step 1 - construction progress Evil Queen Amigurumi Pattern step 2 - assembly progress Evil Queen Amigurumi Pattern step 3 - details and accessories Evil Queen Amigurumi Pattern step 4 - final assembly and finishing

Switch Things Up

I absolutely love experimenting with different color schemes for the Evil Queen to create alternate villain versions! Instead of the classic purple, try using deep emerald green for the dress with black accents for a more witchy appearance. Or go bold with blood red and gold for an even more dramatic, commanding presence. I've also made versions with midnight blue and silver that look incredibly regal and mysterious.

The cape offers wonderful opportunities for creativity - you could reverse the colors and make the outer layer white with black underneath for a striking contrast. Some makers add sparkly or metallic yarn for the crown to make it really catch the light. You could even incorporate tiny beads or sequins into the embroidered gem for genuine shimmer.

For the facial features, experiment with different eyebrow angles to change her expression - slightly less arched makes her look contemplative rather than haughty, while more dramatic arches increase the villainous intensity. I've also tried adding a small beauty mark with embroidery thread for extra glamour.

Consider creating themed accessories for storytelling - a tiny poison apple (the pattern actually includes instructions for this!), a miniature mirror, or even a small basket. The hair can be styled differently too - adding small braids or leaving sections longer creates interesting variations while maintaining her iconic look.

Common Mistakes & How to Fix Them

โœ— Rushing through the cape construction without working in back loops only creates a bulky, stiff cape that won't have the elegant drape and flow intended โœ— Sewing the two cape layers together incorrectly or off-center results in an unbalanced appearance that ruins the dramatic layered effect โœ— Not decreasing properly at the end of the cape pieces leaves too many stitches and prevents the cape from tapering correctly at the neckline โœ— Placing the crown too high or too low on the head disrupts the queenly proportions and makes her look less regal and commanding โœ— Skipping the embroidered eyebrows or making them too soft instead of arched creates a sweet expression instead of the haughty, imperious look required โœ— Forgetting the red belt color change at round 8 of the dress loses the signature color blocking that defines her iconic costume design

Evil Queen Amigurumi Pattern

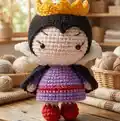
Bring the iconic villain from Snow White to life with this stunning Evil Queen amigurumi crochet pattern! This dramatic design captures the regal yet sinister beauty of Disney's most memorable antagonist, complete with her flowing purple and black cape, elegant dress with red accent, golden crown, and sleek black hair. Perfect for Disney villain collectors and fairy tale enthusiasts, this pattern guides you through creating a sophisticated character with impressive details including a dramatic two-layer cape and dimensional crown. Whether you're making her as a finger puppet for storytelling or a complete display doll, this Evil Queen brings powerful presence and theatrical flair to any handmade collection.

Advanced 5-6 Hours

Materials Needed for Evil Queen Amigurumi Pattern

โ€” Main Fabric

  • 01
    Bordeaux red yarn (Susan Cotton 24, 50g, 120m) for red belt accent
  • 02
    Skin color yarn (Susan Cotton 07, 50g, 120m) for head and arms
  • 03
    Purple yarn (YarnArt Jeans 72, 50g, 160m) for main dress
  • 04
    Black yarn (YarnArt Jeans 53, 50g, 160m) for hair and black cape layer
  • 05
    White yarn (YarnArt Jeans 01, 50g, 160m) for white cape layer and eye highlights
  • 06
    Yellow yarn (YarnArt Jeans 35, 50g, 160m) for crown
  • 07
    Red yarn (YarnArt Jeans 26, 50g, 160m) for crown gem embroidery
  • 08
    Apple green yarn (Yarnart Jeans Bamboo 136, 50g, 160m) for optional poison apple
  • 09
    Brown yarn (YarnArt Jeans 70, 50g, 160m) for optional apple stem

โ€” Tools Required

  • 01
    Crochet hook size 2.5mm
  • 02
    1 pair of safety eyes size 6mm
  • 03
    Tapestry needles
  • 04
    Brown thread for embroidering eyebrows and eyelashes
  • 05
    Pink thread for embroidering cheeks
  • 06
    Pins
  • 07
    Stitch markers
  • 08
    Scissors
  • 09
    Polyester fiberfill stuffing

Progress Tracker

0% Complete

โ€” Head:

Info:

See Master Head from main pattern. Insert the 6mm eyes between rnd 19&20, 8 sts apart. Use brown thread to embroider eyelashes & eyebrows, white yarn to make the eyes bigger, pink thread to embroider the cheeks

โ€” Evil Queen's Dress (yarn C):

Round 1:

[sc 3, inc] 3x (15)

Round 2:

[sc 1, inc, sc 1] 5x (20)

Round 3:

[sc 3, inc] 5x (25)

Round 4:

[sc 2, inc, sc 2] 5x (30)

Round 5:

[sc 5, inc] 5x (35)

Round 6:

[sc 3, inc, sc 3] 5x (40)

Round 7-8:

sc 40 (2 rnds), change to yarn A (40)

Round 9:

sc 40, change to yarn C (40)

Round 10-12:

sc 40 (3 rnds) (40)

Info:

Break the yarn, hide the remaining yarn

โ€” Evil Queen's Hair (yarn D):

Round 1:

sc 6 into a magic loop (6)

Round 2:

inc 6 (12)

Round 3:

[sc 1, inc] 6x (18)

Round 4:

[sc 1, inc, sc 1] 6x (24)

Round 5:

[sc 3, inc] 6x (30)

Round 6:

[sc 2, inc, sc 2] 6x (36)

Round 7:

[sc 5, inc] 6x (42)

Round 8:

[sc 3, inc, sc 3] 6x (48)

Round 9-19:

sc 48 (11 rnds) (48)

Round 20:

[sc 4, dec, sc 4] 2x, hdc 2, dc 1, (dc 1, tr 1, ch 2, slst on the 1st ch, tr 1, dc 1) on the same st, dc 1, hdc 2, sc 1, [sc 4, dec, sc 4] 2x (47)

Info:

Break the yarn. Wear the hair on the head

โ€” Arms:

Info:

See 7 Dwarfs's Arms from pattern. Sew the arms on the body

โ€” Evil Queen's White Cape (yarn E):

Round 1:

ch 14, start on the 2nd st from the hook, slst 13, ch 1, turn (13)

Round 2:

(blo) slst 13, ch 1, turn (13)

Round 3-52:

Repeat rnd 2 (50 rnds) (13)

Info:

Do not break the yarn, we will decrease 13 times, just make sure we have 13 remaining sts

โ€” Evil Queen's Black Cape (yarn D):

Round 1:

ch 12, start on the 2nd st from the hook, slst 11, ch 1, turn (11)

Round 2:

(blo) slst 11, ch 1, turn (11)

Round 3-52:

Repeat rnd 2 (50 rnds) (11)

Info:

Do not break the yarn, we will decrease 13 times, just make sure we have 13 remaining sts. Use a tapestry needle to sew 2 parts together, sew the finished cape on the body

โ€” Evil Queen's Crown (yarn F):

Round 1:

ch 43, slst on the 1st ch to make a ring, sc 42 (42)

Round 2:

*skip 1 st, (dc 2, ch 2, slst on the 1st ch, dc 2) on the same st, skip 1 st, slst on the next st*, repeat ** till the end

Info:

Break the yarn, sew the crown on the hair, use yarn A to embroider a gem on top of the crown

โ€” Body:

Info:

See Master Body from main pattern. If you just make the finger puppet, your Evil Queen is ready to play with. Put the body inside the head, you have Evil Queen Doll

Assembly Instructions

  • Insert 6mm safety eyes between rounds 19 and 20 of the head, spacing them 8 stitches apart for proper proportion
  • Embroider arched, haughty eyebrows using brown thread to give the Queen her imperious expression - these should angle upward
  • Use brown thread to add eyelashes and white yarn to create eye highlights for a dramatic, enhanced look
  • Add subtle pink embroidered cheeks for a touch of cold beauty to the face
  • Wear the completed black hair piece onto the head, ensuring the dimensional front detail sits properly at center front
  • Create the two-layer cape by first completing both the white (13 stitches) and black (11 stitches) cape pieces separately
  • After decreasing both cape pieces to 13 remaining stitches, carefully sew them together with the black layer on top of white
  • Attach the finished layered cape to the back of the body, positioning it to drape elegantly over the shoulders
  • Sew both arms to the sides of the dress at appropriate positions
  • Place the golden crown on top of the hair and sew securely, then embroider a red gem detail at the center front
  • For full doll version, insert the completed Master Body into the head opening and secure firmly

Important Notes

  • ๐Ÿ’กThe cape construction is the most complex part - work both pieces completely before attempting to sew them together
  • ๐Ÿ’กAlways work cape rounds in back loops only (BLO) to create the ribbed texture that allows the cape to drape properly
  • ๐Ÿ’กThe white cape layer has 13 starting stitches while the black layer has 11 - this size difference is intentional for layering
  • ๐Ÿ’กWhen decreasing the cape pieces at the end, count carefully to ensure you end with exactly 13 remaining stitches on each
  • ๐Ÿ’กThe hair round 20 creates a dimensional detail at the front - this section uses multiple stitch types for texture
  • ๐Ÿ’กCrown round 2 creates pointed peaks - work the pattern repeat carefully to achieve even spacing around the entire crown
  • ๐Ÿ’กThe facial embroidery is crucial for capturing the Queen's personality - arched eyebrows make all the difference
  • ๐Ÿ’กUse pins to position the cape before sewing to ensure it sits symmetrically and drapes correctly

This magnificent Evil Queen amigurumi pattern brings Disney's most iconic villain to life with dramatic flair and regal elegance! The sophisticated design features a stunning two-layer cape that actually drapes, a golden crown with gem detail, and carefully embroidered facial features that capture her cold beauty and commanding presence. Perfect for Disney villain collectors or to complete your Snow White fairy tale set, this pattern challenges you with advanced techniques while delivering truly impressive results. Whether displayed alone or alongside Snow White, the Evil Queen makes a powerful statement. ๐Ÿงถ Mirror, mirror, this pattern's the fairest of them all! ๐Ÿ‘‘โœจ

You ask,

we answer.

FAQs

Why is this pattern rated as Advanced difficulty?

This pattern involves several advanced techniques including creating a complex two-layer cape with different stitch counts that must be sewn together precisely, working multiple color changes, dimensional hair construction, crown shaping, and detailed facial embroidery to achieve the Queen's specific haughty expression. The cape alone requires careful attention to back loop only work and precise decreasing.

Can I make the Evil Queen without the cape?

Yes, you can skip the cape if you want a simpler version, and she'll still be recognizable with her purple dress, black hair, and crown. However, the cape is truly the signature element that makes this character dramatic and impressive - it's what transforms her from a basic doll into the commanding Evil Queen. I'd recommend attempting it even if it seems challenging!

How do I sew the two cape pieces together correctly?

After completing both cape pieces and decreasing them to 13 stitches each, lay the black cape on top of the white cape, aligning them at the top edge where you decreased. The white cape will peek out around the edges due to its larger starting size. Use a tapestry needle and matching thread to sew along the top edge, then attach this combined piece to the doll's shoulders.

What makes the hair look dimensional at the front?

Round 20 of the hair creates a special peaked detail at the center front by using a combination of dc, tr, chain stitches, and slip stitches all worked in the same stitch. This creates a raised, pointed section that frames the face like the Evil Queen's iconic widow's peak hairstyle from the movie.

How important is the embroidered gem on the crown?

While the crown looks regal even without it, the embroidered gem adds that final touch of authenticity to the Evil Queen's signature look. You can use red yarn as specified, or try other colors like purple, blue, or even metallic thread for a jewel-like effect. It only takes a few minutes and makes a noticeable difference.

Can I display this with the Snow White and other characters?

Absolutely! This Evil Queen is designed using the same Master Head and Body construction as the Snow White and Seven Dwarfs patterns, so they're all perfectly proportioned to display together. Creating the full set makes an incredible fairy tale scene with both the heroes and villain represented.