🧢 Beautiful ✨ Detailed πŸ’ Adorable

Little Bear Amigurumi Pattern

Little Bear Amigurumi Pattern
4.1β˜… Rating
3-4 Hours Time Needed
3.7K Made This
βœ‚οΈ

Beginner Friendly Level

Perfect for those just starting their sewing journey, with clear instructions and simple techniques

⏱️

Weekend Treat

Takes 5-7 hours, making it an enjoyable project to finish over a couple of days.

🧸

Cute Companion

An adorable friend to cherish, handcrafted with love to bring comfort and joy for years to come.

About This Little Bear Amigurumi Pattern

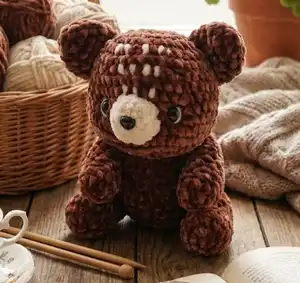
This Little Bear pattern is designed with simplicity and charm in mind, making it perfect for crocheters who want to create something special without complicated techniques. Using soft plush or velvet yarn, you'll craft a cuddly bear with a sweet white muzzle, round ears, and four sturdy limbs. The pattern works up quickly in continuous rounds, and the finished bear has a delightful chubby body that's perfect for hugging. Every detail, from the eye placement to the tail attachment, is clearly explained to ensure your bear turns out absolutely adorable.

Little Bear Amigurumi Pattern crochet pattern - detailed view of completed project

The Little Bear comes together beautifully with basic amigurumi techniques like magic rings, single crochet, and simple increases and decreases. With clear round-by-round instructions and helpful assembly tips, you'll create a treasured companion that showcases your handmade love.

Why You'll Love This Little Bear Amigurumi Pattern

I absolutely love this Little Bear pattern because it's the perfect balance of simple and sweet! The compact size makes it work up quickly, so you can see your progress and feel accomplished in just a few hours. I appreciate how the plush yarn creates such a soft, huggable texture that makes the finished bear irresistibly cuddly. The design is classic and timeless, which means your bear will never go out of style. Plus, the straightforward instructions make it stress-free to crochet, allowing you to relax and enjoy the creative process while making something truly special.

Little Bear Amigurumi Pattern step 1 - construction progress Little Bear Amigurumi Pattern step 2 - assembly progress Little Bear Amigurumi Pattern step 3 - details and accessories Little Bear Amigurumi Pattern step 4 - final assembly and finishing

Switch Things Up

I love experimenting with different colors when making this Little Bear! While the pattern calls for brown yarn, you could create a polar bear using white or cream yarn, or even make a panda by combining black and white. Trying pastel colors like baby pink, lavender, or mint green gives the bear an adorable nursery-worthy look that's perfect for baby gifts.

You can also customize the bear's expression by changing the eye placement or adding embroidered details like rosy cheeks using pink yarn. Some makers love adding a tiny bow tie or ribbon around the neck, or even crocheting a miniature scarf for seasonal variations. If you want to make the bear larger or smaller, simply adjust your yarn weight and hook size accordingly.

For a more personalized touch, consider embroidering the bear's nose instead of using a safety nose, which gives you complete control over the shape and expression. You could also experiment with the muzzle shape by adjusting the increase pattern slightly for a longer or rounder snout. The beauty of amigurumi is that small modifications can create completely unique characters, so don't be afraid to make this pattern your own!

Common Mistakes & How to Fix Them

βœ— Losing your place in continuous rounds - always use a stitch marker at the beginning of each round to track your progress accurately βœ— Stuffing too firmly or not firmly enough - the head and body need firm stuffing for shape, but ears should remain flat and unstuffed βœ— Placing safety eyes incorrectly - double-check the positioning between rounds 10 and 11 with 7 stitches between them before securing permanently βœ— Forgetting to leave long tails for sewing - always leave at least 12 inches of yarn when fastening off pieces to make assembly easier and more secure

Little Bear Amigurumi Pattern

Create your own adorable Little Bear with this charming crochet pattern! This cuddly companion measures approximately 11 cm in height and 19 cm in length when made with plush velvet yarn. Perfect for beginners and intermediate crocheters, this pattern includes detailed instructions for crafting a sweet bear with safety eyes, a white muzzle, and lovingly stuffed arms and legs. The finished bear makes a wonderful gift or a delightful addition to any amigurumi collection, bringing handmade warmth and personality to your crafting projects.

Beginner Friendly 3-4 Hours

Materials Needed for Little Bear Amigurumi Pattern

β€” Main Fabric

  • 01
    Plush/Velvet/Chenille yarn in Brown color (approximately 120m or 1.2 skeins)
  • 02
    Plush/Velvet/Chenille yarn in White color (small amount for muzzle)
  • 03
    Recommended yarn brands: Himalaya Velvet, Himalaya Dolphin Baby, YarnArt Dolce, or Premier Parfait Chunky

β€” Tools Required

  • 01
    Crochet hook 4mm
  • 02
    Safety eyes 14mm
  • 03
    Safety nose 10mm
  • 04
    Polyester fiberfill stuffing
  • 05
    Tapestry needle
  • 06
    White yarn for eyelashes
  • 07
    Black yarn for eyelashes
  • 08
    Scissors
  • 09
    Pins
  • 10
    Stitch marker

Progress Tracker

0% Complete

β€” HEAD :

Round 1 :

MR 8 sc (8)

Round 2 :

8 inc (16)

Round 3 :

(1 sc, inc) x 8 times (24)

Round 4 :

1 sc, inc, (2 sc, inc) x 7 times, 1 sc (32)

Round 5 :

(3 sc, inc) x 8 times (40)

Round 6-7 :

40 sc (40)

Round 8 :

(9 sc, inc) x 4 times (44)

Round 9-10 :

44 sc (44)

Round 11 :

5 sc, inc, (10 sc, inc) x 3 times, 5 sc (48)

Round 12-13 :

48 sc (48)

Info :

Insert the safety eyes between rounds 10 and 11, the distance between 2 eyes is 7 sts

Round 14 :

(4 sc, dec) x 8 times (40)

Round 15 :

(3 sc, dec) x 8 times (32)

Info :

Start stuff the head. Stuff the head firmly with fiberfill

Round 16 :

(2 sc, dec) x 8 times (24)

Round 17 :

12 dec (12)

Round 18 :

6 dec, slst (6)

Info :

Fasten off, leaving a long tail for sewing. Weave the yarn tail through the front loops of the last round and pull it tight to close the hole. Hide the yarn tail inside the head

β€” MUZZLE :

Round 1 :

MR 6 sc (6)

Round 2 :

(1 sc, inc) x 3 times (9)

Round 3 :

6 sc, 3 inc, slst (12)

Info :

Use White yarn. Do not stuff the muzzle. Fasten off, leaving a long tail for sewing

β€” TAIL :

Round 1 :

MR 6 sc (6)

Round 2 :

(1 sc, inc) x 3 times (9)

Round 3 :

(2 sc, inc) x 3 times, slst (12)

Info :

Use Brown yarn. Fasten off, leaving a long tail for sewing. Stuff the tail lightly with fiberfill

β€” BODY :

Round 1 :

MR 8 sc (8)

Round 2 :

8 inc (16)

Round 3 :

(1 sc, inc) x 8 times (24)

Round 4 :

(1 sc, inc, 1 sc) x 8 times (32)

Round 5 :

(3 sc, inc) x 8 times (40)

Round 6-10 :

40 sc (40)

Round 11 :

(3 sc, dec) x 8 times (32)

Round 12-14 :

32 sc (32)

Round 15 :

(14 sc, dec) x 2 times (30)

Round 16 :

30 sc, slst (30)

Info :

Use Brown yarn. Fasten off, leaving a long tail for sewing. Stuff the body firmly with fiberfill

β€” EARS (Make 2) :

Round 1 :

MR 6 sc (6)

Round 2 :

6 inc (12)

Round 3 :

(5 sc, inc) x 2 times (14)

Round 4-5 :

14 sc (14)

Round 6 :

7 sc, slst (7)

Info :

Use Brown yarn. Do not stuff the ears. Flatten the opening of the ear and work the next round through both layers to close. Fasten off, leaving a long tail for sewing

β€” ARMS/LEGS (Make 4) :

Round 1 :

MR 6 sc (6)

Round 2 :

6 inc (12)

Round 3-12 :

4 sc, inc, 5 sc, dec (12)

Round 13 :

6 sc, slst (6)

Info :

Use Brown yarn. Stuff the arms/legs firmly with fiberfill. Flatten the opening of the arm/leg and work the next round through both layers to close. Fasten off, leaving a long tail for sewing

Assembly Instructions

  • Create eye sockets for the bear to give the face more dimension and character
  • Sew the muzzle to the head between the eyes, then attach the safety nose (or embroider the nose with yarn)
  • Sew the ears to the head between rounds 4 and 8, with 8 stitches distance between the two ears
  • Create eyelashes using white and black yarn for added detail and expression
  • Sew the body to the head by placing both pieces on a flat surface and using pins to mark positioning, then sew one stitch on the body to one stitch on the head
  • Sew the legs to round 6 of the body with 10 stitches distance between the two legs
  • Sew the arms to rounds 12-15 of the body, positioning them naturally on either side
  • Sew the tail to the back of the body for the finishing touch

Important Notes

  • πŸ’‘Work in continuous spiral rounds unless otherwise stated and do not join rounds
  • πŸ’‘Use a stitch marker to mark the beginning of each round to avoid losing your place
  • πŸ’‘The finished size will vary depending on yarn weight and hook size used
  • πŸ’‘Change colors in the last single crochet of the round by pulling new yarn through the final two loops
  • πŸ’‘Pin all pieces in place before sewing to ensure proper positioning and symmetry
  • πŸ’‘Stuff the head and body firmly but keep ears flat and unstuffed for the correct shape
  • πŸ’‘Read through the entire pattern before beginning to familiarize yourself with all steps

This adorable Little Bear pattern is perfect for creating a cuddly companion that will be treasured for years to come! Using soft plush yarn and simple amigurumi techniques, you'll bring this sweet bear to life with its charming white muzzle, round ears, and huggable body. Whether you're crafting for yourself, a child, or as a heartfelt gift, this little bear is sure to bring smiles and warmth. The clear instructions and helpful assembly tips make this an enjoyable project from start to finish. 🧸 Happy crocheting! 🧢✨

You ask,

we answer.

FAQs

What size will my finished bear be?

When using the recommended plush/velvet yarn with a 4mm hook, your finished bear will measure approximately 11 cm (4.3 inches) in height and 19 cm (7.5 inches) in length. The size will vary if you use different yarn weights or hook sizes.

Can I use different yarn brands than those recommended?

Yes! While the pattern recommends Himalaya Velvet, Himalaya Dolphin Baby, YarnArt Dolce, or Premier Parfait Chunky, you can use any plush, velvet, or chenille yarn. Just ensure your hook size matches your yarn weight for proper gauge.

Do I need to stuff all the parts of the bear?

No, only certain parts need stuffing. The head, body, arms, legs, and tail should be stuffed firmly with fiberfill. However, the ears and muzzle should NOT be stuffed to maintain their proper shape and appearance.

When should I insert the safety eyes?

Insert the safety eyes between rounds 10 and 11 of the head, with 7 stitches distance between them. Make sure to position them correctly before securing, as they cannot be moved once locked in place.

Is this pattern suitable for beginners?

Yes! This pattern is beginner-friendly and uses basic amigurumi techniques like magic rings, single crochet, increases, and decreases. The clear round-by-round instructions make it easy to follow along even if you're new to amigurumi.