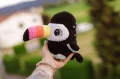
You're going to love bringing this colorful bird to life! With its iconic oversized beak and sweet expression, this toucan is a joy to crochet. It uses super soft chenille yarn for a huggable finish that's just perfect for gifting or brightening up your own shelf. The contrast between the sleek black body and the vibrant beak makes it a real standout project.
Progress Tracker
0% Complete
— 1. Left Eye :
Round 1 :
Using black yarn, work 6 sc into a MR. (6)
Round 2 :
Work 6 x inc around the circle. (12)
Round 3 :
Repeat (1 sc, inc) 6 t around. (18)
Round 4 :
Switch to blue yarn and work 2 sc, 3 inc, 2 sc, then 1 sl st. Continuing with black yarn, work 10 sl st. (21)
Round 5 :
Switch to white yarn and work 1 sl st, (1 sc, inc) 3 t, 1 sc, followed by 3 sl st. (14)
Round 6 :
Turn the piece so the wrong side faces you and work 10 sl st in black, leaving 4 white stitches unworked. Fasten off.
— 2. Right Eye :
Round 1 :
Using black yarn, work 6 sc into a MR. (6)
Round 2 :
Work 6 x inc around the circle. (12)
Round 3 :
Repeat (1 sc, inc) 6 t around. (18)
Round 4 :
Switch to blue yarn and work 1 sl st, 2 sc, 3 inc, 2 sc. Continuing with black yarn, work 10 sl st. (21)
Round 5 :
Switch to white yarn and work 3 sl st, 1 sc, (inc, 1 sc) 3 t, followed by 1 sl st. (14)
Round 6 :
Locate the 5th stitch from the bottom in white and mark it. Turn the piece wrong side out and work 9 sl st in black starting from that marker. Fasten off.
— 3. Body :
Round 1 :
Using black yarn, ch 2 and work 6 sc into the second ch from the hook. (6)
Round 2 :
Work 6 x inc around. (12)
Round 3 :
Repeat (3 sc, 3 inc) 2 t. (18)
Round 4 :
Work 3 sc, (1 sc, inc) 3 t, 3 sc, (1 sc, inc) 3 t. (24)
Round 5 :
Work 3 sc, (2 sc, inc) 3 t, 3 sc, (2 sc, inc) 3 t. (30)
Round 6 :
Work 3 sc, (3 sc, inc) 3 t, 3 sc, (3 sc, inc) 3 t. (36)
Round 7 :
Work 3 sc, (4 sc, inc) 3 t, 3 sc, (4 sc, inc) 3 t. (42)
Round 8 :
Work 3 sc, (5 sc, inc) 3 t, then 21 sc. (45)
Round 9-16 :
Work 1 sc in each stitch around. (45)
Round 17 :
Work 15 sc, 1 inc, then 29 sc. (46)
Round 18 :
Work 1 sc in each stitch around. (46)
Round 19 :
Work 15 sc, 1 inc, then 30 sc. (47)
Round 20 :
Work 1 sc in each stitch around. (47)
Round 21 :
Work 16 sc, 1 inc, then 30 sc. (48)
Round 22 :
Work 1 sc in each stitch around. (48)
Round 23 :
Work 17 sc, 1 inc, then 30 sc. (49)
Round 24 :
Work 1 sc in each stitch around. (49)
Round 25 :
Work 18 sc, 1 inc, then 30 sc. (50)
Round 26 :
Work 1 sc in each stitch around. (50)
Round 27 :
Work 19 sc, 1 inc, then 30 sc. (51)
Round 28 :
Work 19 sc, 1 inc, then 31 sc. (52)
Round 29 :
Work 20 sc, 1 inc, then 31 sc. (53)
Round 30 :
Work 21 sc, 1 inc, then 31 sc. (54)
Round 31 :
Repeat (dec, 7 sc) 6 t. (48)
Round 32 :
Work 3 sc, (dec, 6 sc) 5 t, then 1 dec and 3 sc. (42)
Round 33 :
Repeat (dec, 5 sc) 6 t. (36)
Round 34 :
Work 2 sc, (dec, 4 sc) 5 t, then 1 dec and 2 sc. (30)
Round 35 :
Repeat (dec, 3 sc) 6 t. (24)
Round 36 :
Repeat (dec, 2 sc) 6 t. (18)
Round 37 :
Repeat (dec, 1 sc) 6 t. (12)
Round 38 :
Work 6 x dec and sew the remaining opening closed. (6)
— 4. White Eye Patch :
Round 1 :
Using white yarn, ch 21. Starting in the 2nd ch from the hook, repeat (3 sc in 1 st, 18 sc) 2 t. (42)
Round 2 :
Repeat (3 inc, 18 sc) 2 t. (48)
Round 3 :
Work (1 sc, inc) 3 t, 18 sc, (1 sc, inc) 3 t, then 18 sc. (54)
Round 4 :
Work (2 sc, inc) 3 t, 18 sc, (2 sc, inc) 3 t, then 18 sc. (60)
Round 5 :
Work 7 sc, then 2 sl st. Fasten off and leave a long tail for sewing.
— 5. Tail - Large Piece :
Round 1 :
Ch 2, then work 6 sc into the second ch from the hook. (6)
Round 2 :
Work 6 x inc around. (12)
Round 3 :
Work 1 sc in each stitch around. (12)
Round 4 :
Work 1 dec, then 10 sc. (11)
Round 5 :
Work 1 dec, then 9 sc. (10)
Round 6 :
Work 1 dec, then 8 sc. (9)
Round 7 :
Work 1 dec, then 7 sc. (8)
Round 8 :
Work 1 dec, then 6 sc. (7)
Round 9 :
Work 1 dec, then 5 sc. (6)
Round 10 :
Work 1 dec, then 4 sc. (5)
Round 11 :
Work 1 dec, then 3 sc. Fasten off and leave a tail for sewing. (4)
— 6. Tail - Small Pieces (Make 2) :
Round 1 :
Ch 2, then work 6 sc into the second ch from the hook. (6)
Round 2 :
Repeat (1 sc, inc) 3 t. (9)
Round 3 :
Work 1 sc in each stitch around. (9)
Round 4 :
Work 1 dec, then 7 sc. (8)
Round 5 :
Work 1 dec, then 6 sc. (7)
Round 6 :
Work 1 dec, then 5 sc. (6)
Round 7 :
Work 1 dec, then 4 sc. (5)
Round 8 :
Work 1 dec, then 3 sc. Fasten off and leave a tail for sewing. (4)
— 7. Wings (Make 2) :
Round 1 :
Using black yarn, ch 2 and work 6 sc into the second ch from the hook. (6)
Round 2 :
Work 6 x inc around. (12)
Round 3 :
Repeat (3 sc, 3 inc) 2 t. (18)
Round 4 :
Work 3 sc, (1 sc, inc) 3 t, 3 sc, (1 sc, inc) 3 t. (24)
Info :
Fold the wing in half. Using blue yarn, work 12 sl st through both layers to close the edge.
— 8. Beak - Option 1 :
Round 1 :
Using black yarn, ch 6. From the 2nd ch, repeat (3 sc in 1 st, 3 sc) 2 t. (12)
Round 2 :
Work 6 sc, inc, 1 sc, inc, then 3 sc. (14)
Round 3 :
Work 6 sc, (inc, 1 sc) 3 t, then 2 sc. (17)
Round 4 :
Work 9 sc, (inc, 1 sc) 3 t, then 2 sc. (20)
Round 5 :
Work 2 sc in black, then switch to pink and work 18 sc. (20)
Round 6-8 :
Work 1 sc in each stitch around. (20)
Round 9 :
Work 2 sc in pink, then switch to orange and work 18 sc. (20)
Round 10-12 :
Work 1 sc in each stitch around. (20)
Round 13 :
Work 2 sc in orange, then switch to yellow and work 18 sc. (20)
Round 14-16 :
Work 1 sc in each stitch around. Fasten off and leave a tail for sewing.
— 9. Beak - Option 2 :
Round 1 :
Using pink yarn, ch 2 and work 6 sc into the second ch from the hook. (6)
Round 2 :
Work 1 sc in each stitch around. (6)
Round 3 :
Work 3 x inc, then 3 sc. (9)
Round 4 :
Work 6 x inc, then 3 sc. (15)
Round 5 :
Repeat (2 sc, inc) 4 t, then 3 sc. (19)
Round 6-7 :
Work 1 sc in each stitch around. (19)
Round 8-12 :
Switch to orange and work 1 sc in each stitch around. (19)
Round 13-16 :
Switch to yellow and work 1 sc in each stitch around. Fasten off and leave a tail for sewing.
— 10. Legs - Big Toe :
Row 1 :
Ch 10. Starting in the 2nd ch, work 9 sc, then turn your work. (9)
Row 2 :
Ch 1 (turning chain) and work 9 sc. (9)
Row 3 :
Fold the piece lengthwise and work 9 sl st along the edge to close. Leave a tail for sewing.
— 11. Legs - Little Toes (Make 2 per leg) :
Row 1 :
Ch 8. Starting in the 2nd ch, work 7 sc, then turn your work. (7)
Row 2 :
Ch 1 (turning chain) and work 7 sc. (7)
Row 3 :
Fold the piece and work 7 sl st along the edge. Leave a tail for sewing.
I hope you enjoy every stitch of this tropical project! There's nothing quite like seeing those bright colors come together to create such a cheerful little friend. Whether he's destined for a gift or a spot on your own shelf, he's sure to bring a bit of sunshine wherever he goes. Don't forget to take a moment to admire your work once those final feathers are embroidered. I love how each bird ends up with its own little personality depending on the eye placement. Happy crocheting, and may your hook always find the right stitch! 🧶 ✨ 🐦