Create adorable handmade baby clogs featuring vibrant tribal-inspired designs with decorative macramé straps. This charming pattern guides you through crafting comfortable footwear for newborns up to 9 months old, combining practical baby shoe construction with beautiful knotted chevron detailing. Perfect for gift-giving or adding a unique handcrafted touch to your little one's wardrobe, these clogs feature adjustable button closures and come in four different sizes to accommodate growing feet throughout baby's first year.
Progress Tracker
0% Complete
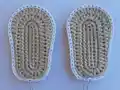
— Soles (Make 4) :
Info :
Use CC1 yarn color with C/2 hook. Crochet continuously without joining at end of every round
Round 1 :
Ch 13 (14, 16, 18). Sc in 2nd ch from hook. Sc in next 10 (11, 13, 15) sts. 3 sc in next st. Sc in next 10 (11, 13, 15) sts. 2 sc in next st [Total: 26 (28, 32, 36)]
Round 2 :
2 sc in next st. Sc in next 10 (11, 13, 15) sts. 2 sc in next 3 sts. Sc in next 10 (11, 13, 15) sts. 2 sc in next 2 sts [Total: 32 (34, 38, 42)]
Round 3 :
2 hdc in next 2 sts. Hdc in next 10 (11, 12, 12) sts. Dc in next 0 (0, 1, 3) sts. 2 hdc in next 6 (6, 0, 0) sts. 2 dc in next 0 (0, 6, 6) sts. Dc in next 0 (0, 1, 3) sts. Hdc in next 10 (11, 12, 12) sts. (2 hdc in next st. Hdc in next st) x 2 [Total: 42 (44, 48, 52)]
Round 4 :
2 sc in next 3 sts. Sc in next 6 (7, 8, 4) sts. Hdc in next 3 (3, 3, 8) sts. Dc in next 2 (2, 3, 4) sts. (2 dc in next st. Dc in next st) x 6. Dc in next 2 (2, 3, 4) sts. Hdc in next 3 (3, 3, 8) sts. Sc in next 6 (7, 8, 4) sts. 2 sc in next st. Sc in next st. 2 sc in next st. Cut yarn leaving short tail. Thread to tapestry needle. Sk 1 st. Sew inv sl st to top of next st. Hide yarn tail [Total: 52 (54, 58, 62) including inv sl st]
Info :
Mark 1st sc of Round 4 for both soles. Place soles together with WS facing each other. Starting in marked sts, use CC2 yarn to crochet both layers together with 52 (54, 58, 62) sl sts around soles. Cut yarn leaving short tail and neatly sew last sl st [Total: 53 (55, 59, 63)]
— Main Body :
Round 5 :
Identify mid-heel. Using MC yarn and C/2 hook, make standing sc in back loop of sl st from previous round at marked mid-heel. Sc blo in next 52 (54, 58, 62) sts around soles. Sl st to top of beg standing sc blo [Total: 53 (55, 59, 63)]
Round 6 :
Ch 1. Sc2tog starting in same st base as ch. Sc in next 49 (51, 55, 59) sts. Sc2tog in last 2 sts. Sl st to top of beg sc2tog. Cut yarn short and FO [Total: 51 (55, 57, 61)]
Info :
Mark 24th (25th, 27th, 29th) st from mid-heel. From here onwards, do not ch 1 after turning at end of every row
Row 1 :
With toe portion facing you, attach MC yarn to recently marked 24th (25th, 27th, 29th) st. Sc in next 3 sts. 2 sc in next st. Sc in next 3 sts. Turn [Total: 8]
Row 2 :
Sc in next 8 sts. Then sc into next 2 side sts. Turn [Total: 10]
Row 3-4 :
Sk 1st and 2nd sts. Sc in next 8 sts. Sc in next 2 side sts. Turn. Do this for 2 rounds [Total: 10]
Row 5 :
Sk 1st st. Sc in next 9 sts. Sc in next 2 side sts. Turn [Total: 11]
Row 6 :
Sk 1st and 2nd sts. Sc in next 9 sts. Sc in next 2 side sts. Turn [Total: 11]
Row 7 :
Sk 1st st. Sc in next 10 sts. Sc in next 2 side sts. Turn [Total: 12]
Row 8 :
Sk 1st st. Sc in next 11 sts. Sc in next 2 side sts. Turn [Total: 13]
Row 9 (9-10, 9-11, 9-11) :
Sk 1st and 2nd sts. Sc in next 11 sts. Sc in next 2 side sts. Turn. Do this for 1 (2, 3, 3) rounds [Total: 13]
Row 10 (11, 12, 12) :
Sk 1st st. Sc in next 12 sts. Sc in next 2 side sts. Turn [Total: 14]
Row 11 (12, 13, 13) :
Sk 1st and 2nd sts. Sc in next 12 sts. Sc in next 2 side sts. Turn [Total: 14]
For Size 1, 2 & 3 only - Row 12 (13, 14) :
Sk 1st st. Sc in next 13 sts. Sc in next 4 side sts. Turn [Total: 17]
For Size 4 only - Row 14 :
Sk 1st st. Sc in next 13 sts. Sc in next 2 side sts. Turn [Total: 15]
For Size 1, 2 & 3 only - Row 13 (14, 15) :
Sk 1st st. Sc in next 16 sts. Now crochet along side sts to mid heel and all the way back to starting point. Sc in next 20 (20, 22) sts. Cut yarn leaving short tail and thread to tapestry needle. Inv sl st to top of 2nd beg sc. Hide yarn tail [Total: 35 (36, 36)]
For Size 4 only - Row 15 :
Sk 1st st. Sc in next 14 sts. Sc in next 4 side sts. Turn [Total: 18]
For Size 4 only - Row 16 :
Sk 1st st. Sc in next 17 sts. Now crochet along next 13 side sts. Sc2tog at mid heel. Sc in next 9 sts moving all the way back to starting point. Cut yarn leaving short tail and thread to tapestry needle. Inv sl st to top of 2nd beg sc. Hide yarn tail [Total: 39]
Edging for All Sizes :
Using CC2 yarn color, crochet 36 (36, 36, 39) sl sts around top edge. End sl st neatly. Cut yarn short and hide yarn tail ends [Total: 36 (36, 36, 39)]
— Shoe Strap (Make 2) :
Info :
Cut 4 different colored yarns of your choice about 130 cm long each except for 1 color which should be longer - about 150 cm long. The longest yarn will be used to make button loops. Divide yarns into 2 groups according to intended color sequence. Fold yarn strands in equal length and tie loose knot in middle. Pin mid-knot to cushion or stick mid-length to immovable surface
Button Loop :
Place white yarn over other 3 colors from Group 1 forming shape of flipped number 4. Yarn goes under all 3 other yarns and back up loop. Pull white yarn tightly all the way up. Repeat until desired button loop length is achieved - twice button's diameter (4 cm for 2 cm button). When complete, remove pins/tape and bend loop. Pin/stick bended loop onto surface again
Macramé Section 1 - Knotting Sequence :
1. G2Br over G1Br (knot 2x). 2. G1Y over G1Br (knot 2x). 3. G2Y over G2Br (knot 2x). 4. G2Y over G1Y (knot 2x). 5. G1Bl over G1Br (knot 2x). 6. G1Bl over G1Y (knot 2x). 7. G2Bl over G2Br (knot 2x). 8. G2Bl over G2Y (knot 2x). 9. G2Bl over G1Bl (knot 2x). 10. G1W over G1Br (knot 2x). 11. G1W over G1Y (knot 2x). 12. G1W over G1Bl (knot 2x). 13. G2W over G2Br (knot 2x). 14. G2W over G2Y (knot 2x). 15. G2W over G2Bl (knot 2x). 16. G2W over G1W (knot 2x)
Macramé Section 2 Onwards - Knotting Sequence :
Brown yarn now at sides instead of middle. Knot from sides towards middle for Group 1 and 2. Section 2: 1. G1Br over G1Y (knot 2x). 2. G1Br over G1Bl (knot 2x). 3. G1Br over G1W (knot 2x). 4. G2Br over G2Y (knot 2x). 5. G2Br over G2Bl (knot 2x). 6. G2Br over G2W (knot 2x). 7. G2Br over G1Br (knot 2x). Continue knotting from side to middle for each group and color sequence until desired strap length achieved
— Assembly :
Step 1 :
Position strap across shoe body ensuring arrows point in opposite directions for both straps. Turn one strap counter-clockwise
Step 2 :
Thread strap yarn tails to tapestry needle and sew into inner sides of shoes. Knot yarns to secure strap in place
Step 3 :
Hide yarn tails between double soles by running needle through several stitches
Step 4 :
Sew button onto opposite side of shoe. For right shoe, sew button on right side. For left shoe, sew button on left side
— Blocking (Optional) :
Info :
Wet some tissues and squeeze out excess water leaving neither too wet nor dry. Stuff around inside shoe. Shape accordingly. Leave to dry under fan or sun for a day. When shoes dried, remove tissues
These charming Tribal Baby Clogs combine the warmth of handcrafted crochet with the artistic beauty of macramé detailing to create truly special footwear for your little one! The pattern thoughtfully guides you through every step, from constructing sturdy double-layered soles to mastering the eye-catching knotted chevron straps. With four sizes covering newborn through nine months, you can craft growing wardrobes or meaningful gifts that will be treasured for years. The tribal-inspired color combinations offer endless creative possibilities while the adjustable button closure ensures a perfect fit. 🧶 Happy crocheting! 👶✨