Create a stunning trapeze-style handbag with this detailed crochet pattern featuring hexagonal and square motifs. This elegant bag measures approximately 15 inches high and 12 inches wide, making it perfect for everyday use or special occasions. The pattern combines geometric shapes with practical construction techniques, resulting in a structured yet stylish accessory. Using cord yarn and a simple hook, you'll create a durable bag with clean lines and professional finishing. The trapeze silhouette offers a modern twist on classic crochet bags, with plenty of room for essentials while maintaining an chic appearance.
Progress Tracker
0% Complete
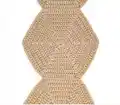
— Hexagon Part (Make 3 total)
Round 1:
In MR: ch5 (counts as 1dc and a ch2), [2dc, ch2]*5, 1dc, tighten the ring firmly, sl st in 3rd ch (12). Note: ch2 space will be referred to as the corner chain space = corner
Round 2:
Begin in the corner: (1sc, ch3, 1dc) - 1sc and a ch1 counts as 1dc here and throughout pattern, dc in the next 2 stitches, [in the next corner: (1dc, ch2, 1dc), 2dc]*5, sl st in first ch of ch3 (24)
Info:
Using a needle, weave in the loose thread that began the magic ring between stitches on the wrong side. Cut off the end
Round 3:
Begin in the corner: (1sc, ch3, 1dc), 4dc, [in the next corner: (1dc, ch2, 1dc), 4dc]*5, sl st (36)
Round 4:
Begin in the corner: (1sc, ch3, 1dc), 6dc, [in the corner: (1dc, ch2, 1dc), 6dc]*5, sl st (48)
Round 5:
Begin in the corner: (1sc, ch3, 1dc), 8dc, [in the corner: (1dc, ch2, 1dc), 8dc]*5, sl st (60)
Round 6:
Begin in the corner: (1sc, ch3, 1dc), 10dc, [in the corner: (1dc, ch2, 1dc), 10dc]*5, sl st (72)
Round 7:
Begin in the corner: (1sc, ch3, 1dc), 12dc, [in the corner: (1dc, ch2, 1dc), 12dc]*5, sl st (84)
Round 8:
Begin in the corner: (1sc, ch3, 1dc), 14dc, [in the corner: (1dc, ch2, 1dc), 14dc]*5, sl st (96)
Info:
Cut off the cord, leaving the end about 20 cm. Pull the cord out and using a needle close the round. Hide the end on wrong side and cut it off. For hexagons 2 and 3, leave the ends of cord about 110-120 centimeters long
— Square Part (Make 2 pieces)
Round 1:
In MR: ch3 (counts as a 1dc), 3dc, [ch2, 4dc]*3, ch1, tighten the ring firmly, sl st in 3rd ch (16)
Info:
Using a needle, weave in the loose thread that began the magic ring between stitches on the wrong side. 1sc and a ch1 counts as 1dc here and throughout pattern
Round 2:
Into the corner just behind: (1sc, ch1, 1dc), [dc in the next 4 stitches, into the next corner: (2dc, ch2, 2dc)]*3, 4dc, into the last corner: (2dc, ch1, sl st in ch1) (32)
Round 3:
Into the corner just behind: (1sc, ch1, 1dc), [8dc, into the next corner: (2dc, ch2, 2dc)]*3, 8dc, into the last corner: (2dc, ch1, sl st) (48)
Round 4:
Into the corner just behind: (1sc, ch1, 1dc), [12dc, into the next corner: (2dc, ch2, 2dc)]*3, 12dc, into the last corner: (2dc, ch2, sl st) (64)
Info:
Leave the end of the cord about 4 meters long. Pull out the cord. Crochet the second square using rows 1-4
— Assembly
Info:
Steam the parts following the recommendations for your cord or yarn
Step 1:
Put the 1st and 2nd hexagons with the front side together. Join parts: work sl st along 1 side through 2 layers using the 110 cm cord end from the second hexagon. Make the first and the last sl st in ch of corner spaces. You'll have 18 sts in total. Hide the end on the wrong side and cut it off
Step 2:
Join the 2nd and 3rd hexagons in the same way using the cord end from the third hexagon
Step 3:
Take the part of 3 hexagons and fold it in half, front side outside. Put a square part near. The long end of the cord should be on top. Join the square to the hexagon with sl st. One square side has 16 dc. One side of hexagon has 16 dc. Make the first sl st in ch of the corner spaces
Step 4:
Pay attention on how to work in corners: Join one ch of the corner with ch of one hexagon, then join second ch with ch of another hexagon. Continue work with sl st to the end of square part
Step 5:
Make 5 sl st on sides of hexagons, connecting them. Hide the end of cord on the wrong side and cut off
Step 6:
Join the square part on the other side of the bag, working in the same way
Finishing:
Steam the bag following the recommendations for your cord or yarn. Insert or sew the handles at the top of the bag in the corner spaces
This elegant trapeze bag pattern combines geometric crochet techniques with modern design sensibility. The modular construction method teaches valuable skills in joining motifs while creating a structured, professional-looking accessory. Using cord yarn ensures durability and shape retention, making this bag perfect for everyday use or special occasions. The hexagonal base creates visual interest while the square side panels provide stability and that signature trapeze silhouette. Whether you're building your crochet bag collection or looking for a stunning handmade gift, this pattern delivers both style and functionality. 🧶 Happy crocheting! 🧵✨