🧶 Beautiful ✨ Detailed 💝 Adorable

Toastie Bread Bag Crochet Pattern

Toastie Bread Bag Crochet Pattern
4.4★ Rating
4-5 Hours Time Needed
1.5K Made This
✂️

Intermediate Level

Ideal for those with basic knitting experience, featuring slightly more advanced stitches and techniques to expand your skills.

⏱️

Weekend Treat

Takes 5-7 hours, making it an enjoyable project to finish over a couple of days.

🏡

Cozy Accent

A warm touch for your space that transforms ordinary corners into inviting nooks filled with handmade charm.

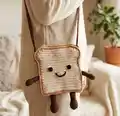
About This Toastie Bread Bag Crochet Pattern

Toastie Bread Bag Crochet Pattern crochet pattern - detailed view of completed project

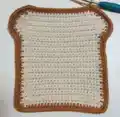
What makes this pattern special is the attention to detail in creating the bread crust through specific stitch placement and the charming character elements that transform a simple bag into a personality-filled companion. The included sling strap makes it practical for carrying or hanging as kitchen decor.

Why You'll Love This Toastie Bread Bag Crochet Pattern

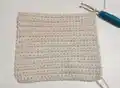
I absolutely love this Toastie Bread Bag pattern because it perfectly balances whimsy with functionality! The clever construction method for creating the realistic bread crust edge is so satisfying to work through, and watching the slice take shape with each round is genuinely exciting. I appreciate how the pattern teaches you to work with curved shapes and strategic stitch placement, which are valuable skills for many crochet projects. The kawaii-style face details add such charm and personality that every bread bag becomes unique. Plus, there's something incredibly joyful about making something so unexpectedly cute and practical at the same time—it always brings a smile to my face and everyone who sees it!

Toastie Bread Bag Crochet Pattern step 1 - construction progress Toastie Bread Bag Crochet Pattern step 2 - assembly progress Toastie Bread Bag Crochet Pattern step 3 - details and accessories Toastie Bread Bag Crochet Pattern step 4 - final assembly and finishing

Switch Things Up

I love experimenting with this Toastie Bread Bag pattern because there are so many creative ways to make it uniquely yours! For color variations, I've tried making whole wheat versions using darker brown yarns, created white bread bags with pure cream colors, and even made rainbow bread slices by striping different colors through the interior. The facial expressions are another fun area to play with—I've made sleepy bread bags with closed eyes, surprised ones with wide-open eyes, and even grumpy toast faces that make everyone laugh.

For functionality tweaks, I sometimes add a button closure at the top or create a drawstring version by adding eyelets and a cord through the opening. I've also experimented with making the bag double-layered by adding a fabric lining inside for extra durability when storing actual bread products. Size variations work beautifully too—making mini versions as keychains or ornaments, or supersized ones as throw pillows adds versatility to this pattern.

The arms and legs positioning can completely change the character's vibe—I've attached them in different poses like waving, sitting, or even doing yoga poses for a fun twist. Adding embroidered details like sesame seeds on top using french knots, creating burnt toast versions with darker edges, or stitching on a butter pat detail makes each piece special. This pattern truly invites creativity and personal expression!

Common Mistakes & How to Fix Them

✗ Skipping the standing single crochet at the beginning can throw off your stitch count for the entire bread crust round 
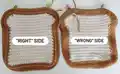
✗ Not placing exactly 2 single crochets in each hole along the curved portion results in a misshapen slice that won't lay flat ✗ Forgetting to skip 1 stitch in Step 6 creates uneven sides on your bread slice and affects the overall symmetry ✗ Working only through back loops instead of back bumps in Row 3 makes the connection less secure and the bag structure weaker

Toastie Bread Bag Crochet Pattern

Create an adorable and functional Toastie Bread Bag with this delightful crochet pattern! This charming project features a unique bread slice design complete with crust details, a cute face with eyes and mouth, tiny arms and legs, and an optional sling strap. Perfect for storing your favorite breads or as a whimsical gift for bread lovers, this pattern combines creativity with practicality to make a conversation-starter piece that's both fun to make and useful in the kitchen.

Intermediate 4-5 Hours

Materials Needed for Toastie Bread Bag Crochet Pattern

— Main Fabric

  • 01
    Yarn in bread crust color (tan/beige/brown)
  • 02
    Yarn in bread interior color (cream/off-white)
  • 03
    Small amounts of black yarn for eyes and mouth details
  • 04
    Yarn for optional colorful accents on arms/legs

— Tools Required

  • 01
    Crochet hook (size appropriate for chosen yarn weight)
  • 02
    Yarn needle for sewing
  • 03
    Scissors
  • 04
    Stitch markers
  • 05
    Stuffing or filling material
  • 06
    Pins for assembly
  • 07
    Safety eyes (optional, or use embroidery thread)
  • 08
    Black felt for facial features (optional)

Progress Tracker

0% Complete

— Front and back slice

— Bread crust

Info :

Continue to sc around the entire slice, forming the bread crust. Follow the diagrams below to know how many sc to place in each st.

Step 1 :

Starting from the standing sc, continue to sc in every st along the top row until you have 1 st left. Place 2 sc in the last st of the row.

Step 2 :

Place 2 sc in every hole you see along the curved portion. You should make a total of 9 inc, including the one done in the previous step.

Step 3 :

Sc next 2 st together (dec).

Step 4 :

Place 1 sc in every hole along the vertical portion of the slice till you reach the bottom left-hand corner. You should have made 22 sc. Place 3 sc in the hole at the bottom left-hand corner. This will form the corner turn.

Step 5 :

Place 1 sc in every st along the bottom of the slice till you reach the bottom right-hand corner. You should have made 23 sc. Place 3 sc in the last st at the bottom right-hand corner. This will form the corner turn.

Step 6 :

Sk 1 st. This is to ensure that there are the same number of sc on each side of the bread. Sc along the vertical portion of the slice till you reach the curved portion. You should have made 22 sc.

Step 7 :

Sc next 2 st together (dec).

Step 8 :

Place 2 sc in every hole you see along the curved portion until you reach the first standing sc. Place 1 sc in the same st you made the standing sc in. You should end up with a total of 9 inc, including the one done with the standing sc. Sl st into the first st. Ch 1.

Row 2 :

Sc in the st that you did the sl st in and continue to sc in every st until the bottom left-hand corner of the slice. Place 2 sc in the 2nd st of the corner turn. Sc in every st until the bottom right-hand corner of the slice. Place 2 sc in the 2nd st of the corner turn. Sc in every st until the first st. Sl st in the first st. Ch 1.

Row 3 :

Scblo in every st. To ensure that the st made are more secure, instead of just going through the back loop, recommend going through the bumps at the back when doing scblo. It may be hard to go through the back bumps but you may use your finger to help push your hook through. Continue doing scblo in every st until the first st. Sl st into the first st. Ch 1.

Info :

Your work should start to bend. The first sc in every round goes into the same st you did the sl st in.

Row 4 :

Sc in every st. Sl st into the first st. Ch 1.

Row 5 :

Sc in every st. Sl st into the first st. Fasten off and cut yarn.

Info :

You may repeat row 4 to make the bag as thick as you want. Repeat rows 1-5 to make the bread crust for the back slice but do not fasten off for the second slice. Ch 1.

— Joining both slices

— Eyes (make 2)

Info :

To secure both eyes, tie a knot at the back using the two ends to fix the placement, then proceed to sew them on tightly onto the main body.

— Mouth

— Arms (make 2)

— Legs (make 2)

— Assembling the arms and legs

— Sling strap

Assembly Instructions

  • Complete both front and back bread slices, ensuring the back slice remains attached to your working yarn for joining.
  • Align both slices with wrong sides together and use slip stitches or single crochet to join around the edges, leaving an opening at the top for the bag.
  • Create the eyes by crocheting small circles or using safety eyes, then secure them to the front slice by tying knots at the back and sewing tightly.
  • Embroider or crochet the mouth onto the front slice, positioning it below the eyes for a cute expression.
  • Crochet the arms and legs according to the pattern, then position and sew them onto the sides and bottom of the bag body.
  • Create the sling strap to your desired length and attach it securely to both sides of the bag for carrying.
  • Weave in all loose ends and add any final decorative touches to personalize your Toastie Bread Bag.

Important Notes

  • 💡Use stitch markers to track your placement, especially when counting stitches along the curved portions and corners
  • 💡Work the back loop stitches through the back bumps rather than just the loops for a more secure structure
  • 💡Pin the arms, legs, and facial features in place before sewing to ensure proper positioning and symmetry
  • 💡Stuff the bag lightly if desired before closing, but avoid overstuffing to maintain the flat bread slice shape
  • 💡The skip stitch in Step 6 is crucial for maintaining even sides—don't forget this step
  • 💡You can customize the bag thickness by repeating Row 4 multiple times before fastening off

This adorable Toastie Bread Bag pattern brings kawaii charm to your kitchen with its cheerful bread slice design complete with personality! The pattern cleverly combines dimensional crust details with cute character features to create a functional bag that's perfect for storing bread, rolls, or other kitchen items. With detailed step-by-step instructions and helpful diagrams, you'll master working curved shapes and creating three-dimensional texture. Whether you're making it as a practical kitchen accessory or a delightful gift for bread enthusiasts, this pattern delivers smiles with every stitch. 🍞✨ Happy crocheting!

You ask,

we answer.

FAQs

What yarn weight works best for the Toastie Bread Bag?

Medium weight yarn (worsted weight/category 4) works perfectly for this project, giving you a sturdy bag with good structure. You can use DK weight for a smaller, more delicate version or bulky weight for a larger, chunkier bread bag.

How do I make sure my bread crust has the right curve?

The key is following the increase pattern carefully along the curved portion—you should have exactly 9 increases total. Place 2 single crochets in every hole along the curve, and use stitch markers to track your progress to ensure even shaping.

Can I make this bag larger or smaller?

Yes! To adjust size, start with a larger or smaller base slice and maintain the same stitch pattern proportions. Remember that changing the size will also require adjusting the number of stitches in your increases and corner turns accordingly.

What's the difference between working through back loops vs back bumps in Row 3?

Working through back bumps (the small bumps visible on the back of your stitches) creates a stronger, more secure connection than just the back loop. This technique helps your bag maintain its structure and prevents the crust edge from becoming floppy.

Do I have to add the arms, legs, and face features?

Not at all! The basic bread bag shape is functional on its own. The kawaii features are optional embellishments—you can create a simple, minimalist bread bag or go all out with the cute character design based on your preference.

How should I attach the sling strap securely?

Sew the strap ends to the inside of the bag on both sides, reinforcing the attachment points with multiple passes of your needle. You can also crochet the strap directly onto the bag edges for extra security if you plan to carry heavier items.