🧢 Beautiful ✨ Detailed πŸ’ Adorable

Theory of Braids Boy's Sweater Knitting Pattern

Theory of Braids Boy's Sweater Knitting Pattern
4.8β˜… Rating
40-60 Hours Time Needed
2.4K Made This
βœ‚οΈ

Advanced Level

Designed for experienced knitters, these patterns involve intricate designs and complex techniques to challenge and inspire.

⏱️

Slow & Steady

A complex multi-day projectβ€”great for savoring the process over several sessions with intricate cable work.

πŸ§₯

Layered Comfort

Perfect for cozy, stylish layering through changing seasons with versatile, mix-and-match potential.

About This Theory of Braids Boy's Sweater Knitting Pattern

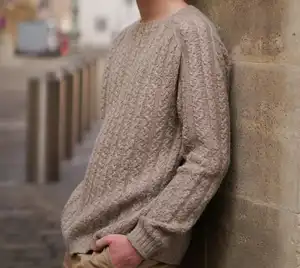
The Theory of Braids sweater is a masterfully constructed seamless garment worked from the neck down using circular needles. The pattern features intricate cable braids that flow gracefully across the yoke, creating a sophisticated texture that continues throughout the body and sleeves. With nine size options ranging from 12 months to 14 years, this versatile design grows with your child while maintaining its elegant appearance.

Theory of Braids Boy's Sweater Knitting Pattern crochet pattern - detailed view of completed project

Using the contiguous method for raglan shaping, this pattern eliminates bulk at the shoulders while creating a beautiful, seamless finish. Short rows are incorporated to raise the back neck for improved fit and comfort.

Why You'll Love This Theory of Braids Boy's Sweater Knitting Pattern

I absolutely love this pattern for its perfect blend of technical challenge and stunning visual results. The cable work creates a mesmerizing texture that looks incredibly sophisticated, yet the seamless construction means no tedious seaming at the end. I appreciate how the contiguous method creates such clean lines at the raglan, and the way the cables flow continuously from yoke to body is simply beautiful. Working with luxurious cashmere makes every stitch a pleasure, and seeing the intricate braids come together is deeply satisfying for any knitter who enjoys challenging, detailed work.

Theory of Braids Boy's Sweater Knitting Pattern step 1 - construction progress Theory of Braids Boy's Sweater Knitting Pattern step 2 - assembly progress Theory of Braids Boy's Sweater Knitting Pattern step 3 - details and accessories Theory of Braids Boy's Sweater Knitting Pattern step 4 - final assembly and finishing

Switch Things Up

I love how versatile this cable pattern is once you understand the basic structure. You could easily adapt this design by working it in a heavier weight yarn for a chunkier, more casual look - just remember to adjust your needle size and work a gauge swatch.

For a different aesthetic, consider working the body in stockinette stitch and keeping the cables only on the yoke, which would speed up the knitting considerably while still showcasing that beautiful braided detail.

I've also thought about adding pockets to the body - you could pick up stitches along the side seam area and work small pocket pouches that would be both functional and cute for kids.

The color possibilities are endless too. While the pattern shows a sophisticated neutral, imagine this in a rich burgundy, deep navy, or even a bright color that kids would love.

You could also modify the neckline by working fewer initial rounds for a wider, more open neck, or add extra rounds for a taller, cozier collar.

For advanced knitters, try incorporating a different cable pattern from your personal library - just maintain the same stitch count and gauge.

I think working this with a self-striping yarn would create interesting color play within the cable structure, though you'd want to choose yarn with long color transitions.

Consider lengthening the body for an oversized, modern fit that's popular with older kids and teens.

The sleeve length is also easily adjusted - simply work more or fewer rounds before starting the cuff ribbing to customize the fit.

Finally, you could work this same pattern for adults by scaling up the measurements and yarn weight - the construction method remains the same regardless of size.

Common Mistakes & How to Fix Them

βœ— Losing track of rounds during cable pattern - Use stitch markers at each pattern repeat and a row counter to track your progress through the cable charts βœ— Uneven tension in cables causing distortion - Practice maintaining consistent tension and consider using a slightly larger cable needle to prevent tight stitches βœ— Confusion during short row shaping for back neck - Mark each double stitch clearly with a removable marker and carefully follow the step-by-step instructions for your specific size βœ— Misalignment of cable patterns after sleeve division - Pin the work carefully before continuing and ensure you're starting the side panel inserts at the correct round number indicated for your size

Theory of Braids Boy's Sweater Knitting Pattern

This elegant seamless sweater features intricate cable braids worked from the neck down using the contiguous method. Perfect for boys aged 12 months to 14 years, this pattern showcases beautiful textured stitchwork with detailed cable patterns throughout the yoke, body, and sleeves. The luxurious design uses premium cashmere yarn to create a sophisticated, timeless piece that combines traditional cable techniques with modern construction methods for a comfortable, seamless fit.

Advanced 40-60 Hours

Materials Needed for Theory of Braids Boy's Sweater Knitting Pattern

β€” Main Fabric

  • 01
    Cariaggi Piuma Cashmere (100% cashmere; 100g = 320m / 3.53oz = 350 yards)
  • 02
    200-470g (7-16.6oz) depending on size - see chart for specific amounts

β€” Tools Required

  • 01
    Circular knitting needles 2.5mm [US1.5]
  • 02
    Circular knitting needles 4.0mm [US6]
  • 03
    Cable needles
  • 04
    Stitch markers
  • 05
    Tapestry needle
  • 06
    Stitch holders or spare circular needles
  • 07
    Extra cords or auxiliary yarn
  • 08
    Row counter (recommended)

Progress Tracker

0% Complete

β€” Begin Neck Ribbing:

Setup:

Using 2.75mm [US1.5] needles, cast on 88; 88; 88 (94; 94; 94) (94; 110; 110) sts, join into the round without twisting, place BoR marker

Round 1:

Work 17 sts according to sleeve ribbing chart, place marker 1 (left sleeve), p2 (2, 2, 2, 2, 2)(2, 2, 2), work body ribbing chart, place markers as indicated

Rounds 2-6:

Work neckline ribbing in established pattern according to charts

Round 7:

Work increases as shown in charts

β€” Change to Main Needles:

Info:

Change to 4.0mm [US6] needles and continue with shoulder line shaping

β€” Shoulder Line Shaping:

Row 1:

Work according to Shoulder Line Shaping Chart #1 and #2 for your size, working sleeve chart for sleeves and body chart for front/back

Info:

Continue following charts, working increases at raglan lines using LLI and RLI as indicated

β€” Short Row Shaping for Back Neck:

Info:

Follow specific short row instructions for your size to raise the back neck, creating double stitches at turn points

Infos:

Work short rows in steps as specified for your size: 12 mos (4,4,1 sts); 18-24 mos (4,4,1,1 sts); 3 yrs (4,4,1,1,2 sts); 4-5 yrs (4,4,1,1,3,4 sts); etc.

β€” Sleeve Cap Shaping:

Info:

Follow Sleeve Cap Chart for your size, incorporating increased stitches into cable pattern

Info:

Continue until specified stitch counts are reached for your size

β€” Sleeve Division:

Next Round:

Transfer sleeve stitches to holders, cast on underarm stitches as specified for your size

Info:

Move markers as indicated and begin side panel insert charts

β€” Body:

Continue:

Work in established pattern with side panel inserts until piece measures specified length from sleeve division

Final Ribbing:

Work 3-5cm of k2, p2 ribbing on smaller needles, adjusting stitches in first round as specified

Finish:

Bind off all stitches

β€” Sleeves:

Setup:

Pick up held sleeve stitches with 4.0mm needles, pick up underarm stitches, place BoR marker

Decreases:

Work decrease rounds every 8-16 rounds (depending on size) as specified

Cuff Ribbing:

Work 5cm of k2, p2 ribbing on smaller needles

Finish:

Bind off all stitches

β€” Finishing:

Blocking:

Moisten the sweater and block on an even horizontal surface, leaving pinned until completely dry

Assembly Instructions

  • This is a seamless garment with no assembly required - all pieces are worked together from the neck down
  • After completing body and sleeves, weave in all yarn ends securely on the wrong side of the fabric
  • Block the finished sweater by moistening and pinning to measurements on a flat surface
  • Allow to dry completely before removing pins to set the cable patterns and achieve proper drape
  • Steam block lightly if desired for extra smoothness, being careful not to flatten the cables

Important Notes

  • πŸ’‘Use stitch markers liberally to keep track of pattern repeats and raglan lines throughout construction
  • πŸ’‘Cable charts are read from bottom to top, right to left for RS rounds, left to right for WS rows
  • πŸ’‘Maintain even tension throughout cable work - practice swatches if unfamiliar with these cable techniques
  • πŸ’‘Check gauge carefully before beginning - cable patterns can significantly affect gauge measurements
  • πŸ’‘The contiguous method creates a smooth raglan line - pay careful attention to increase placement
  • πŸ’‘When working short rows, mark double stitches clearly to avoid confusion when working them together
  • πŸ’‘Choose size based on actual chest measurements of the intended wearer, not just age recommendations

This sophisticated Theory of Braids sweater showcases the beauty of intricate cable work in a wearable, classic design. The seamless construction from the neck down eliminates finishing work while the contiguous method creates elegant, barely-there raglan lines. Worked in luxurious cashmere, this pattern offers a rewarding challenge for experienced knitters ready to create an heirloom-quality garment. 🧢 Happy knitting! ✨

You ask,

we answer.

FAQs

What is the contiguous method mentioned in this pattern?

The contiguous method is a seamless raglan technique that creates smooth, nearly invisible raglan lines by working increases in a specific way that eliminates the typical 'bar' or line of increases visible in traditional raglan construction.

Can I substitute a different yarn for the cashmere?

Yes, but choose a yarn that achieves the same gauge (26 sts and 30 rows = 10x10cm on 4.0mm needles after blocking). Wool, merino, or wool blends would work well. You'll need 200-470g depending on size.

How do I know which size to make?

Measure the child's actual chest circumference and compare to the finished measurements in the size chart. The sweater is designed with positive ease (slightly larger than body measurements). Age ranges are approximate guides only.

What if I've never worked cables before?

This pattern is rated Advanced for a reason - it's recommended that you practice cable techniques on swatches first. The pattern includes multiple cable variations (2/2 LC, 2/2 RC, 2/1 LPC, 2/1 RPC) that should be familiar before starting.

Do I need to follow the charts or can I use written instructions?

The pattern provides both charted instructions and written directions for stitch patterns. However, the complex cable arrangements are best followed using the charts, which show the visual progression of the braided patterns.

Why do I need to work short rows for the back neck?

Short rows add extra length to the back neck, which improves the fit and prevents the front neckline from pulling down. This creates a more comfortable, professional-looking garment.