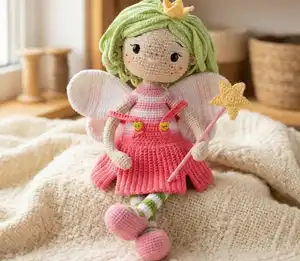
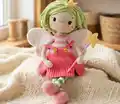
Create your own enchanting fairy friend with this delightful crochet pattern for Teya the Fairy! Standing at 11.8 inches tall, this whimsical fairy features beautiful green hair styled in flowing strands, delicate wings in white and pink, a charming sundress with button details, and adorable striped legs. Complete with a magical wand, tiny crown, and a sweet dragonfly companion, Teya brings pure magic and wonder to life through your crochet hook. Perfect for fairy tale lovers and those who want to craft a truly special handmade treasure that will be cherished for years to come.
Progress Tracker
0% Complete
— Head :
Round 1 :
Start 6 SC in a MR (6)
Round 3 :
(1 SC, INC) x 6 (18)
Round 4 :
(2 SC, INC) x 6 (24)
Round 5 :
(3 SC, INC) x 6 (30)
Round 6 :
(4 SC, INC) x 6 (36)
Round 7 :
(5 SC, INC) x 6 (42)
Round 8 :
(6 SC, INC) x 6 (48)
Round 9 :
(7 SC, INC) x 6 (54)
Round 10 :
(8 SC, INC) x 6 (60)
Round 11-12 :
60 SC (60), 2 rounds
Round 13 :
(9 SC, INC) x 6 (66)
Round 14-25 :
66 SC (66), 12 rounds
Info :
Install the eyes in the 19th-20th rounds with the distance 14 stitches between the eyes
Round 26 :
(9 SC, dec) x 6 (60)
Round 28 :
(8 SC, dec) x 6 (54)
Round 29 :
(7 SC, dec) x 6 (48)
Round 30 :
(6 SC, dec) x 6 (42)
Round 31 :
(5 SC, dec) x 6 (36)
Round 32 :
(4 SC, dec) x 6 (30)
Round 33 :
(3 SC, dec) x 6 (24)
Round 34 :
(2 SC, dec) x 6 (18)
Info :
Do not sew the opening closed
— Ears :
Info :
Crochet in beige color code 05
Round 1 :
Start 6 SC in a MR, sl st (6)
Info :
Sew the ears on the 19th-21st rounds
— Hair (Wig) :
Info :
Crochet hair in green color code 11
Round 1 :
Start 6 SC in a MR (6)
Round 2 :
6 INC SC (12) into BLO
Round 3 :
(1 SC, INC) x 6 (18)
Round 4 :
(2 SC, INC) x 6 (24) into BLO
Round 5 :
(3 SC, INC) x 6 (30)
Round 6 :
(4 SC, INC) x 6 (36) into BLO
Round 7 :
(5 SC, INC) x 6 (42)
Round 8 :
(6 SC, INC) x 6 (48) into BLO
Round 9 :
(7 SC, INC) x 6 (54)
Hair Strand Layer 1 :
Where you stopped working make ch35 and from the 2nd stitch from hook crochet 34 SC, now make sl st into nearest stitch, one more sl st into next stitch, crochet ch35 and crochet 34 SC from the 2nd stitch from hook, repeat to the end of the round. You made 27 hair strands
Hair Strand Layer 2 :
Crochet sl st in the 8th round. Make ch37 and from the 2nd stitch from hook crochet 36 SC, sl st into next stitch, one more sl st into next stitch and make ch37 and repeat to the end of the round. You made 21 hair strands
Hair Strand Layer 3 :
SL ST in the 6th round. Make ch39 and from the 2nd stitch from hook crochet 38 SC, sl st into next stitch, one more sl st into next stitch and make ch39, repeat to the end of the round. You made 15 hair strands
Hair Strand Layer 4 :
SL ST in the 4th round. Make ch41 and crochet from the 2nd stitch from hook 40 SC, sl st into next stitch, one more sl st into next stitch and crochet ch41 and repeat to the end of the round. You made 10 hair strands
Hair Strand Layer 5 :
SL ST in the 2nd round. Make ch43 and from the 2nd stitch from hook crochet 42 SC, sl st into next stitch, one more sl st into next stitch and make ch43, repeat to the end of the round. You made 6 hair strands
Info :
Glue the wig on the head. Steam the wig first to make the hair strands straight. Keep the shape of the wig as pictured
— Face Details :
Infos :
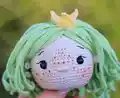
Install the eyes in the 19th-20th rounds with the distance 14 stitches between the eyes. If you use safety eyes, do sculpting around them. If you glue the eyes, place pins and do sculpting and only then glue the eyes. When sculpting is done, glue the eyes, now embroider white lines along the eyes. Embroider thin black line and eyelashes. Embroider the nose on the 22nd round, grabbing 3 or 4 stitches. Step 2 or 3 stitches up from the eyes, embroider the eyebrows grabbing 3 stitches with the distance 14 stitches between the eyebrows. Use soft pastel pink color to tone the cheeks
— Crown :
Info :
Work in yellow color
Round 1 :
17 SC, crochet sl st to connect the round
Round 2 :
Ch1, 17 SC, sl st (17)
Round 3 :
Ch1, DC into the 3rd stitch from hook, into the same stitch (1 DC, ch1, 1 DC, ch1, TR, ch4 and make sl st into the 1st stitch of the chain, TR, ch1, DC, ch1, DC, ch1), now step 2 SC and crochet sl st into the 3rd stitch, Ch1, DC into the 3rd stitch from hook, into the same stitch (1 DC, ch1, 1 DC, ch1, TR, ch4 and make sl st into the 1st stitch of the chain, TR, ch1, DC, ch1, DC, ch1), now step 2 SC and crochet sl st into the 3rd stitch, Ch1, DC into the 3rd stitch from hook, into the same stitch (1 DC, ch1, 1 DC, ch1, TR, ch4 and make sl st into the 1st stitch of the chain, TR, ch1, DC, ch1, DC, ch1), now step 2 SC and crochet sl st into the 3rd stitch. You made 3 triangles
Info :
Sew or glue the crown on the head, as pictured
— Arms :
Info :
Work in beige color code 05
Round 1 :
Start 6 SC in a MR (6)
Round 4 :
(2 SC, INC) x 4 (16)
Round 5-7 :
16 SC (16), 3 rounds
Round 8 :
(2 SC, dec) x 4 (12)
Round 9-32 :
12 SC (12), 24 rounds
Info :
Change the yarn to pink color
Round 33-35 :
12 SC (12), 3 rounds
— Legs :
Info :
Start working in white color code 62
Round 1 :
Start 6 SC in a MR (6)
Round 3 :
(1 SC, INC) x 6 (18)
Round 4 :
(2 SC, INC) x 6 (24)
Round 5-7 :
24 SC (24), 3 rounds
Info :
Attach green color code 69
Round 8-10 :
24 SC (24), 3 rounds
Info :
Change yarn color to white
Round 11-13 :
24 SC (24), 3 rounds
Round 14-16 :
24 SC (24), 3 rounds
Round 17-18 :
24 SC (24), 2 rounds
Round 19 :
8 SC, ch6, skip 6 stitches and into the 7th stitch crochet SC, 9 SC (24)
Round 20 :
(2 SC, dec) x 6 (18)
Round 21 :
(1 SC, dec) x 6 (12)
Round 22 :
6 dec, make decreases to close the opening, stuff the foot
Info :
Now attach white yarn on the right side. Crochet 6 SC in the round + 1 SC on the side line + 6 SC + 1 SC on the side line = 14 SC
Round 1-2 :
14 SC (14), 2 rounds
Round 3 :
14 SC + 3 stitches to shift
Info :
Change the yarn to green, now the round begins at the middle of back part
Round 4-6 :
14 SC (14), 3 rounds
Round 7-9 :
14 SC (14), 3 rounds
Round 10-12 :
14 SC (14), 3 rounds
Round 13-15 :
14 SC (14), 3 rounds
Round 16-18 :
14 SC (14), 3 rounds
Round 19-21 :
14 SC (14), 3 rounds
Round 22-24 :
14 SC (14), 3 rounds
Round 25-26 :
14 SC (14), 2 rounds
Info :
Stuff the legs well
— Body :
Info :
Work in white yarn color. From stitch marker in the middle of back part of the 1st leg, count 5 SC counterclockwise and place a stitch marker. From stitch marker in the middle of back part of the 2nd leg, crochet 6 more SC and make ch12, crochet sl st into the marked stitch of the 1st leg, now beginning of the round in the place of the leg connection. Work in the round (14 SC along the leg + 12 SC along the chain + 14 SC along the leg + 12 SC along the chain)
Info :
Change the yarn to green color
Round 2 :
6 SC, INC, 24 SC, INC, 20 SC (54)
Info :
Change the yarn to white color
Round 5-7 :
54 SC (54), 3 rounds
Round 8-10 :
54 SC (54), 3 rounds
Round 11-13 :
54 SC (54), 3 rounds
Round 14-16 :
54 SC (54), 3 rounds
Info :
Change the yarn to pink color 36
Round 17-19 :
54 SC (54), 3 rounds
Info :
Change the yarn to light pink 74
Round 21 :
(7 SC, dec) x 6 (48) + 1 stitch to shift
Info :
Change the yarn to pink color
Round 23-24 :
48 SC (48), 2 rounds
Round 25 :
(6 SC, dec) x 6 (42) + 1 stitch to shift
Round 26-27 :
42 SC (42), 2 rounds
Round 28 :
(5 SC, dec) x 6 (36) + 1 stitch to shift
Round 29-31 :
36 SC (36), 3 rounds
Round 32 :
3 SC, 6 SC through the stitches of one side of the arm, 11 SC, 6 SC through the stitches of one side of the arm, 10 SC (36)
Round 33 :
3 SC, 1 SC into the place where the arm and the body meet, 6 SC into the unused stitches of the arm, 1 SC into the place where the arm and the body meet, 11 SC, 1 SC into the place where the arm and the body meet, 6 SC into the unused stitches of the arm, 1 SC into the place where the arm and the body meet, 10 SC (40)
Round 36 :
(3 SC, dec) x 8 (32)
Round 37 :
(2 SC, dec) x 8 (24), stuff the body well
Info :
Insert wire frame into the arms. Twist arms wire frames to connect, as a result, you made the neck wire frame. It helps the head not to wobble when you finish sewing
Info :
Change the yarn to beige color 05
Round 38 :
(2 SC, dec) x 6 (18) into BLO
Round 39-42 :
18 SC (18), 4 rounds
Info :
Crochet SC in the round in pink color on the 28th round, insert hook bottom up. Pin the head to the neck and sew. Stitches number of the neck and the head are equal
— Shoes :
Info :
Work in pink color code 36. Stitch marker goes through back side
Round 1 :
ch12, 10 SC, 3 SC into 1 stitch, 9 SC, INC (24)
Round 2 :
INC, 9 SC, 3 INC, 9 SC, 2 INC (30)
Round 3 :
1 SC, INC, 10 SC, INC, (1 SC, INC) x 2, 10 SC, INC, 1 SC, INC (36)
Round 4 :
2 SC, INC, 11 SC, INC, (2 SC, INC) x 2, 11 SC, INC, 2 SC, INC (42)
Round 5 :
42 SC into BLO(42)
Round 6-11 :
42 SC (42), 6 rounds
Round 12 :
12 SC, (1 SC, dec) x 5, 15 SC (37)
Info :
Step 7 SC counterclockwise from stitch marker and place additional stitch marker
Round 13 :
5 SC, make ch10 and crochet sc into the stitch you marked (additional stitch marker) to connect the chain and crochet 7 SC to the stitch marker. It may help to make the chain longer and make a button loop to remove the shoes
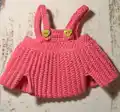
— Sundress :
Info :
Work in dark-pink color 42. Work in flat rows
Row 1 :
Make ch 49 and from the 2nd stitch from hook crochet 48 SC (48)
Row 2-3 :
Ch1, 48 SC (48), 2 rows
Stripe 1 :
From the place where you finished the 3rd round make ch21, from the 2nd stitch from hook crochet 20 SC, now sl st into belt of the skirt, now crochet into BLO along the crocheted stripe. Now work each row in flat rows into BLO and make sl st into the belt of the skirt
Row 2-24 :
Ch1, 20 SC, sl st, turn 20 SC (20), 23 rows
Row 25 :
Ch1, 20 SC, sl st, turn and work 26 row
Row 28 :
12 SC, do not finish 8 SC, make ch 9 and from the 2nd stitch from hook crochet 20 normal SC (crochet 8 SC along the chain and then work as usual), as a result, you made a skirt slit (20)
Row 27-50 :
ch1, 20 SC, sl st, turn 20 SC (20), 24 rows
Row 51 :
Ch1, 20 SC, sl st, turn and work 52 row
Row 52 :
12 SC, leave 8 SC unused, make ch 9 and from the 2nd stitch from hook crochet 20 normal SC (8 SC along the chain and then work as usual), as a result, you made a skirt slit (20)
Row 53-94 :
Ch1, 20 SC, sl st, turn 20 SC (20), 41 rows
Info :
Put two sides of the skirt together and crochet sl st to connect the skirt. Now crochet 11 SC in the middle of front part. Work in flat rows
Row 1-5 :
Ch1, 11 SC (11), 5 rows
Info :
Now crochet SC, in the corners crochet INC
Straps (Make 2) :
Make ch33 and from the 2nd stitch from hook crochet 32 HDC
Info :
Sew the straps on the sundress, sew the stripes on back part to have enough space to place the wings. Sew buttons on front part
— Wings (Make 2 Big) :
Info :
Crochet in white color
Round 1 :
Start 6 SC in a MR (6)
Round 3 :
(1 SC, INC) x 6 (18)
Round 4 :
(2 SC, INC) x 6 (24)
Round 5 :
(3 SC, INC) x 6 (30)
Round 6 :
(4 SC, INC) x 6 (36)
Round 7 :
(5 SC, INC) x 6 (42)
Round 8-10 :
42 SC (42), 3 rounds
Info :
Change the yarn to light pink color
Info :
Change to white color
Info :
Attach light pink color and alternate: 1 SC in light pink color, 1 SC in white color
Round 16-17 :
42 SC (42), 2 rounds
Round 18 :
(5 SC, dec) x 6 (36)
Round 19-21 :
36 SC (36), 3 rounds
Round 22 :
(4 SC, dec) x 6 (30)
Round 23-24 :
30 SC (30), 2 rounds
Round 25 :
(3 SC, dec) x 6 (24)
Round 26-27 :
24 SC (24), 2 rounds
Round 28 :
(2 SC, dec) x 6 (18)
Round 30 :
13 SC, do not crochet 5 SC, put together and crochet 9SC through the stitches of both sides
— Wings (Make 2 Small) :
Info :
Crochet in white color
Round 1 :
Start 6 SC in a MR (6)
Round 3 :
(1 SC, INC) x 6 (18)
Round 4 :
(2 SC, INC) x 6 (24)
Round 5 :
(3 SC, INC) x 6 (30)
Round 6-8 :
30 SC (30), 3 rounds
Info :
Change the yarn to light-pink color
Info :
Change the yarn to white color
Info :
Attach light pink color and alternate: 1 SC in light pink color, 1 SC in white
Round 14-15 :
30 SC (30), 2 rounds
Round 16 :
(3 SC, dec) x 6 (24)
Round 17-19 :
24 SC (24), 3 rounds
Round 20 :
(2 SC, dec) x 6 (18)
Round 22 :
13 SC, do not crochet 5 SC, put together and crochet 9SC through the stitches of both sides
Info :
Sew the wings as pictured
— Magic Wand :
Info :
Work in yellow yarn color, make 2
Round 1 :
Start 8 SC in a MR, sl st (8)
Round 2 :
ch1, 8 INC, sl st (16)
Round 3 :
Make ch6 and from the 2nd stitch from hook crochet sl st, SC, 2 DC, TR, skip 2 stitches on the foundation of the star and crochet sl st into the 3rd stitch. Make ch 6 again and repeat all steps. As a result, you made 5 pieces
Info :
Put 2 parts of the star together and crochet sl st in the round to connect. Now take a cut of wire or a wooden stick 15 cm length. Drop some glue and wrap pink thread around the stick. Now glue the stick inside the star
— Dragonfly :
Info :
Start working in light green color. The head and the body is a continuous piece
Round 1 :
Start 6 SC in a MR (6)
Round 3 :
(1 SC, INC) x 6 (18)
Round 4 :
(2 SC, INC) x 6 (24)
Round 5-7 :
24 SC (24), 3 rounds
Round 8 :
(2 SC, dec) x 6 (18)
Round 10 :
(1 SC, dec) x 6 (12), stuff
Round 12 :
(1 SC, INC) x 6 (18)
Round 13-14 :
18 SC (18), 2 rounds
Info :
Attach dark-green color
Round 15-16 :
18 SC (18), 2 rounds
Info :
Change the yarn to light green color
Round 17-18 :
18 SC (18), 2 rounds
Info :
Change the yarn to dark green color
Round 19-20 :
18 SC (18), 2 rounds
Info :
Change the yarn to light green color
Round 21-22 :
18 SC (18), 2 rounds
Round 23 :
(1 SC, dec) x 6 (12), stuff
Round 27 :
Make decreases to close the opening
Antennas (Make 2) :
Attach light green yarn color to the 2nd round of the head and make ch10, tie a knot on the tip of the chain as pictured. The distance between the antennas is 4 stitches
Wings (Make 4) :
Work in white color. Make ch10 and crochet from the 2nd stitch from hook 3 SC, 3 HDC, 2 DC, 3 DC into 1 stitch, continue into the unused loops on the opposite side of the chain 2 DC, 3 HDC, 3 SC
Info :
Sew the wings on the back with the distance 4 stitches between the wings
Front Legs :
Make ch12 in the 12th round and tie a knot at the end
Back Legs :
Make ch15 in the 21st round and tie a knot at the end
Scarf :
Work in light yellow yarn color, make ch50 and tie knots from both sides
Infos :
Install or embroider the eyes in the 5th or the 6th round with the distance 2 stitches between the eyes. Embroider white and black lines to decorate the eyes. Step 1 stitch up from the eyes and embroider the eyebrows, grabbing 1 stitch with the distance 2 or 3 stitches between the eyebrows. Step 1 or 2 stitches down from the eyes and embroider red mouth grabbing 3 stitches. Embroider pink cheeks as pictured, it may help to tone them. Also I draw freckles but this step is optional. Sew a button on front part of the body as pictured. Tie the scarf and your dragonfly is finished
This enchanting Teya the Fairy pattern brings a touch of magic to your crochet collection! With her flowing green hair, delicate layered wings, and charming striped outfit, she's a project that combines intermediate techniques with creative embellishment. The adorable dragonfly companion and miniature accessories add extra charm to this 11.8-inch whimsical creation. Perfect for fairy lovers and anyone who wants to craft something truly magical! 🧚✨🌟