🧢 Beautiful ✨ Detailed πŸ’ Adorable

Blue the Dumbo Octopus Amigurumi Pattern

Blue the Dumbo Octopus Amigurumi Pattern
4.3β˜… Rating
4-5 Hours Time Needed
2.1K Made This
βœ‚οΈ

Intermediate Level

Ideal for those with basic knitting experience, featuring slightly more advanced stitches and techniques to expand your skills.

⏱️

Weekend Treat

Takes 5-7 hours, making it an enjoyable project to finish over a couple of days.

πŸ™

Charming Critter

Delightful animal designs with sweet details that capture the essence of your favorite woodland and farmyard friends.

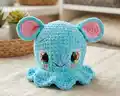
About This Blue the Dumbo Octopus Amigurumi Pattern

Blue the Dumbo Octopus Amigurumi Pattern crochet pattern - detailed view of completed project

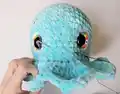
With clear step-by-step guidance and helpful photo references, you'll learn special techniques like creating dimensional ears and achieving professional-looking eye placement that brings your octopus to life with personality.

Why You'll Love This Blue the Dumbo Octopus Amigurumi Pattern

I absolutely love this pattern because it transforms simple crochet stitches into something truly magical! The sunken eye technique creates such incredible depth and character - it's like watching your octopus come alive right before your eyes. I'm fascinated by how the contrasting ear colors and the delicate ruffled frill add so much personality without being overly complicated. What really makes my heart happy is seeing that adorable embroidered smile and those sweet little eyebrows that give Blue such a gentle, friendly expression. It's the perfect blend of creative challenge and heartwarming results!

Blue the Dumbo Octopus Amigurumi Pattern step 1 - construction progress Blue the Dumbo Octopus Amigurumi Pattern step 2 - assembly progress Blue the Dumbo Octopus Amigurumi Pattern step 3 - details and accessories Blue the Dumbo Octopus Amigurumi Pattern step 4 - final assembly and finishing

Switch Things Up

I absolutely love experimenting with this pattern to create unique variations that reflect different ocean personalities! For a magical twist, try making your octopus in gradient yarn that shifts from deep purple to soft lavender - it creates this stunning ombre effect that looks like twilight in the ocean. I've also had amazing results using sparkly yarn for the ears to give them a shimmery, bioluminescent quality.

Color blocking is another fun approach I adore - imagine bright coral pink for the body with sunny yellow ears, or a sophisticated navy blue with metallic gold accents. You could even create a whole family of octopuses in rainbow colors, each one representing a different personality.

For those who want extra embellishment, I sometimes add tiny seed beads or sequins scattered across the head for a sparkly underwater effect, or embroider small hearts or stars on the body. The tentacle frill also looks gorgeous when you alternate colors every few stitches - creating stripes or a candy cane effect.

Size variations are endlessly fun too! Using fingering weight yarn and a tiny hook creates the most precious mini octopus perfect for keychains, while super bulky yarn makes an impressive statement piece. I've even made micro versions (just 3 inches tall) that work beautifully as bag charms or nursery decorations strung together as a mobile.

Common Mistakes & How to Fix Them
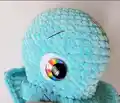
βœ— Mistake: Placing eyes too close together or too far apart - measure carefully and leave exactly 11 holes between them for proper spacing βœ— Mistake: Adding eye backs too early before stuffing - wait until round 20 and remove stuffing temporarily to secure eye washers properly βœ— Mistake: Pulling thread too tight when creating sunken eyes - use gentle, even tension and repeat the threading process only three times per side βœ— Mistake: Forgetting to stuff head firmly before closing - pause at round 18 to add sufficient stuffing for proper head shape and structure βœ— Mistake: Not pinching ears at the bottom before sewing - this step creates the signature dumbo ear shape and shouldn't be skipped

Blue the Dumbo Octopus Amigurumi Pattern

Create your own adorable Blue the Dumbo Octopus with this charming crochet pattern! This delightful ocean-inspired amigurumi features sweet dumbo-style ears, a ruffled tentacle frill, and customizable sunken eyes that give your octopus incredible character. Perfect for ocean lovers and anyone who adores unique handmade plushies, this pattern combines simple stitches with creative assembly techniques to bring this whimsical sea creature to life in vibrant blue and pink colors.

Intermediate 4-5 Hours

Materials Needed for Blue the Dumbo Octopus Amigurumi Pattern

β€” Main Fabric

  • 01
    Bulky yarn Weight #6, approximately 100g of blue (Color A) for main body
  • 02
    Bulky yarn Weight #6, approximately 25g of pink (Color B) for accent ears
  • 03
    Premier Parfait Chunky in Turquoise recommended for blue color
  • 04
    Premier Parfait Chunky in Bubblegum recommended for pink color

β€” Tools Required

  • 01
    Crochet hook size J (6.00 mm)
  • 02
    30 mm safety eyes
  • 03
    Scissors
  • 04
    Sewing needle
  • 05
    Stitch marker
  • 06
    Fiberfill stuffing (Polyfil recommended)
  • 07
    Black embroidery thread for face details
  • 08
    White felt (optional, approximately 4 cm diameter circles for eye backing)
  • 09
    Craft glue (optional, for securing felt)

Progress Tracker

0% Complete

β€” Head and Body :

Info :

Crocheted from top of head to bottom of body. Starting with Color A (Blue)

Round 1 :

Make 6 sc into a magic ring (6)

Round 2 :

Increase in each st around (12)

Round 3 :

(sc, inc) x 6 (18)

Round 4 :

(2 sc, inc) x 6 (24)

Round 5 :

(3 sc, inc) x 6 (30)

Round 6 :

(4 sc, inc) x 6 (36)

Round 7 :

(5 sc, inc) x 6 (42)

Round 8 :

sc in each st around (42)

Round 9 :

(6 sc, inc) x 6 (48)

Round 10-14 :

sc in each st around (48)

Round 15 :

(6 sc, dec) x 6 (42)

Round 16 :

sc in each st around (42)

Round 17 :

(5 sc, dec) x 6 (36)

Infos :

Optional: Cut white felt circle larger than eye (approximately 4 cm diameter) with hole on outer edge for eye placement. Place eyes between rounds 15 and 16, leaving 11 holes between them. For sunken eye look, do not place eye backs until round 20. Eye placement may need adjustment depending on yarn and hook size used.

Round 18-20 :

sc in each st around (36)

Info :

Start stuffing the head and body. For sunken eyes: Cut long piece of yarn and remove eyes. Place needle in first eye hole and insert into hole next to eye hole. Go back and forth between each eye hole, pulling slightly on yarn after each pass. Repeat process about 3 times on each side until desired look is achieved. Remove most stuffing to place eye washers, then re-stuff.

Round 21 :

BLO (4 sc, dec) x 6 (30)

Round 22 :

(3 sc, dec) x 6 (24)

Round 23 :

(2 sc, dec) x 6 (18)

Round 24 :

(sc, dec) x 6 (12)

Round 25 :

Dec x 6 (6)

Info :

F/O and sew the hole closed

β€” Tentacles or Frill :

Info :

Turn the body upside down. Attach Color A yarn on round 21 with a sl st. Ch 2

Round 1 :

hdc-inc in each st around, join with a sl st to top of ch 2 (60)

Round 2 :

Ch 2, hdc in each st around, join with a sl st to top of ch 2 (60)

Round 3 :

Ch 2, (hdc, dc, tr, ch 1, tr, dc, hdc, 3 sl) x 8, sl st to top of ch 2 to fasten off

Info :

Weave in the tail ends

β€” Ears :

Info :

Make 2 in Color A (Blue), Make 2 in Color B (Pink)

Round 1 :

Make 6 sc into a magic ring (6)

Round 2 :

Increase in each st around (12)

Round 3 :

(sc, inc) x 6 (18)

Round 4 :

(2 sc, inc) x 6 (24)

Info :

Do not F/O the Color A ears. Place the back sides of Color A and Color B ears together. Sc around the ears with the Color A yarn. F/O and leave a long tail for sewing.

Assembly Instructions

  • Thread needle with black embroidery thread. Insert needle into a hole on the head and bring it above the eye. Embroider an eyebrow. Repeat for the second eye. Weave in tail ends.
  • Thread needle with a long strand of black embroidery thread. Insert needle into a hole in the head. Bring the needle up to a spot between the eyes. Embroider a smile. Weave in the tail ends.
  • Optional: Glue down your white felt circles to make them flat against the body for a cleaner look.
  • Pinch the ears at the bottom. Sew about 3 stitches together at the bottom to give the ear a pinched, dumbo-style look.
  • Pin the ears onto the top of the head in desired position to ensure proper placement before sewing.
  • Sew the ears securely onto the head using the long tail left from assembly.
  • Optional: Add blush to the cheeks using actual blush or pink crayon for extra cuteness.

Important Notes

  • πŸ’‘Do not join rounds unless stated - work in a continuous spiral and use stitch markers to mark the beginning of each round
  • πŸ’‘All stitches are worked in both loops unless the pattern specifically states BLO (back loops only) or FLO (front loops only)
  • πŸ’‘The sunken eye technique requires patience - watch the YouTube tutorial video provided for visual guidance on this special technique
  • πŸ’‘How you stuff matters significantly - use Polyfil stuffing and stuff firmly but not too tightly for best shape
  • πŸ’‘You can customize by using different yarn weights and hook sizes, but this will change the finished size and may require eye placement adjustments
  • πŸ’‘Keep tension consistent throughout the project, especially when creating the ruffled frill for the tentacles
  • πŸ’‘Pin all pieces before sewing to ensure symmetrical placement and the best final appearance

This enchanting Blue the Dumbo Octopus pattern was lovingly designed to capture the magical charm of deep-sea creatures in soft, huggable form! The combination of contrasting ear colors, expressive sunken eyes, and flowing tentacle frills creates a plushie bursting with personality and ocean magic. Whether you're making it as a gift for a marine life enthusiast or adding to your own collection of adorable amigurumi friends, this pattern delivers both creative satisfaction and an absolutely precious finished result. πŸ™πŸ’™ Happy crocheting! 🧢✨

You ask,

we answer.

FAQs

What makes the eyes look sunken and how difficult is this technique?

The sunken eye technique involves threading yarn through the eye holes and gently pulling to create depth. While it requires patience, the pattern includes detailed written instructions and references a YouTube video tutorial. Practice gentle tension and repeat the process only 3 times per side for best results.

Can I make this octopus in different colors?

Absolutely! While the pattern uses blue and pink, you can choose any color combination you like. Consider ocean-inspired colors like purple, teal, or even rainbow colors for a whimsical twist. Just maintain the same yarn weight for consistent sizing.

Do I need to use the exact yarn brands mentioned?

No, the Premier Parfait Chunky yarns are recommendations. Any bulky weight #6 yarn will work perfectly. Just ensure you're using approximately 100g of your main color and 25g of your accent color for proper proportions.

Can I skip the white felt circles for the eyes?

Yes, the white felt circles are completely optional. They add a nice finished look and can enhance the eye appearance, but your octopus will still look adorable without them. The pattern works beautifully either way.

What size will my octopus be if I use different yarn?

The pattern creates a 12-inch octopus with weight 6 yarn and a 6.00mm hook. Using lighter weight yarn and smaller hooks will create a smaller octopus, while heavier yarn creates a larger one. Just adjust your eye size accordingly for proper proportions.

Is this pattern suitable for beginners?

This is an intermediate pattern best suited for crocheters with basic skills. You should be comfortable with magic rings, increases, decreases, and working in continuous rounds. The sunken eye technique and ear assembly require patience and precision, making it a great skill-building project.