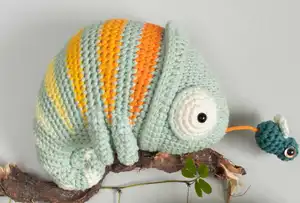
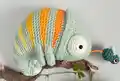
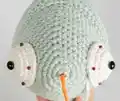
Create your own enchanting musical chameleon companion with this stunning pattern featuring vibrant color gradients and a special music box insert that plays 'The Lion Sleeps Tonight'. This detailed amigurumi project combines intricate short-row color work with clever construction techniques to bring Conrad the Chameleon to life in all his camouflaged glory. Perfect for intermediate to advanced crocheters ready to tackle a rewarding challenge, this pattern includes complete instructions for the body, curled tail, adorable fly accessory, and integrated music box mechanism for a truly interactive handmade treasure.
Progress Tracker
0% Complete
— Head :
Info :
Using color A (main color sage), make a magic loop
Round 1 :
sc 6 into the magic loop (6)
Round 3 :
[°sc 3°, sc 3] 3x (18)
Round 4 :
sc 1, °sc 3°, sc 5, °sc 3°, sc 5, °sc 3°, sc 4 (24)
Round 5 :
sc 10, °sc 3°, sc 13 (26)
Round 6 :
sc 2, °sc 3°, sc 8, °sc 3°, sc 8, °sc 3°, sc 5 (32)
Round 7 :
sc 14, °sc 3°, sc 17 (34)
Round 8 :
sc 3, °sc 3°, sc 11, °sc 3°, sc 11, °sc 3°, sc 6 (40)
Round 9 :
sc 18, °sc 3°, sc 21 (42)
Round 10 :
sc 19, °sc 3°, sc 22 (44)
Round 11 :
sc 20, °sc 3°, sc 23 (46)
Round 13 :
sc 21, [inc] 2x, sc 23 (48)
Round 15 :
sc-blo 23, inc-blo, sc-blo 24 (49)
Round 17 :
sc 23, inc, sc 1, inc, sc 23 (51)
Info :
Take main color loop off hook and place on stitch marker, count 7 stitches forward from first stitch of round
Round 19 (short row) :
Join color B (orange) with slip knot into 7th stitch, sc 1 into next stitch, sc 35, slst 1, cut yarn and close row invisibly
Round 20 (short row) :
Join color B with slip knot into 5th stitch of previous orange row, sc 27, slst 1, cut yarn and close row invisibly
Round 21 (short row) :
Join color B with slip knot into 5th stitch of previous orange row, sc 18, slst 1, cut yarn and close row invisibly
Info :
Pick up main color loop
Round 22 :
sc 6, sc 1 in same stitch as slip knot join, sc 4, sc 1 in same stitch like slip knot join of 2nd orange row, sc 4, sc 1 in same stitch like slip knot join of 3rd orange row, sc 19, sc-flo 1 into closing stitch working into both front loops, sc 14 (51)
Round 23-24 :
sc 51 (2 rounds)
Info :
Take main color loop off hook and place on stitch marker, count 8 stitches forward from first stitch of round
Round 25 (short row) :
Join color C (yellow 1) with slip knot into 8th stitch, sc 36, slst 1, cut yarn and close row invisibly
Round 26 (short row) :
Join color C with slip knot into 5th stitch of previous yellow row, sc 27, slst 1, cut yarn and close row invisibly
Round 27 (short row) :
Join color C with slip knot into 5th stitch of previous yellow row, sc 18, slst 1, cut yarn and close row invisibly
Info :
Pick up main color loop
Round 28 :
sc 7, sc 1 in same stitch as slip knot join, sc 4, sc 1 in same stitch like slip knot join of 2nd yellow row, sc 4, sc 1 in same stitch like slip knot join of 3rd yellow row, sc 33 (51)
Round 29-30 :
sc 51 (2 rounds)
Infos :
Take main color loop off hook and place on stitch marker. Insert music box through opening, draw pull cord through center of magic loop and secure with safety pin on outside. Stuff space in front of music box well, place music box with top side facing bottom of body. Stuff all around music box very well to prevent movement. Continue stuffing as you go.
Info :
Count 9 stitches forward from first stitch of round
Round 31 (short row) :
Join color D (yellow 2) with slip knot into 9th stitch, sc 36, slst 1, cut yarn and close row invisibly
Round 32 (short row) :
Join color D with slip knot into 5th stitch of previous yellow row, sc 27, slst 1, cut yarn and close row invisibly
Round 33 (short row) :
Join color D with slip knot into 5th stitch of previous yellow row, sc 7, [dec] 2x, sc 7, slst 1, cut yarn and close row invisibly (49)
Info :
Pick up main color loop
Round 34 :
sc 8, sc 1 in same stitch as slip knot join, sc 4, sc 1 in same stitch like slip knot join of 2nd yellow row, sc 4, sc 1 in same stitch like slip knot join of 3rd yellow row, sc 7, dec, sc 21 (48)
Round 35 :
sc 24, dec, sc 1, dec, sc 19 (46)
Round 36 :
sc 25, dec, sc 19 (45)
Info :
Take main color loop off hook and place on stitch marker, count 10 stitches forward from first stitch of round
Round 37 (short row) :
Join color E (yellow 3) with slip knot into 10th stitch, sc 13, dec, sc 1, dec, sc 12, slst 1, cut yarn and close row invisibly (43)
Round 38 (short row) :
Join color E with slip knot into 5th stitch of previous yellow row, sc 9, dec, sc 8, slst 1, cut yarn and close row invisibly (42)
Round 39 (short row) :
Join color E with slip knot into 5th stitch of previous yellow row, sc 2, dec, sc 1, dec, sc 2, slst 1, cut yarn and close row invisibly (40)
Info :
Pick up main color loop
Round 40 :
sc 1, [dec] 2x, sc 4, sc 1 in same stitch as slip knot join, sc 4, sc 1 in same stitch like slip knot join of 2nd yellow row, sc 4, sc 1 in same stitch like slip knot join of 3rd yellow row, sc 2, dec, sc 16 (37)
Round 41 :
sc 18, dec, sc 1, dec, sc 14 (35)
Round 42 :
sc 1, dec, sc 15, dec, sc 15 (33)
Info :
Take main color loop off hook and place on stitch marker, count 8 stitches forward from first stitch of round
Round 43 (short row) :
Join color F (yellow 4) with slip knot into 8th stitch, sc 8, dec, sc 1, dec, sc 8, slst 1, cut yarn and close row invisibly (31)
Round 44 (short row) :
Join color F with slip knot into 3rd stitch of previous yellow row, sc 6, dec, sc 6, slst 1, cut yarn and close row invisibly (30)
Round 45 (short row) :
Join color F with slip knot into 3rd stitch of previous yellow row, sc 2, [dec] 2x, sc 2, slst 1, cut yarn and close row invisibly (28)
Info :
Pick up main color loop
Round 46 :
sc 7, sc 1 in same stitch as slip knot join, sc 2, sc 1 in same stitch like slip knot join of 2nd yellow row, sc 2, sc 1 in same stitch like slip knot join of 3rd yellow row, sc 1, dec, sc 11 (27)
Round 47 :
sc 1, inc, sc 11, dec, sc 1, dec, sc 6, slst 3 (26)
Round 48 :
slst 8, sc 7, dec, sc 9 (25)
Info :
Take main color loop off hook and place on stitch marker, count 9 stitches forward from first stitch of round
Round 49 (short row) :
Join color G/G1 (white/violet) with slip knot into 9th stitch, sc 4, dec, sc 1, dec, sc 4, slst 1, cut yarn and close row invisibly (23)
Round 50 (short row) :
Join color G/G1 with slip knot into 3rd stitch of previous white row, sc 1, [dec] 2x, sc 1, slst 1, cut yarn and close row invisibly (21)
Info :
Pick up main color loop
Round 51 :
sc 3, inc, sc 4, sc 1 in same stitch as slip knot join, sc 2, sc 1 in same stitch like slip knot join of 2nd white row, sc 1, dec, sc 6 (21)
Round 52 :
slst 8, sc 4, [dec] 2x, sc 5
Round 53 :
sc 4, inc, sc 7, dec, sc 5 (19)
Info :
Remove marker, sc 1, slst 1, take main color loop off hook and place on stitch marker, count 8 stitches forward from next stitch of round
Round 54 (short row) :
Join color G (white) with slip knot into 8th stitch, sc 2, [dec] 2x, sc 2, slst 1, cut yarn and close row invisibly (17)
Round 55 (short row) :
Join color G with slip knot into 2nd stitch of previous white row, sc 1, dec, slst 1, cut yarn and close row invisibly (16)
Info :
Pick up main color loop
Round 56 :
slst 7 (pm in 1st slst as new beginning of following rounds), sc 1 in same stitch as slip knot join, sc 1, sc 1 in same stitch like slip knot join of 2nd white row, dec, sc 4 (15)
Round 57 :
sc 3, inc, sc 5, dec, sc 4
Round 58 :
sc 1, slst 6, sc 3, dec, sc 3 (14)
Info :
Remove marker, sc 3, take main color loop off hook and place on stitch marker, count 5 stitches forward from next stitch of round
Round 59 (short row) :
Join color G (white) with slip knot into 5th stitch, sc 2, dec, sc 2, slst 1, cut yarn and close row invisibly (13)
Round 60 (short row) :
Join color G with slip knot into 1st stitch of previous white row, sc 1, dec, slst 1, cut yarn and close row invisibly (12)
Info :
Pick up main color loop
Round 61 :
sc 1 (pm as new beginning of following rounds), inc, sc 2, sc 1 in same stitch as slip knot join, sc 1 in same stitch like slip knot join of 2nd white row, dec, sc 3, slst 1 (12)
Round 62 :
slst 5, sc 2, dec, sc 3 (11)
Round 63 :
sc 2, inc, sc 4, dec, sc 2
Info :
Remove marker, sc 1, slst 1
Round 64 :
Change to color G (white), slst 3 (pm in 1st slst as new beginning of following rounds), sc 3, dec, sc 3 (10)
Round 65 :
sc 1, inc, sc 3, dec, sc 3
Round 66 :
slst 1, change to main color, slst 2, sc 2, dec, sc 3 (9)
Round 67 :
sc 1, inc, sc 3, dec, sc 2
Round 68 :
sc 1, slst 3, sc 1, dec, sc 2 (8)
Round 69 :
sc 2, change to color G, inc, sc 2, dec, sc 1
Info :
Remove marker, sc 2
Round 70 :
slst 3 (pm in 1st slst as new beginning of following rounds), sc 1, dec, sc 2 (7)
Round 71 :
sc 1, change to main color and cut yarn G, inc, sc 1, dec, sc 2
Round 72 :
sc 1, slst 3, sc 1, dec (6)
Info :
Remove marker, sc 2
Round 73 :
sc 1 (pm as new beginning of following rounds), sc 2, dec, sc 1 (5)
Round 74-75 :
sc 5 (2 rounds)
Infos :
Cut yarn leaving very long tail, close last round invisibly. Thread yarn needle with main color tail, roll up chameleon tail starting at tip. Fasten curled tail with sewing stitch every second or third row. When tail is curled up, sew in ends.
— Head Shield :
Info :
Holding body head down, join main color with standing sc into first remaining front loop of round 15
Round 1 :
sc 21, inc, sc 1, inc, sc 22, inc (51)
Round 2 :
slst 1, sc 7, hdc 8, dc 6, [dc-inc] 3x, dc 6, hdc 8, sc 10, dec (53)
Round 3 :
sc 25, inc, sc 27 (54)
Info :
Cut yarn and close round invisibly
— Eyes (Make 2) :
Info :
Using color G (white), make a magic loop
Round 1 :
sc 7 into magic loop (7)
Round 3 :
[sc 1, inc] 7x (21)
Round 4-5 :
sc 21 (2 rounds)
Infos :
Slst 1 into next stitch, cut yarn with very long rest and close round invisibly. Attach black safety eye in center of magic loop. Make another eye same way. Pin eyes between bottom of round 6 and top of round 13. Sew back loops of last round stitches onto body. Before closing last few stitches, add little bit of stuffing. Finish last stitches and weave in ends. With main color yarn, sew border around each white front loop 3 times around entire eye.
— Legs (Make 4) :
Piece A :
Using main color (sage), make magic loop
Round 1 :
sc 6 into magic loop (6)
Round 2-3 :
sc 6 (2 rounds)
Info :
Slst 1 into next stitch, cut yarn and close round invisibly
Piece B :
Repeat instructions as for Piece A until end of round 3, do not cut yarn this time, hold Piece A next to hook
Round 4 :
On Piece A, sc 1 into next stitch after closing stitch (pm as 1st stitch), sc 4, skip closing stitch on Piece A and one stitch on Piece B, then sc 5 along Piece B (10)
Round 6 :
sc 1, sc3tog, sc 6 (8)
Round 7 :
sc3tog, sc 5 (6)
Infos :
Close open end flat with row of sc stitches: fold so 2 stitches line each other in 2 layers, go through both layers at once and sc 2. Cut yarn with long rest to sew leg onto body. Make another 3 legs same way. Pin legs into place and sew onto body, then weave in all ends.
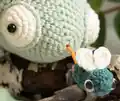
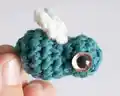
— Fly :
Info :
Using color H (petrol), make magic loop
Round 1 :
sc 6 into magic loop (6)
Infos :
Attach fly to pull string of music box ensuring pull string is completely wound up and music stopped. Draw end of pull string through center of magic ring, place fly 2-3cm (approx 1 inch) from tip of snout. Knot end of pull string near surface inside body of fly, ensure knot is big and fastened enough so it cannot slip back through center of magic loop.
Round 4-5 :
sc 12 (2 rounds) (12)
Round 6 :
[sc 1, dec] 4x, stuff the body (8)
Round 7 :
[inc-flo, sc-flo 1] 4x (12)
Infos :
Attach colored safety eyes (10mm) between rounds 8 and 9. If shanks are too long, cut off end once washer is placed. Melt plastic shank with lighter and press flat if needed. Alternatively embroider eyes with yarn. Stuff head, cut yarn, close last round through front loops and weave in end.
— Wings (Make 2) :
Info :
Using color G (white), make foundation chain of 4 ch
Row :
Start in second ch from hook and crochet along chain: slst 1, sc 1, sc 4 into last stitch. Along other side of chain: sc 1, slst 1, slst 1 into first stitch of round, ch 1
Infos :
Cut yarn with long rest. Make another wing same way. Using yarn tails, sew wings onto body on neck of fly between rounds 6 and 7.
This enchanting Chameleon Conrad Musical Toy pattern brings together advanced amigurumi techniques with whimsical design to create a truly interactive handmade treasure. The gradient color work mimics natural chameleon camouflage while the integrated music box mechanism adds a magical musical element that delights both children and adults alike. Master short-row techniques, invisible decreases, and clever construction methods while creating this seventeen-centimeter masterpiece complete with curled tail, dimensional eyes, and an adorable fly companion. Choose from three stunning color schemes including vibrant orange gradient, lush green tones, or cheerful rainbow stripes to make your Conrad uniquely yours. 🧶 Happy crocheting and enjoy the sweet melody! 🎵✨