About This Teddy Bear Baby Vest Crochet Pattern
Perfect as a cherished family heirloom or a thoughtful baby shower gift, this charming vest brings comfort and a smile to any little one's everyday wardrobe.
Ideal for those with basic crocheting experience, featuring slightly more advanced stitches and techniques to expand your skills.
Takes 5-7 hours, making it an enjoyable project to finish over a couple of days.
An adorable friend to cherish, handcrafted with love to bring comfort and joy for years to come.
Perfect as a cherished family heirloom or a thoughtful baby shower gift, this charming vest brings comfort and a smile to any little one's everyday wardrobe.
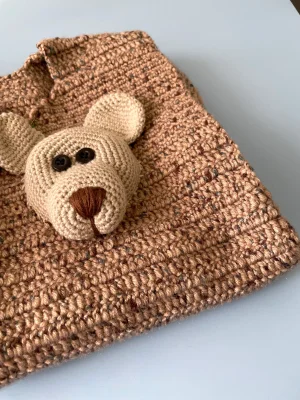
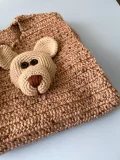
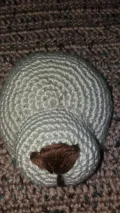
I love how the textured stitch pattern creates such a satisfying, squishy fabric that keeps its shape beautifully. The little teddy bear faces are incredibly fun to assemble, and you can easily customize their expressions to give each vest its own unique personality!
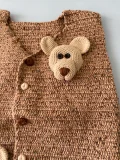
I absolutely adore making garments for little ones, and this sweet teddy bear vest is officially my new favorite project! There is something so magical about watching those cute little bear faces come to life stitch by stitch.
If you want to customize this piece, try switching up the colors—a soft cream vest with chocolate brown bears would look incredibly chic, or you could go full pastel with mint green or dusty pink. I also love the idea of adding a cozy hood to the back of the vest for extra warmth on chilly autumn days.
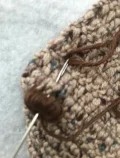
When embroidering the nose, don't worry about making it absolutely perfect—a little asymmetry actually gives each bear its own unique, lovable personality. I can't wait to see the beautiful versions you create for the special little ones in your life!
Keep your favorite little one cozy and cute with this beautiful, textured baby vest! Adorned with sweet crocheted teddy bear faces, this charming layer is perfect for adding a touch of whimsical warmth to any outfit. It is an absolute joy to stitch up and makes a heartwarming handmade gift for baby showers or birthdays.
ch 46, turn.
sc into each ch across, ch 1, turn. (45)
sc into each sc across, ch 1, turn. (45)
Work 9 sc into the cr stitches of the previous row, then increase in the next stitch. Repeat this sequence across to increase your stitch count, ch 2, turn. (50)
cr into each cr across, ch 2, turn. (50)
cr into the next 45 stitches, leaving the remaining stitches unworked, ch 2, turn. (45)
cr into each cr across, ch 2, turn. (45)
cr into the next 44 stitches, ch 1, turn. (44)
sc into each sc across, ch 1, turn. (44)
sc into the next 43 stitches, ch 1, turn. (43)
sc into each sc across, ch 1, turn. (43)
sc into the next 42 stitches, ch 1, turn. (42)
sc into each sc across, ch 1, turn. (42)
sc into the next 41 stitches, ch 1, turn. (41)
sc into each sc across, ch 1, turn. (41)
sc into the next 40 stitches, ch 1, turn. (40)
sc into each sc across, ch 1, turn. (40)
sc into the next 39 stitches, ch 1, turn. (39)
sc into each sc across, ch 1, turn. (39)
sc into the next 38 stitches, ch 1, turn. (38)
sc into each sc across, ch 1, turn. (38)
sc into the next 37 stitches, ch 1, turn. (37)
sc into each sc across, ch 1, turn. (37)
sc into the next 36 stitches, ch 1, turn. (36)
sc into each sc across, ch 1, turn. (36)
sc into the next 35 stitches, ch 1, turn. (35)
sc into each sc across, ch 1, turn. (35)
The source pattern contains a numbering repetition for Row 63. We have adjusted the subsequent steps to keep your row count accurate.
sc into the next 34 stitches, ch 1, turn. (34)
sc into each sc across, ch 1, turn. (34)
sc into the next 33 stitches, ch 1, turn. (33)
sc into each sc across, ch 1, turn. (33)
sc into the next 32 stitches, ch 1, turn. (32)
sc into each sc across, ch 1, turn. (32)
sc into the next 31 stitches, ch 1, turn. (31)
sc into each sc across, ch 1, turn. (31)
sc into the next 30 stitches, ch 1, turn. (30)
sc into each sc across, ch 1, turn. (30)
sc into the next 29 stitches, ch 1, turn. (29)
sc into each sc across, ch 1, turn. (29)
sc into the next 28 stitches, ch 1, turn. (28)
sc into each sc across, ch 1, turn. (28)
sc into the next 27 stitches, ch 1, turn. (27)
sc into each sc across, ch 1, turn. (27)
sc into the next 26 stitches, ch 1, turn. (26)
sc into each sc across, ch 1, turn. (26)
sc into the next 25 stitches, ch 1, turn. (25)
sc into each sc across, ch 1, turn. (25)
sc into the next 24 stitches, ch 1, turn. (24)
Work 22 cr into the stitches across, ch 2, turn. (22)
cr into each cr across, ch 2, turn. Fasten off after Row 89. (22)
ch 81, turn.
sc into each ch across, ch 1, turn. (80)
sc into each sc across, ch 1, turn. (80)
cr into each cr across, ch 2, turn. (80)
Work 4 cr into the first stitches, then 72 cr across, leaving the remaining stitches unworked, ch 2, turn. (72)
cr into each cr across, ch 2, turn. (72)
Work 22 cr across, ch 2, turn. Fasten off after Row 57. (22)
Work 6 sc into a mr. (6)
Work 1 inc in each stitch around. (12)
Repeat [1 sc, 1 inc] 6 times around. (18)
Repeat [2 sc, 1 inc] 6 times around. (24)
Repeat [3 sc, 1 inc] 6 times around. (30)
Repeat [4 sc, 1 inc] 6 times around. (36)
Repeat [5 sc, 1 inc] 6 times around. (42)
Repeat [6 sc, 1 inc] 6 times around. (48)
sc in each stitch around. Fasten off, leaving a long tail for assembly. (48)
Work 6 sc into a mr. (6)
Work 1 inc in each stitch around. (12)
Repeat [1 sc, 1 inc] 6 times around. (18)
Repeat [2 sc, 1 inc] 6 times around. (24)
sc in each stitch around. (24)
Flatten the ear and work 11 sc through both layers to close. Fasten off, leaving a long tail for assembly. (11)
Work 6 sc into a mr. (6)
Work 1 inc in each stitch around. (12)
Repeat [1 sc, 1 inc] 6 times around. (18)
Repeat [2 sc, 1 inc] 6 times around. (24)
Repeat [3 sc, 1 inc] 6 times around. (30)
sc in each stitch around. Stuff the nose lightly and fasten off, leaving a long tail for assembly. (30)
Your beautiful, handmade teddy bear vest is officially complete! I hope you enjoyed every single stitch of this creative journey. Wrap your little one in this cozy, handmade hug, or tuck it away as a beautiful, heartfelt gift. Don't forget to share your finished project with our crafting community—we would love to see your adorable creation! Happy crocheting, friend! 🧶✨
This pattern is designed to fit babies aged 12 to 18 months, which corresponds to a chest size of approximately 18 to 19 inches (45-48 cm).
No! The textured crochet stitch used for the vest panels naturally creates small, flexible gaps that work perfectly as buttonholes for standard-sized buttons.
Yes, but keep in mind that a thicker yarn will make the vest significantly larger. Be sure to check your gauge and adjust your hook size accordingly.
We recommend hand washing the vest in cool water with a mild detergent and laying it flat to dry to keep the bear faces looking perfect.
