🧢 Beautiful ✨ Detailed πŸ’ Adorable

Little White Kitten Amigurumi Pattern

Little White Kitten Amigurumi Pattern
4.6β˜… Rating
3-4 Hours Time Needed
3.8K Made This
βœ‚οΈ

Beginner Friendly Level

Perfect for those just starting their sewing journey, with clear instructions and simple techniques

⏱️

Weekend Treat

Takes 5-7 hours, making it an enjoyable project to finish over a couple of days.

🧸

Cute Companion

An adorable friend to cherish, handcrafted with love to bring comfort and joy for years to come.

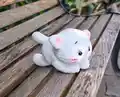
About This Little White Kitten Amigurumi Pattern

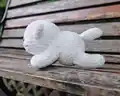
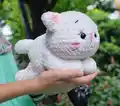
This Little White Kitten pattern is designed to be approachable for crocheters of all skill levels. Using soft chenille or velvet yarn, you'll create a sweet feline friend with a rounded head, plump body, four adorable legs, perky ears, and a curved tail. The pattern works up relatively quickly and uses basic amigurumi techniques including magic rings, increases, and decreases. Safety eyes and nose give your kitten a professional finish, while the plush yarn creates an irresistibly soft texture.

Little White Kitten Amigurumi Pattern crochet pattern - detailed view of completed project

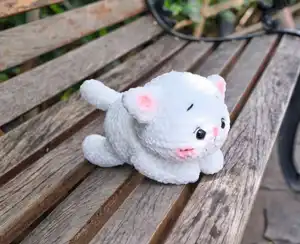
The finished kitten sits at about 11 cm tall, making it the perfect size for display or cuddles. With clear round-by-round instructions and helpful assembly tips, you'll have your own handmade kitten companion in just a few hours of crafting.

Why You'll Love This Little White Kitten Amigurumi Pattern

I absolutely love this pattern because it's incredibly rewarding without being overwhelming! The use of plush yarn means every stitch feels luxurious, and the finished kitten has that professional store-bought look even for beginners. I'm particularly fond of how the pattern includes those thoughtful details like creating eye sockets and positioning the ears just right to give the kitten real personality. The continuous spiral technique keeps things moving smoothly, and there's something deeply satisfying about watching each body part come together before the final assembly. Plus, working with chenille yarn is like giving yourself a little hand massage with every stitch!

Little White Kitten Amigurumi Pattern step 1 - construction progress Little White Kitten Amigurumi Pattern step 2 - assembly progress Little White Kitten Amigurumi Pattern step 3 - details and accessories Little White Kitten Amigurumi Pattern step 4 - final assembly and finishing

Switch Things Up

I love experimenting with this kitten pattern in so many creative ways! Sometimes I'll use a variegated yarn to create a calico or tabby effect, which gives each kitten a completely unique personality. I've also made versions with longer tails by adding extra rounds to the tail section, creating a more elegant, stretched-out look.

One of my favorite modifications is adding a little bow or collar using embroidery thread or thin ribbon, which instantly makes the kitten look extra fancy and gift-ready. I've even tried making the ears slightly larger by adding an extra increase round, giving the kitten a more cartoonish, kawaii appearance that's absolutely adorable.

For holiday versions, I'll sometimes add tiny accessories like a miniature Santa hat or a small heart sewn to the chest for Valentine's Day. You can also experiment with safety eye sizesβ€”using 12mm instead of 14mm creates a sweeter, more innocent expression, while 16mm eyes give a more dramatic, wide-eyed look. The possibilities are truly endless with this versatile little pattern!

Common Mistakes & How to Fix Them

βœ— Not using a stitch marker can cause you to lose track of rounds, leading to uneven shaping and incorrect stitch counts throughout the project βœ— Overstuffing the head and body creates a lumpy appearance and distorts the cute round shape that makes amigurumi so appealing βœ— Placing safety eyes too far apart or at wrong rounds ruins facial proportions, making the kitten look less adorable than intended βœ— Failing to flatten openings properly before closing arms, legs, ears, and tail results in awkward bumps and unprofessional-looking attachments

Little White Kitten Amigurumi Pattern

Create your own adorable little white kitten with this charming amigurumi pattern! This delightful project uses soft plush or chenille yarn to craft a cuddly companion measuring approximately 11 cm tall and 19 cm long. Perfect for cat lovers and crochet enthusiasts, this pattern includes detailed instructions for creating a sweet kitten with safety eyes, a fluffy tail, and precious little paws. The finished piece makes a wonderful gift or decorative accent for any space.

Beginner Friendly 3-4 Hours

Materials Needed for Little White Kitten Amigurumi Pattern

β€” Main Fabric

  • 01
    Plush/Velvet/Chenille yarn in white color (approximately 140m or 1.5 skeins)
  • 02
    Examples: Himalaya Velvet, Himalaya Dolphin Baby, YarnArt Dolce, or Premier Parfait Chunky

β€” Tools Required

  • 01
    Crochet hook 4mm
  • 02
    Safety eyes 14mm
  • 03
    Safety nose 8mm
  • 04
    Polyester fiberfill stuffing
  • 05
    Tapestry needle (white and black)
  • 06
    Scissors
  • 07
    Pins
  • 08
    Stitch markers

Progress Tracker

0% Complete

β€” Head :

Round 1 :

MR 8 sc (8)

Round 2 :

8 inc (16)

Round 3 :

(1 sc, inc) x 8 times (24)

Round 4 :

1 sc, inc, (2 sc, inc) x 7 times, 1 sc (32)

Round 5 :

(3 sc, inc) x 8 times (40)

Round 6-8 :

40 sc (40)

Round 9 :

14 sc, 4 inc, 4 sc, 4 inc, 14 sc (48)

Round 10-12 :

48 sc (48)

Info :

Insert the safety eyes between rounds 10 and 11, the distance between 2 eyes is 5 sts

Round 13 :

14 sc, 4 dec, 4 sc, 4 dec, 14 sc (40)

Round 14 :

40 sc (40)

Round 15 :

(3 sc, dec) x 8 times (32)

Info :

Start stuffing the head firmly with fiberfill

Round 16 :

(2 sc, dec) x 8 times (24)

Round 17 :

12 dec (12)

Round 18 :

6 dec, slst (6)

Info :

Fasten off, leaving a long tail for sewing. Weave the yarn tail through the front loops of the last round and pull tight to close the hole. Hide the yarn tail inside the head.

β€” Body :

Round 1 :

MR 8 sc (8)

Round 2 :

8 inc (16)

Round 3 :

(1 sc, inc) x 8 times (24)

Round 4 :

(1 sc, inc, 1 sc) x 8 times (32)

Round 5 :

(3 sc, inc) x 8 times (40)

Round 6-10 :

40 sc (40)

Round 11 :

(3 sc, dec) x 8 times (32)

Round 12-14 :

32 sc (32)

Round 15 :

(14 sc, dec) x 2 times (30)

Round 16 :

30 sc, slst (30)

Info :

Fasten off, leaving a long tail for sewing. Stuff the body firmly with fiberfill.

β€” Tail :

Round 1 :

MR 6 sc (6)

Round 2 :

(2 sc, inc) x 2 times (8)

Round 3 :

(3 sc, inc) x 2 times (10)

Round 4-10 :

3 sc, inc, 4 sc, dec (10)

Round 11 :

5 sc, slst (5)

Info :

Stuff the tail lightly with fiberfill. Flatten the opening and work through both layers to close. Fasten off, leaving a long tail for sewing.

β€” Ears (Make 2) :

Round 1 :

MR 6 sc (6)

Round 2 :

6 inc (12)

Round 3 :

(5 sc, inc) x 2 times (14)

Round 4-5 :

14 sc (14)

Round 6 :

7 sc, slst (7)

Info :

Do not stuff the ears. Flatten the opening and work through both layers to close. Fasten off, leaving a long tail for sewing.

β€” Arms/Legs (Make 4) :

Round 1 :

MR 6 sc (6)

Round 2 :

6 inc (12)

Round 3-12 :

4 sc, inc, 5 sc, dec (12)

Round 13 :

6 sc, slst (6)

Info :

Stuff the arms/legs firmly with fiberfill. Flatten the opening and work through both layers to close. Fasten off, leaving a long tail for sewing.

Assembly Instructions

  • Create eye sockets for dimension by threading yarn around the safety eyes and pulling gently to indent the face slightly
  • Sew the ears to the head between rounds 4 and 8, ensuring the distance between the two ears is 8 stitches for proper placement
  • Create the nose and whiskers using black tapestry needle and yarn, following the reference pictures in the pattern for guidance
  • Add eyelashes using white and black yarn to give your kitten extra personality and a finished look
  • Attach the body to the head by placing both on a flat surface, using pins to mark alignment, then sewing one stitch on body to one stitch on head
  • Sew the legs to round 6 of the body with a distance of 10 stitches between the two legs for stability
  • Attach the arms to rounds 12-15 of the body, positioning them naturally for your kitten's seated pose, then sew the tail to the back of the body

Important Notes

  • πŸ’‘Work in continuous spiral unless otherwise stated and use a stitch marker to track the beginning of each round
  • πŸ’‘The finished size will vary depending on your yarn choice and tension, so adjust hook size if needed for desired dimensions
  • πŸ’‘When using chenille or velvet yarn, be extra careful not to split the yarn with your hook as it can fray easily
  • πŸ’‘Stuff all parts firmly but not overly tight to maintain the soft, cuddly texture while keeping proper shape
  • πŸ’‘Pin all pieces in place before sewing to ensure correct positioning and achieve the most adorable kitten appearance
  • πŸ’‘When closing openings by working through both layers, make sure layers are properly aligned for neat, flat attachments
  • πŸ’‘Save the pattern tips page for reference on techniques like closing holes and changing colors for best results

This Little White Kitten pattern brings together simplicity and sweetness in one cuddly package! Designed with beginners in mind, it uses basic amigurumi techniques and luxurious plush yarn to create a professional-looking companion that's perfect for gifting or keeping. The clear instructions and helpful assembly tips ensure your kitten turns out absolutely adorable every time. 🧢 Happy crocheting! 🐱✨

You ask,

we answer.

FAQs

Can I use regular yarn instead of chenille or velvet yarn?

Yes, you can use any yarn type you prefer! Regular acrylic or cotton yarn will work beautifully, though the texture will be different from the plush finish. Just match your hook size to your yarn weight and adjust as needed for proper tension.

How do I make my kitten larger or smaller?

Simply use a larger or smaller yarn weight with the corresponding hook size. Using bulky yarn with a 5-6mm hook will make a bigger kitten, while sport weight yarn with a 3mm hook creates a mini version.

What if I can't find safety eyes and nose?

You can embroider the eyes and nose using black yarn instead! This also makes the kitten safer for young children. Use satin stitch for the nose and French knots or embroidered circles for the eyes.

Do I need to know how to do invisible decreases?

While the pattern recommends invisible decreases for a cleaner finish, regular decreases will work too. Invisible decreases simply hide the stitch better, making the surface smoother, but regular decreases are fine especially with textured yarn.

Why does my kitten look different from the picture?

Tension, yarn type, and stuffing amount all affect the final appearance. Make sure you're stuffing firmly but not too tight, placing eyes at the correct rounds, and maintaining consistent tension throughout your work for best results.