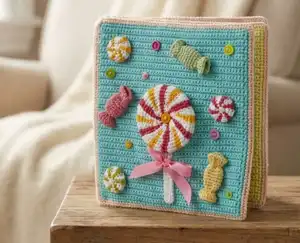
Create an enchanting interactive quiet book that captivates little ones with delightful crochet details. This comprehensive pattern guides you through crafting six charming themed pages featuring a whistling kettle, tea cup with removable tea bag, decorative cupcake with paper liner, ice cream with magnetic scoops, spinning lollipop, and chocolate donut filled with buttons. Perfect for developing fine motor skills while providing hours of tactile entertainment, this handmade treasure combines soft textures with engaging elements like velcro attachments, magnetic pieces, and a hidden squeaker.
Progress Tracker
0% Complete
— Squared Pages (Make 6) :
Foundation :
Chain 50+1 and crochet turning rows up. Total 54 rows of 50 sc. Do not cut the yarn.
Border :
Sc around all 4 sides. Crochet 3 sc in 1 st on angles. Cut the yarn.
Info :
Steam pages with iron to make them even and flat. Compare all squares in size and add 1 row if needed to make them equal.
— Kettle :
Round 3 :
(1 sc, inc)*6=18 sc
Round 4 :
(2 sc, inc)*6=24 sc
Round 5 :
(3 sc, inc)*6=30 sc
Round 6 :
(4 sc, inc)*6=36 sc
Round 7 :
(5 sc, inc)*6=42 sc
Round 8 :
(6 sc, inc)*6=48 sc
Round 9 :
crochet through back loops: (7 sc, inc)*6=54 sc
Round 10 :
(8 sc, inc)*6=60 sc
Round 11-26 :
15 rounds of 60 sc. Finish with sl st. Cut yarn.
Info :
Join yarn to 8th round and crochet reverse st through front loops half circle. Set aside.
— Kettle Spout :
Foundation :
Chain 11 and close ring with sl st
Round 2 :
5 sc, 3 sc in 1 st, 5 sc
Round 3 :
6 sc, 3 sc in 1 st, 6 sc
Round 4 :
7 sc, 3 sc in 1 st, 7 sc
Round 5 :
8 sc, 3 sc in 1 st, 8 sc
Round 6 :
9 sc, 3 sc in 1 st, 9 sc
Round 7 :
10 sc, 3 sc in 1 st, 10 sc. Finish with sl st, leave long end.
Info :
Steam kettle body with iron to make it flat.
— Kettle Lid Handle :
Round 3 :
12 sc. Finish with sl st, leave long end.
Info :
Thread needle and go through every second front loop of last round. Pull and sew opening without stuffing.
— Kettle Handle :
Foundation :
7 sc in AR, crochet 35 spiral rounds without inc. Do not stuff, leave long end. Sew opening.
Infos :
Put squeaker inside kettle. Sew bottom side of kettle. Sew kettle along contour to page. Sew spout to kettle without sewing to page. Sew handle to kettle without sewing to page.
— Flame (Make 5 pieces) :
Foundation :
Chain 10, 9, or 8 (varying lengths); crochet 1 sl st, 1 sc, 1 hdc, 3 dc, 1 hdc, 1 sc, 1 sl st. Cut yarn.
Border :
Join yellow yarn and sc around, crochet 3 sc in 1 st on tip. Leave long end.
Info :
Sew flames under kettle for lower halves.
— Burner :
Foundation :
Chain 18 with grey yarn. Crochet sc on both sides of chain, 4 sc in first and last loop. Leave long end. Sew strip under bottom edge of flame.
— Tea Cup :
Round 3 :
(1 sc, inc)*6=18 sc
Round 4 :
(2 sc, inc)*6=24 sc
Round 5 :
(3 sc, inc)*6=30 sc
Round 6 :
(4 sc, inc)*6=36 sc
Round 7 :
(5 sc, inc)*6=42 sc
Round 8-20 :
13 rounds of 42 sc. Finish with sl st, leave long end.
— Cup Handle :
Foundation :
6 sc in AR and sc 20 spiral rounds without inc. Do not stuff. Leave long end.
— Cup Bottom :
Foundation :
Chain 7 and sc along both sides of chain, 4 sc in first and last ch. Finish with sl st, leave long end.
Infos :
Steam cup to make it flat. Crochet 6 white polka dots: 6 sc in AR, sl st in first st. Sew dots on front side of cup. Sew handle. Sew bottom. Sew cup to page at top edge of back side, then sew sides and bottom, leaving handle free.
— Tea Bag :
Foundation :
Chain 20 with white yarn and brown/dark green sewing threads together, sl st in first loop
Round 1-6 :
6 spiral rounds of 20 sc. Cut sewing threads, continue with white yarn only.
Round 7-10 :
4 rounds with white yarn
Shaping :
Make 1 dec on both sides in every next round - 2 dec per round, until 2 sc left. Chain 35, cut yarn.
Info :
Sew lower side of tea bag. Bend top and sew, pull chain with hook into middle of fold.
— Tea Bag Label :
Foundation :
Crochet white square 7 sc*5 rows, leave long end
Leaf :
Chain 6 with green, crochet 1 sl st, 1 sc, 1 hdc, 1 sc, 1 sl st. 1 ch, turn and crochet along bottom: 1 sl st, 1 sc, 1 hdc, 1 sc, 1 sl st. Leave long end.
Info :
Sew leaf to label. Sew label near cup, sew end of tea bag chain to it.
— Lemon (Make 2) :
Round 3 :
(1 sc, inc)*6=18 sc
Round 4 :
1 sc, inc, (2 sc, inc)*5, 1 sc=24 sc
Round 5 :
(3 sc, inc)*6=30 sc
Round 6 :
2 sc, inc, (4 sc, inc)*5, 2 sc=36 sc. Change to white yarn.
Round 7 :
(5 sc, inc)*6=42 sc. Leave long end of white. Change to yellow.
Round 8 :
3 sc, inc, (6 sc, inc)*5, 3 sc=48 sc. Leave long end.
Infos :
Embroider segments with white yarn end. Fold one lemon in half, sew over edge with yellow. Sew second lemon to page. Sew hard velcro to lemon circle. Sew soft velcro to lemon slice.
— Refined Sugar (Make 4) :
Foundation :
Crochet square 5 sc wide, 4 rows high with white yarn
Border :
Sc around, crochet 3 sc in 1 st on angles
Infos :
Put 2 squares wrong sides together and sew over edge. Make 2 double squares. Sew 2 squares to page. Sew hard velcro to page, soft velcro to double square.
— Cupcake Bottom :
Foundation :
Chain 30 with beige yarn, sl st in first loop
Round 1-2 :
2 spiral rounds of 30 sc
Round 3 :
(inc, 14 sc)*2=32 sc
Round 5 :
1 sc, inc, 15 sc, inc, 14 sc=34 sc
Round 7 :
1 sc, inc, 16 sc, inc, 15 sc=36 sc
Round 9 :
2 sc, inc, 17 sc, inc, 15 sc=38 sc
Round 11 :
3 sc, inc, 18 sc, inc, 15 sc=40 sc
Round 13 :
Crochet to side fold 4 sc, 1 sl st. Cut yarn.
— Cupcake Top :
Round 3 :
(1 sc, inc)*6=18 sc
Round 4 :
(2 sc, inc)*6=24 sc
Round 5 :
(3 sc, inc)*6=30 sc
Round 6 :
(4 sc, inc)*6=36 sc
Round 7 :
(5 sc, inc)*6=42 sc
Round 8-14 :
7 rounds of 42 sc. Leave long end.
Infos :
Sew top to bottom through both loops of beige part and back loops of pink part. Join pink yarn to front loops and crochet shells: skip 1 st, 5 dc in 1 st, skip 1 st, 1 sc. Repeat 5 times. Steam well. Sew bottom side.
— Glaze :
Round 3 :
(1 sc, inc)*6=18 sc
Round 4 :
(2 sc, inc)*6=24 sc
Round 5 :
(3 sc, inc)*6=30 sc
Shells :
Crochet shells on half circle: (skip 1 st, 5 dc in 1 st, skip 1 st, 1 sc)*4. Cut yarn, leave long end.
Infos :
Embroider multicolored sprinkles and sew on cupcake, folding back half circle without shells. Crochet cherry with red: 6 sc in AR, inc*6. Sew on cupcake.
— Cupcake Back Rectangle :
Foundation :
Crochet beige rectangle 20 sc wide and 10 rows high. Sew to back side of cupcake along long sides, leave short sides open.
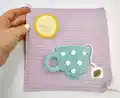
— Paper Liner :
Row 1 :
Chain 16, crochet 15 sc
Row 2 :
Chain 12, crochet 11 sc, 1 sl st in next loop of base
Row 3 :
Crochet through back loops only. Do not make turning chain, crochet 11 sc.
Row 4 :
1 turning chain, 11 sc. Skip 1 st of base, 1 sl st in next st.
Info :
Repeat rows 2-4, alternating fixation to base. Leave long end.
— Cupcake Strip :
Foundation :
Crochet light green strip 48 sc*5 rows. Sew one end to top edge of page. Pass strip under rectangle on backside of cupcake. Sew second end to bottom of page. Sew liner to page along sides and bottom, leaving top open.
— Multicolored Bumps :
Round 3-4 :
2 rounds of 12 sc. Finish with sl st, leave long end.
Info :
Thread needle and pass through every second front loop of last round. Do not stuff, pull and sew opening. Sew bumps on free space.
— Ice Cream Cup :
Foundation :
Chain 30 with beige, sl st in first loop. Work closing rounds, not spiral.
Round 2-6 :
2 ch, (1 fp dc, 1 dc)*14, 1 fp dc
Round 7 :
2 ch, (1 fp dc, dc inc)*14, 1 fp dc
Round 8 :
2 ch, (1 fp dc, 2 dc)*14, 1 fp dc, 1 dc
Round 9-11 :
sc 3 rounds without inc. Cut yarn.
Infos :
Thread beige yarn into needle and stitch through both layers between 6th and 7th rounds. Sew bottom side of cup.
— Ice Cream Balls (Make 3) :
Round 3 :
(1 sc, inc)*6=18 sc
Round 4 :
1 sc, inc, (2 sc, inc)*5, 1 sc=24 sc
Round 5 :
(3 sc, inc)*6=30 sc
Round 6 :
2 sc, inc, (4 sc, inc)*5, 2 sc=36 sc
Round 7 :
(5 sc, inc)*6=42 sc. Crochet 1 sc after last inc, finish with sl st, cut yarn.
Infos :
Make another with long end. Attach magnetic button thin part to one circle. Put 2 circles wrong sides together and sew over edge. Sew through with small stitches around button. Make 3 colors. Add sprinkles to vanilla before sewing.
— Ice Cream Rectangles (Make 3) :
Foundation :
6 rows of 20 sc in same color as balls. Chain 19, 1 sc in last st of row. Crochet 20 sc on chain, then sc 3 rows more.
Border :
Sc around all 4 sides, crocheting 3 sc in 1 st on angles. Cut yarn. Sc around with white yarn, crocheting 3 sc in 1 st on angles.
Infos :
Make 3 color pieces. Sew rectangles to page close to each other. Embroider sprinkles before sewing! Sew cup on right: bottom, sides and back side of top edge. Attach thick parts of magnetic buttons over cup. Arrange so ice cream circles don't overlap 2 buttons at once.
— Lollipop :
Foundation :
Chain 6, sl st in first loop
Round 1 :
Join coral yarn and crochet 1 white sc + 1 coral sc in every st
Round 2 :
2 white sc in every white sc, 1 coral sc in every coral sc
Round 3 :
White: 1 inc, 1 sc. Coral: 1 sc.
Round 4 :
Join yellow. White sector: 1 white sc, 1 yellow sc, 1 white sc. 2 coral sc in every coral sc.
Round 5 :
Inc in all odd white sectors (make inc in 6 white sectors from 12)
Round 6 :
Inc in all even white sectors. Should get 2 sc in all white sectors.
Round 7 :
Make inc in yellow sector. Should get 2 sc in all sectors.
Round 8 :
Inc in all odd white sectors (inc, 1 sc)
Round 9 :
Inc in all even white sectors. Should get 3 sc in all white sectors and 2 sc in all colored sectors.
Round 10-11 :
Crochet 2 rounds without changing
Round 12 :
Dec in all odd white sectors
Round 13 :
Dec in all even white sectors. Should get 2 sc in all sectors. Cut coral and yellow, leave only white. Do not stuff!
Round 14 :
(6 sc, dec)*6=42 sc
Round 15 :
(5 sc, dec)*6=36 sc
Round 16 :
(4 sc, dec)*6=30 sc
Round 17 :
(3 sc, dec)6=24 sc
Round 18 :
(2 sc, dec)6=18 sc
Round 19 :
(1 sc, dec)6=12 sc
Round 20 :
dec6. Cut yarn, do not sew opening. Steam well with iron.
— Lollipop Stick :
Foundation :
Chain 25 with white, sc around both sides of chain, 4 sc in first and last loop. Leave long end. Attach stick to page with pins, having previously passed ribbon under it. Sew stick with ribbon. Tie bow and secure with few stitches.
— Mint Candies (Make 3) :
Round 1 :
6 sc in AR with white yarn
Round 2 :
join colored yarn, crochet 1 white sc+1 colored sc in every st
Round 3 :
2 white sc in every white sc, 1 colored sc in every colored sc
Round 4 :
2 colored sc in every colored sc, 1 white sc in every white sc
Round 5 :
1 round without inc, do not stuff
Round 6 :
dec in every colored sector
Round 7 :
dec in every white sector, cut colored yarn
Round 8 :
6 dec with white yarn
— Wrapped Candies (Make 3) :
Round 3-8 :
6 rounds of 12 sc, do not stuff
Round 10 :
3 ch, 2 dc in every st, finish with sl st
Info :
Attach yarn to beginning (to AR) and crochet tail same way at other end.
Infos :
To make lollipop spin, sew on with button. Insert needle into hole of button, then exactly into central hole of lollipop and sew to page. Repeat several times. Needle should not go through lollipop itself, only through hole in center. Sew small candies around. Add small multicolored buttons.
— Donut :
Foundation :
Chain 54 with beige, sl st in first loop
Round 1 :
4 sc, inc, (8 sc, inc)*5, 4 sc=60 sc
Round 2 :
(9 sc, inc)*6=66 sc
Round 3 :
5 sc, inc, (10 sc, inc)*5, 5 sc=72 sc
Round 4 :
(11 sc, inc)*6=78 sc
Round 5 :
6 sc, inc, (12 sc, inc)*5, 6 sc=84 sc
Round 6 :
(13 sc, inc)*6=90 sc
Round 7 :
7 sc, inc, (14 sc, inc)*5, 7 sc=96 sc
Round 8 :
(15 sc, inc)*6=102 sc
Round 9 :
8 sc, inc, (16 sc, inc)*5, 8 sc=108 sc
Round 10 :
(17 sc, inc)*6=114 sc
Round 11 :
9 sc, inc, (18 sc, inc)*5, 9 sc=120 sc
Round 12 :
(19 sc, inc)*6=126 sc
Round 13 :
10 sc, inc, (20 sc, inc)*5, 10 sc=132 sc. Finish with sl st, leave long end. Steam with iron.
— Donut Glaze :
Foundation :
Chain 60 with brown, sl st in first loop
Round 1 :
(9 sc, inc)*6=66 sc
Round 2 :
5 sc, inc, (10 sc, inc)*5, 5 sc=72 sc
Round 3 :
(11 sc, inc)*6=78 sc
Round 4 :
6 sc, inc, (12 sc, inc)*5, 6 sc=84 sc
Round 5 :
(13 sc, inc)*6=90 sc
Round 6 :
7 sc, inc, (14 sc, inc)*5, 7 sc=96 sc
Round 7 :
(15 sc, inc)*6=102 sc
Round 8 :
8 sc, inc, (16 sc, inc)*5, 8 sc=108 sc
Round 9 :
(17 sc, inc)6=114 sc, finish with sl st, do not cut yarn
Shells :
Skip 2 st, 6 dc in third st, skip 2 st, 1 sc. Repeat around. Leave long end. Steam with iron.
Infos :
Embroider multicolored sprinkles on glaze. Sew glaze on donut. Cut 1010 cm square from fine tulle or organza and sew in center of page, placing buttons inside. Sew donut on top so all buttons are inside circle.
— Assembly :
Page Borders :
Sc 1 round with peach yarn around all pages, crochet 3 sc in 1 st on angles
Canvas :
Cut square from canvas to fit page without last peach round. Sew canvas along entire perimeter with sewing threads. Make small stitches on front side. Also sew canvas with few stitches around objects.
First Page Pair :
Put together page with cup and cover. Canvas sewn only to page with cup! Sew with peach yarn over edge along 3 sides, except left side (binding side). Sew with small stitches with sewing thread through both pages around objects. Especially sew around velcro and magnetic buttons.
Binding Side :
Along left edge (binding side), sew pages not over edge, but stepping back 1 row from edge
Other Pages :
Sew canvas to pages with cupcake and ice cream. In pairs, sew cupcake page with kettle page, and ice cream with donut. Sew 3 sides over edge, and stitch binding side stepping back 1 row from edge.
Binding Strips :
Join peach yarn to right edge of cup page and sc 1 row through front loops. Sc 3 rows more through both loops. Leave long end. At central page with cupcake/kettle crochet same strip of 4 rows on both sides on binding side. At last page/back cover crochet same strip only on ice cream side.
Joining Pages :
Join cup and kettle pages with strips overlapping and sew along right edge. Turn to cover side and sew strip of kettle page to back loops of cup page. Not to cover! Also sew on top and bottom. Join last page/cover same way. On spine, sew together back loops of central page.
— Spine :
Foundation :
Join yarn to left side of front cover and sc through both loops. Crochet 12 straight rows. Cut piece of canvas and sew inside spine. Sew free edge of spine to back cover. Also sew top and bottom sides of spine.
This enchanting Sweet Quiet Book pattern transforms simple crochet stitches into an interactive sensory adventure that delights both the maker and the child who receives it. Each themed page offers unique tactile experiences from spinning lollipops to magnetic ice cream scoops, creating countless hours of educational play. The detailed instructions guide you through professional finishing techniques including canvas reinforcement and proper spine construction for a book that rivals store-bought quality. Whether you're crafting a cherished baby gift or creating a family heirloom, this pattern combines practical skill-building with pure creative joy. 🧶 Happy crocheting! 🍰✨