๐Ÿงถ Beautiful โœจ Detailed ๐Ÿ’ Adorable

Brighten Your Day Crochet Rainbow Stuffie Pattern

Brighten Your Day Crochet Rainbow Stuffie Pattern
4.6โ˜… Rating
2-3 Hours Time Needed
1.2K Made This
โœ‚๏ธ

Beginner Friendly Level

Perfect for those just starting their sewing journey, with clear instructions and simple techniques

โฑ๏ธ

Bite-Sized Project

Complete in under 2 hoursโ€”quick, fun, and perfect for a little creative escape.

๐Ÿงธ

Cute Companion

An adorable friend to cherish, handcrafted with love to bring comfort and joy for years to come.

About This Brighten Your Day Crochet Rainbow Stuffie Pattern

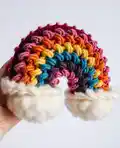
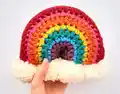
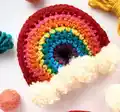
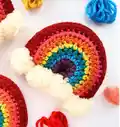
This charming rainbow stuffie pattern is designed to spread happiness wherever it goes! Using basic single crochet stitches and simple color changes, you'll create a vibrant rainbow with beautiful graduated stripes from dark mauve through the spectrum to wine. The two-piece construction makes it easy to achieve a professional-looking result, while the fluffy pom-pom clouds add that perfect finishing touch. This pattern is ideal for using up yarn scraps or creating a rainbow in your favorite color palette.

Brighten Your Day Crochet Rainbow Stuffie Pattern crochet pattern - detailed view of completed project

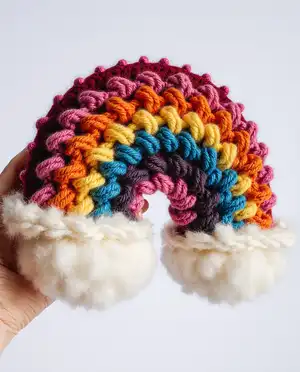
The finished rainbow measures a delightful 7 inches wide by 6 inches tall, making it perfect for display on shelves, in children's rooms, or as a cheerful desk companion. With detailed instructions for creating perfectly rounded pom-pom clouds, your rainbow will look professionally crafted.

Why You'll Love This Brighten Your Day Crochet Rainbow Stuffie Pattern

I absolutely love this rainbow pattern because it's pure joy in yarn form! There's something magical about watching those colorful stripes come together row by row, and the instant gratification of completing it in just a couple of hours makes it incredibly satisfying. I find myself making these rainbows for everyoneโ€”baby showers, housewarming gifts, or just to brighten someone's day. The pom-pom clouds are my favorite part; they add such a playful, whimsical touch that makes people smile every time. Plus, it's the perfect pattern for practicing your color-changing technique without any complicated stitches to worry about. Every time I make one, I'm reminded of how something so simple can bring so much happiness!

Brighten Your Day Crochet Rainbow Stuffie Pattern step 1 - construction progress Brighten Your Day Crochet Rainbow Stuffie Pattern step 2 - assembly progress Brighten Your Day Crochet Rainbow Stuffie Pattern step 3 - details and accessories Brighten Your Day Crochet Rainbow Stuffie Pattern step 4 - final assembly and finishing

Switch Things Up

I love experimenting with this rainbow pattern because it's so versatile! One of my favorite variations is creating a pastel rainbow using soft pinks, lavenders, mint greens, and baby bluesโ€”it looks absolutely dreamy in a nursery. You could also make it seasonal by using autumn colors like burnt orange, deep red, golden yellow, and brown for a fall-themed version.

For a more modern look, try a monochromatic rainbow using different shades of the same color family, like going from pale gray through to charcoal. I've also made tiny versions using sport weight yarn and a smaller hook for adorable keychains or bag charms. Another fun idea is to add embroidered details like a sleeping face on the rainbow or tiny raindrops hanging from fishing line underneath.

If you want to make it extra special, consider using sparkle yarn for one or two of the stripes to add some shimmer, or work metallic thread alongside your regular yarn for a subtle shine. You could even skip the pom-pom clouds and add felt star appliquรฉs at each end instead. The possibilities are truly endless, and that's what makes this pattern so enjoyable to make again and again!

Common Mistakes & How to Fix Them

โœ— Not maintaining consistent tension when changing colors can create uneven stripes, so practice keeping your stitches uniform throughout each row for a polished look โœ— Forgetting to align the stripes when seaming the front and back pieces together ruins the rainbow effect, always pin pieces carefully before sewing โœ— Overstuffing the rainbow can distort its curved shape and stretch the stitches, stuff lightly to maintain the natural arc and prevent gaps โœ— Making pom-poms that are too sparse or unevenly trimmed looks unprofessional, wind yarn the full 40 times and trim carefully for fluffy clouds

Brighten Your Day Crochet Rainbow Stuffie Pattern

Create your own cheerful rainbow companion with this delightful crochet pattern! This adorable stuffed rainbow features vibrant stripes worked in single crochet stitch, making it perfect for brightening any space. The pattern includes two identical pieces that are seamed together and finished with fluffy cloud pom-poms at the base. With its simple construction and colorful design, this rainbow stuffie brings joy and warmth to nurseries, playrooms, or as a thoughtful handmade gift. The finished piece measures approximately 7 inches wide by 6 inches tall, making it the perfect size for little hands to hold or as a decorative accent piece.

Beginner Friendly 2-3 Hours

Materials Needed for Brighten Your Day Crochet Rainbow Stuffie Pattern

โ€” Main Fabric

  • 01
    Bernat Softee Chunky Yarn #6 Bulky - Dark Mauve (28323) - 7 yards
  • 02
    Bernat Softee Chunky Yarn #6 Bulky - Ultra Blue (28742) - 4 yards
  • 03
    Bernat Softee Chunky Yarn #6 Bulky - Emerald (28200) - 6 yards
  • 04
    Bernat Softee Chunky Yarn #6 Bulky - Glowing Gold (28607) - 6 yards
  • 05
    Bernat Softee Chunky Yarn #6 Bulky - Pumpkin (28630) - 8 yards
  • 06
    Bernat Softee Chunky Yarn #6 Bulky - Hot Pink (28416) - 9 yards
  • 07
    Bernat Softee Chunky Yarn #6 Bulky - Wine (28532) - 21 yards
  • 08
    Bernat Softee Chunky Yarn #6 Bulky - Natural (28008) - 21 yards

โ€” Tools Required

  • 01
    US J/10 (6 mm) crochet hook
  • 02
    Stuffing
  • 03
    Yarn needle for sewing
  • 04
    Scissors
  • 05
    2 inch (5 cm) piece of cardboard for pom-poms

Progress Tracker

0% Complete

โ€” Front and Back (make alike) :

Setup :

With A, ch 8

1st row (RS) :

1 sc in 2nd ch from hook (counts as ch 1, 1 sc). 1 sc in next ch. 2 sc in next ch. 1 sc in next ch. 2 sc in next ch. 1 sc in each of last 2 ch. Turn. (9 sc)

2nd row :

Ch 1. 1 sc in each of first 2 sc. 2 sc in each of next 5 sc. 1 sc in each of last 2 sc. Join B. Break A. Turn. (14 sc)

3rd row :

With B, ch 1. 1 sc in each sc across. Join C. Break B. Turn.

4th row :

With C, ch 1. 1 sc in each of first 3 sc. 2 sc in next sc. 1 sc in next sc. 2 sc in next sc. 1 sc in each of next 2 sc. 2 sc in next sc. 1 sc in next sc. 2 sc in next sc. 1 sc in each of next 3 sc. Join D. Break C. Turn. (18 sc)

5th row :

With D, ch 1. 1 sc in each of first 5 sc. 2 sc in next sc. 1 sc in next sc. 2 sc in next sc. 1 sc in each of next 2 sc. 2 sc in next sc. 1 sc in next sc. 2 sc in next sc. 1 sc in each of next 5 sc. Join E. Break D. Turn. (22 sc)

6th row :

With E, ch 1. 1 sc in each of first 4 sc. 2 sc in next sc. (1 sc in next sc. 2 sc in next sc) 3 times. (2 sc in next sc. 1 sc in next sc) 4 times. 1 sc in each of last 3 sc. Join F. Break E. Turn. (30 sc)

7th row :

With F, ch 1. 1 sc in each sc across. Join G. Break F. Turn.

8th row :

With G, ch 1. 1 sc in each of first 10 sc. (2 sc in next sc. 1 sc in next sc) twice. 2 sc in each of next 2 sc. (1 sc in next sc. 2 sc in next sc) twice. 1 sc in each of last 10 sc. Turn. (36 sc)

9th row :

Ch 1. 1 sc in each sc across. Fasten off.

โ€” Finishing :

Assembly :

With WS facing each other, sew Front and Back together using appropriate color while aligning stripes and leaving a small opening for stuffing. Stuff stuffie, making sure to maintain Rainbow shape. Sew opening closed.

Info :

To sew the inner arc of Rainbow closed, use a strand of A and a flat slip stitch join method across. To seam top arc of Rainbow closed, use a strand of G and flat slip stitch join method across. To sew the bottoms of the Rainbow closed, use a strand of yarn (any shade) and sew them together.

โ€” 2 inch (5 cm) Pom-Poms (make 4) :

Instructions :

Wind yarn around 2 inch (5 cm) piece of cardboard 40 times. Tie tightly in the middle and leave a long end for attaching to Rainbow. Cut loops at both ends and trim to smooth round shape.

Attachment :

Using long ends, sew 2 pom-poms evenly across each bottom of Rainbow

Assembly Instructions

  • Place the front and back rainbow pieces with wrong sides facing each other and carefully align all color stripes before beginning to sew
  • Using matching yarn colors, sew around the outer edges leaving a small opening at the bottom for stuffing using a whipstitch or slip stitch method
  • For the inner curve of the rainbow, use dark mauve yarn (Color A) and the flat slip stitch join method to create a neat seam
  • For the outer top curve, use wine yarn (Color G) and the same flat slip stitch join method for a professional finish
  • Stuff the rainbow lightly with fiberfill, maintaining the natural curved shape and ensuring even distribution throughout
  • Close the stuffing opening using matching yarn and small invisible stitches
  • Create four fluffy pom-poms using natural yarn, winding 40 times around the cardboard and trimming evenly into round cloud shapes
  • Attach two pom-poms to the bottom of each side of the rainbow, spacing them evenly to create the cloud effect

Important Notes

  • ๐Ÿ’กColor changes are made on the last stitch of a row by working to the last 2 loops, then yarn over with new color to complete
  • ๐Ÿ’กGauge is important for this pattern: 10 sc and 11 rows should equal 4 inches, adjust hook size if needed
  • ๐Ÿ’กWhen winding pom-poms, be sure to wind the full 40 times for fluffy clouds that won't look sparse
  • ๐Ÿ’กMaintain even tension throughout to keep stripes looking uniform and professional
  • ๐Ÿ’กThe flat slip stitch join method creates the neatest seams for this project, working through back loops only
  • ๐Ÿ’กPin pieces together before sewing to ensure stripes align perfectly on both sides

This delightful Brighten Your Day Rainbow Stuffie pattern was created to bring a burst of color and happiness into any space! With its cheerful rainbow stripes and fluffy cloud pom-poms, this quick project is perfect for beginners looking to practice color changes while creating something truly special. Whether you're making it for a nursery, a friend who needs cheering up, or just to add some whimsy to your home, this little rainbow is sure to bring smiles. The simple single crochet construction means you can complete it in an afternoon, making it an ideal weekend project or last-minute gift! ๐ŸŒˆ Happy crocheting! ๐Ÿงถโœจ

You ask,

we answer.

FAQs

Can I use different yarn weights for this rainbow pattern?

While the pattern is designed for bulky weight yarn, you can adapt it to other weights. Just remember that using a lighter weight yarn will result in a smaller rainbow, and you'll need to adjust your hook size accordingly to maintain proper gauge. Test your gauge before starting to ensure the finished size meets your expectations.

How do I prevent the color changes from looking messy?

The key to neat color changes is to switch colors on the last yarn over of the previous row. Work your last stitch until you have 2 loops on the hook, then yarn over with the new color and pull through both loops. This hides the transition beautifully and keeps your stripes clean and crisp.

Can I customize the rainbow colors?

Absolutely! Feel free to use any colors you love. You could create a pastel rainbow, a monochromatic version in shades of one color, or even use up yarn scraps from your stash. Just make sure you have enough yardage of each color and maintain consistent yarn weight throughout.

How can I make the pom-poms extra fluffy?

The secret to fluffy pom-poms is winding enough yarn (the pattern calls for 40 wraps) and trimming carefully. After tying the center tightly and cutting the loops, take your time trimming the pom-pom into a smooth, round shape. Don't be afraid to trim quite a bit to achieve that perfect cloud look!

What's the best way to stuff the rainbow to maintain its shape?

Stuff lightly and evenly, focusing on maintaining the curved rainbow shape. Start by stuffing small amounts into the ends and outer edges first, then fill the center. Overstuffing will distort the arc and create gaps between stitches, so less is more for this project.